
All products are selected by our editorial team for quality. If you buy through our links, we may earn a small commission at no extra cost to you.
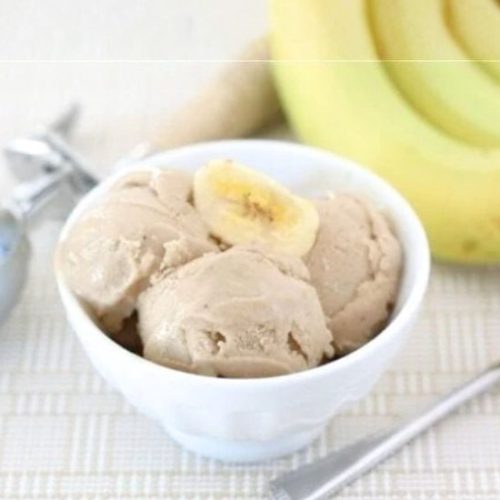
This Two-Ingredient Banana Peanut Butter Ice Cream stands out for its simplicity and wholesome ingredients, making it a perfect guilt-free treat for any time of day.
Using only ripe bananas and creamy peanut butter, it delivers a naturally sweet and satisfying flavor without added sugars or preservatives.
This recipe is rich in dietary fiber and potassium from bananas, supporting digestive health and heart function.
Peanut butter contributes plant-based protein and healthy fats, including monounsaturated fats that promote satiety and energy.
Plus, it’s naturally low in saturated fat and free from dairy, making it an excellent choice for vegans or those with lactose intolerance.
The quick prep and no-cook method make it ideal for busy lifestyles, providing a nutritious dessert or snack in under two hours.
Whether you want a creamy soft-serve or a firmer frozen treat, this recipe adapts easily, making it a versatile staple for your kitchen.
Must-Have Tools for Perfect Results
Powerful Food Processor or Blender
Essential for turning frozen banana slices into a smooth, creamy texture. It ensures a perfect ice cream consistency and is invaluable for smoothies, purees, and sauces in everyday cooking.
Sharp Knife
Used for slicing bananas into uniform pieces for even freezing and blending. A quality chef’s knife speeds prep and improves safety when working with fresh produce.
Freezer-Safe Baking Sheet or Plate
Ideal for freezing banana slices in a single layer, preventing clumping and making blending easier. This versatile tool also works great for chilling or freezing other ingredients.
Spatula
Useful for scraping down the sides of the food processor bowl, ensuring no banana bits are left unblended. It’s a kitchen staple for mixing, folding, and transferring ingredients efficiently.
Two-Ingredient Banana Peanut Butter Ice Cream
Equipment
- 1 Powerful food processor or blender
- 1 Sharp kitchen knife
- 1 Freezer-safe baking sheet or plate
- 1 Rubber Spatula
Ingredients
- 4 large ripe bananas
- 2 tablespoons peanut butter
Instructions
- Prepare and Slice Bananas: Begin by selecting four large, very ripe bananas—these should have brown spots or be fully yellow for the best natural sweetness and creamy texture. Peel each banana carefully, removing all the skin. Using a sharp kitchen knife, slice the bananas into uniform half-inch thick discs. Uniform slices ensure even freezing and smooth blending later on. Arrange the banana slices in a single layer on a freezer-safe baking sheet or large plate, making sure they don’t overlap or stick together. This helps them freeze evenly and prevents clumping.
- Freeze Banana Slices Thoroughly: Place the baking sheet or plate with the banana slices into the freezer. Allow the bananas to freeze completely for at least 1 to 2 hours. This freezing step is crucial because it firms up the bananas, allowing the food processor or blender to create that creamy ice cream-like texture without melting. While you wait, prepare your other tools so everything is ready for blending.
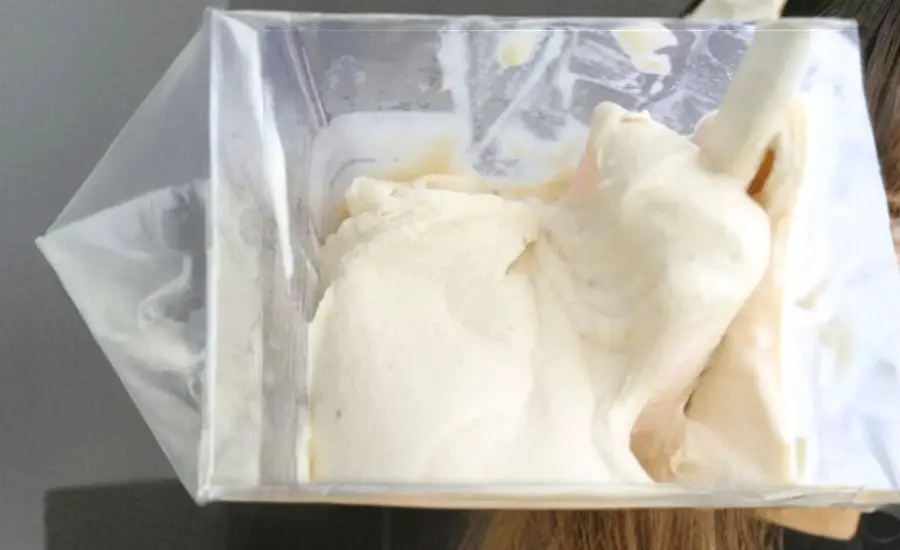
- Transfer Frozen Bananas to Food Processor: Once the banana slices are fully frozen and solid, transfer them carefully into the bowl of a powerful food processor or high-speed blender. It’s important to use a device with a strong motor to handle the frozen fruit effectively, preventing chunks and achieving a smooth consistency. If needed, stop occasionally to scrape down the sides with a rubber spatula to ensure even blending.
- Puree Bananas into Creamy Base: Turn on your food processor or blender and start pulsing the frozen banana slices. Gradually increase speed and continue processing until the bananas break down into a creamy, smooth consistency resembling soft-serve ice cream. This may take several minutes, and you might need to pause a few times to scrape down the sides of the bowl to incorporate all pieces evenly. Patience here is key for that luscious texture.
- Add Peanut Butter and Blend Again: Once your banana base is creamy and smooth, add 2 tablespoons of peanut butter directly into the food processor. Peanut butter adds a rich, nutty flavor and healthy fats that elevate the dessert’s texture and taste. Blend again until the peanut butter is fully incorporated, creating a uniform mixture with no streaks. Taste and adjust if needed—you can add a little more peanut butter for extra richness or a splash of milk if blending gets too thick.
- Serve or Freeze for Firmer Texture: For an immediately soft-serve style ice cream, serve the mixture right away in bowls or cones. If you prefer a firmer, scoopable ice cream, transfer the blended mixture into an airtight container and place it in the freezer for an additional 2 to 3 hours. This allows it to harden further while maintaining creaminess. Before serving, let it sit at room temperature for a few minutes to soften slightly for easier scooping.
- Storage and Leftover Tips: If you have leftovers, store them in an airtight container in the freezer. The ice cream will keep well for up to one week. When ready to enjoy again, remove from the freezer and let it thaw slightly at room temperature to reach the desired consistency. Avoid refreezing repeatedly, as this can cause ice crystals and affect texture.
Notes
- Use very ripe bananas with plenty of brown spots for natural sweetness and the best creamy texture.
- A high-powered blender or food processor is essential for smooth blending; weaker devices may struggle with frozen fruit.
- For creamier results, you can add 1-2 tablespoons of milk (dairy or plant-based) during blending if needed.
- Feel free to swap peanut butter with almond butter or sunflower seed butter to accommodate allergies or preferences.
- This recipe is best enjoyed fresh but can be frozen longer for a firmer texture or stored for later use.
Chef’s Secrets to Creamy Ice Cream
Achieving a smooth and creamy texture with only two ingredients hinges on the quality of your bananas and your blending technique.
Always select bananas that are very ripe because they bring natural sweetness and a soft texture that’s easy to puree.
Freezing the banana slices in a single layer is key to preventing clumps and ensuring they break down evenly.
Using a powerful food processor or blender will help you avoid a grainy texture—if your machine struggles, add a little milk or nut milk to help create a silky consistency.
Lastly, patience while blending is important; stopping to scrape the sides ensures all banana pieces are incorporated, producing a luscious, smooth “nice cream” every time.
Serving Suggestions for Best Enjoyment
This banana peanut butter ice cream is incredibly versatile. Serve it as a refreshing snack or a healthy dessert after meals.
For a fun twist, top with chopped nuts, dark chocolate chips, or a drizzle of honey or maple syrup.
You can also pair it with fresh berries or sliced fruit for added color and flavor.
For an indulgent treat, serve it alongside warm apple crisp or vegan brownies.
It also works beautifully as a creamy filling for homemade banana ice cream sandwiches, making it perfect for summer gatherings or family-friendly parties.
Storage Tips for Maintaining Freshness
Store your homemade banana peanut butter ice cream in an airtight container in the freezer to maintain freshness and texture.
It’s best consumed within one week for optimal taste and creaminess.
When you’re ready to enjoy leftovers, remove the container from the freezer and allow it to thaw at room temperature for 5 to 10 minutes to soften slightly, making it easier to scoop.
Avoid repeated freeze-thaw cycles as they can cause ice crystals to form, resulting in a grainy texture.
Always use a clean spoon when serving to keep your ice cream fresh longer.
Frequently Asked Questions Answered
1. Can I use regular bananas instead of ripe ones?
Ripe bananas with brown spots are essential for sweetness and creamy texture. Unripe bananas tend to be starchy and less sweet, resulting in a less smooth ice cream.
2. What if I don’t have peanut butter?
You can substitute peanut butter with almond butter, cashew butter, or sunflower seed butter. Each will give a slightly different flavor but maintain the creamy richness.
3. Is this recipe vegan and dairy-free?
Yes! This recipe uses only fruit and nut butter, making it naturally vegan and free from dairy, gluten, and refined sugars.
4. How long can I store this ice cream?
Stored in an airtight container, it’s best eaten within one week for the best texture and flavor.
5. Can I add other flavors or ingredients?
Absolutely! Try adding cinnamon, cocoa powder, vanilla extract, or mixing in chopped nuts or chocolate chips during blending for extra flavor and texture.
This recipe is inspired by twopeasandtheirpod and has been carefully refined to enhance clarity, streamline preparation steps, and ensure accurate results. We’ve also included health benefits, nutritional highlights, and Must-Have Tools to help you get the best results every time you cook.
