All products are selected by our editorial team for quality. If you buy through our links, we may earn a small commission at no extra cost to you.
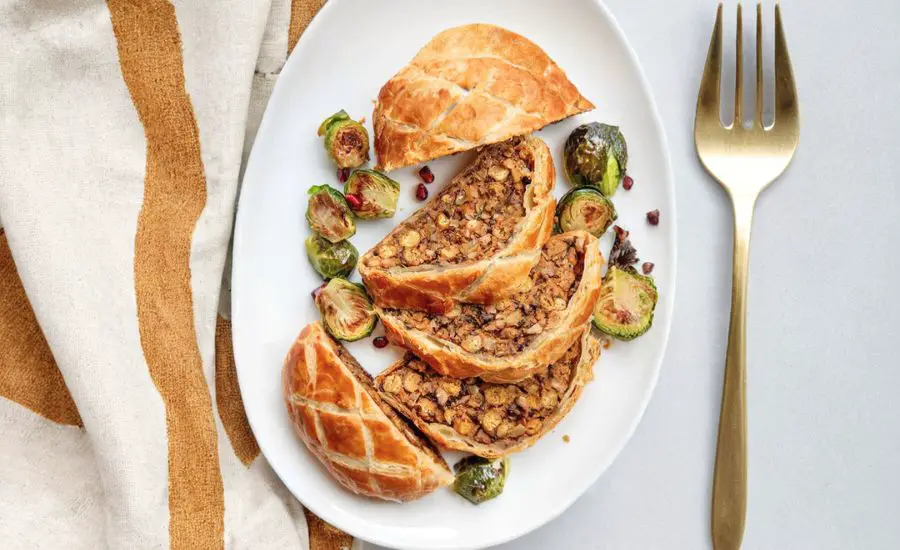
This Herb Roasted Chickpea Vegetable Wellington is a show-stopping plant-based main course that blends comfort food warmth with wholesome nutrition.
The filling is loaded with roasted chickpeas and sweet potatoes, bringing both hearty texture and natural sweetness, while mushrooms add rich, savory depth.
Chickpeas deliver a healthy dose of plant-based protein and fiber, making the dish satisfying and gut-friendly.
Walnuts and avocado oil contribute heart-healthy fats, while fresh herbs infuse every bite with aromatic freshness.
With minimal saturated fat and no animal products, it’s a lighter alternative to traditional wellingtons without sacrificing flavor or indulgence.
Ideal for holiday tables or weekday meal prep, this recipe balances elegance with practicality — it can be made ahead, bakes beautifully, and slices cleanly for serving.
Whether you’re hosting guests or simply craving a special dinner, this wellington delivers nutrition, flavor, and presentation in one golden, flaky package.
Must-Have Tools for Perfect Results
Half Sheet Baking Pan
Perfect for roasting sweet potatoes and chickpeas evenly without crowding. A high-quality sheet pan ensures better heat distribution for crisp, caramelized edges — ideal for countless roasting and baking needs.
Non-Stick Skillet
Essential for cooking down mushrooms and aromatics without sticking or burning. A durable skillet will become your go-to for sautéing vegetables, searing proteins, and making quick sauces.
Potato Masher
Used to blend the roasted sweet potato and chickpeas into a cohesive filling. Beyond this recipe, a masher is great for guacamole, refried beans, and mashed root vegetables.
Rolling Pin
Helps roll the puff pastry to the perfect size for wrapping. A sturdy rolling pin is indispensable for baking projects, from pies to cookies to homemade pasta.
Pastry Brush
Key for brushing the puff pastry with the plant-based milk mixture, giving it that golden, glossy finish. Also great for egg washes, marinades, or lightly oiling pans.

Hearty Herb Roasted Chickpea Vegetable Wellington
Equipment
- 2 Half Sheet Baking Pans
- 1 Non-Stick Skillet
- 1 Potato Masher
- 1 Rolling Pin
- 1 Pastry brush
- Parchment paper
Ingredients
- Avocado oil — for roasting and sautéing
- 1 × 15 oz 425 g can chickpeas, drained and rinsed
- 1 medium sweet potato ~300 g, halved lengthwise
- 12 oz 340 g mushrooms, finely diced
- 1 tbsp tamari
- ½ medium yellow onion diced
- 4 garlic cloves minced
- 8 fresh sage leaves minced
- 8 sprigs thyme leaves removed and minced
- 1 sprig rosemary minced
- ¼ tsp fennel seeds
- ⅓ cup 35 g walnuts, finely chopped
- ⅓ cup 20 g panko breadcrumbs
- 1 tbsp maple syrup divided
- 1 tsp Dijon mustard
- 1 sheet puff pastry thawed as per package instructions
- ¼ cup 60 ml unsweetened plant-based milk
- Kosher salt — to taste
- Mushroom Miso Gravy — for serving
Instructions
- Preheat and Prepare Baking Trays: Begin by setting your oven to 425°F (220°C) so it reaches the proper temperature while you prep the ingredients. Line two large half-sheet baking pans with parchment paper — this will prevent sticking and make cleanup easier later.
- Roast the Sweet Potato to Perfection: Place the halved sweet potato, cut side facing up, on one of the prepared trays. Drizzle lightly with avocado oil and use a brush or your fingers to coat the surface evenly. Turn the halves cut side down so they caramelize beautifully as they roast. Transfer the tray to the oven and roast for 30–35 minutes, or until the potato is soft when pierced with a fork and the cut sides are golden-brown.
- Dry and Roast the Chickpeas: While the sweet potato roasts, spread the drained chickpeas over a clean kitchen towel. Gently pat them completely dry — this step is important for achieving a crisp texture. Transfer the chickpeas to the second prepared tray, drizzle with about 1 tablespoon of avocado oil and sprinkle with a pinch of kosher salt. Toss gently to coat, then spread in a single layer so they roast evenly. Place the tray in the oven alongside the sweet potato and roast for 30 minutes, shaking or stirring halfway through.
- Sauté the Mushrooms for a Meaty Texture: While the roasting continues, heat a large non-stick skillet over medium-low heat. Add the finely diced mushrooms in an even layer without oil. Let them cook undisturbed for 4–5 minutes — this allows excess water to evaporate and intensifies their flavor. Stir, spread out again, and cook another 2–3 minutes until most moisture is gone. Now add 1/2 tablespoon avocado oil and a pinch of salt, then sauté for 1–2 minutes until lightly golden. Stir in the tamari to coat the mushrooms in a rich umami flavor. Transfer them to a bowl and set aside.
- Build the Aromatic Herb Base: Using the same skillet (no need to wash), add another light drizzle of oil. Toss in the diced onion and cook until soft and translucent, about 4 minutes. Add the minced garlic, sage, thyme, rosemary, and fennel seeds. Stir and cook for another 1–2 minutes until the herbs release their aroma and the garlic becomes fragrant but not browned.
- Toast the Walnuts and Breadcrumbs: Add the chopped walnuts and panko breadcrumbs directly into the skillet with the aromatics.Stir frequently for 4 minutes to toast the nuts and breadcrumbs, which will enhance their flavor and give the filling a pleasant crunch. Once toasted, remove the skillet from heat.
- Mash the Roasted Base Ingredients: Once the sweet potato and chickpeas are cool enough to handle, scoop the sweet potato flesh out of its skin and place it in the skillet with the walnut-breadcrumb mixture.Add the roasted chickpeas, 1/2 tablespoon maple syrup, and Dijon mustard. Use a potato masher to mash everything together until partly smooth but still slightly chunky. This texture helps the filling hold together without being mushy.
- Fold in the Mushrooms: Gently mix the cooked mushrooms into the mashed filling. Stir until evenly combined, ensuring each bite will have the perfect balance of vegetables, protein, and herbs. At this point, taste and adjust seasoning with more salt if desired.
- Prepare and Roll the Puff Pastry: Reduce the oven temperature to 400°F (200°C). Lightly flour a large piece of parchment paper on your work surface. Place the thawed puff pastry sheet onto the paper and roll it into a rectangle about 12 × 15 inches. Carefully lift the parchment with pastry onto a clean baking sheet.
- Shape and Wrap the Filling: Spoon the filling onto the center of the pastry, arranging it into a log shape that runs widthwise. Leave about 1 inch of pastry exposed at both ends. Brush the exposed edges with plant-based milk to help seal. Fold the sides of the pastry up and over the filling, pressing gently to close, then tuck the ends under the log. If you have excess pastry overlapping, trim it with a knife and pinch edges to seal completely.
- Create the Golden Finish: Mix the remaining 1/2 tablespoon maple syrup into the plant-based milk. Using a pastry brush, apply a thin, even layer over the entire pastry surface. For a decorative touch, use a sharp knife to gently score diagonal lines in one direction, then the other, forming a crisscross pattern — be careful not to cut through the pastry.
- Chill Before Baking: Place the assembled wellington in the freezer for 10–15 minutes. This step keeps the pastry cold, which helps it bake into flaky layers instead of becoming dense.
- Bake to Crispy, Flaky Perfection: Bake the chilled wellington for 35–40 minutes, or until the crust is a deep golden-brown and crispy all over. Rotate the baking sheet halfway through for even browning.
- Rest and Slice with Care: Once baked, remove the wellington from the oven and let it rest for 15 minutes. This cooling period allows the filling to firm up, making it easier to slice neatly. Use a sharp serrated knife to cut into thick slices.
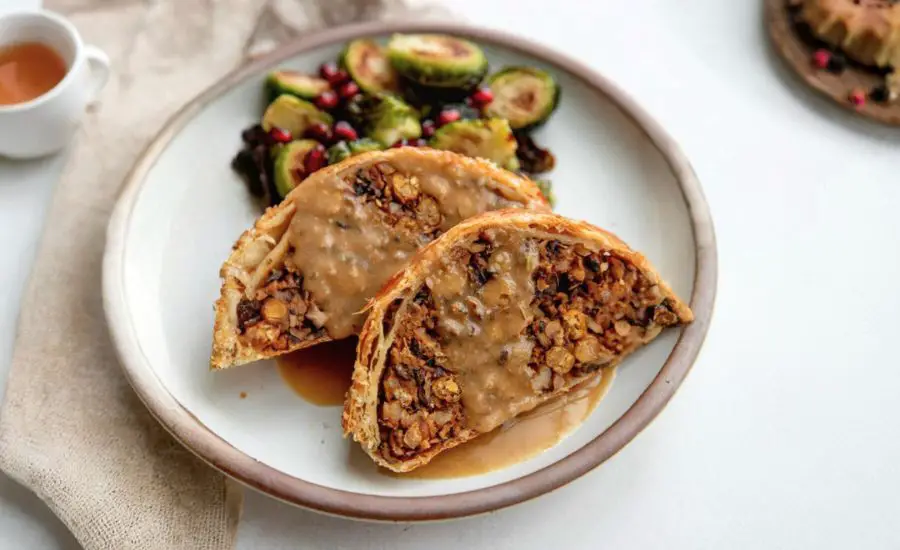
- Serve and Enjoy: Serve warm, ideally with mushroom miso gravy or your favorite plant-based sauce.Pair with roasted vegetables, a crisp salad, or mashed potatoes for a complete and satisfying meal.
Notes
- Roast chickpeas and mushrooms thoroughly to remove excess moisture for a firm, flavorful filling.
- Keep puff pastry cold until just before baking for maximum flakiness.
- Use fresh herbs for the most vibrant flavor; dried herbs will work but reduce the amounts slightly.
- Don’t skip the chilling step before baking — it ensures a crisp, professional-looking crust.
- The filling can be prepared up to 24 hours ahead and stored in the fridge for convenience.
Chef’s Secrets for Flawless Results
The key to an outstanding wellington lies in moisture control.
By roasting the chickpeas and cooking the mushrooms without oil at first, you prevent the filling from becoming soggy and ensure it holds together beautifully when sliced.
Fresh herbs elevate the aroma and taste, so if you can, use garden-fresh sage, thyme, and rosemary.
The puff pastry’s flakiness depends entirely on keeping it cold — work quickly when rolling and assembling, and let it chill before baking.
For an extra golden crust, the maple syrup–milk glaze adds both shine and a subtle sweetness that complements the savory filling.
Finally, always let the wellington rest before cutting; this step is essential for clean slices and a professional presentation.
Serving Suggestions for Maximum Enjoyment
This wellington makes a stunning centerpiece for holiday gatherings, dinner parties, or special weeknight meals.
Serve it alongside rich mushroom miso gravy for extra umami depth. Pair with roasted root vegetables, green beans almondine, or a crisp mixed salad to balance the richness of the pastry.
For a heartier plate, add creamy mashed potatoes or a wild rice pilaf. If you’re entertaining, slice the wellington at the table for a dramatic reveal that’s sure to impress guests.
It’s equally delicious warm from the oven or gently reheated the next day, making it ideal for both formal and casual occasions.
Storage Tips to Keep it Fresh
If you have leftovers, store them in an airtight container in the refrigerator for up to 3 days.
To reheat without losing crispness, warm slices in a 350°F (175°C) oven for 10–15 minutes rather than microwaving.
You can also prepare the filling in advance and refrigerate for up to 24 hours before wrapping in pastry.
For longer storage, assemble the unbaked wellington, wrap tightly in plastic, and freeze for up to 2 months.
Bake from frozen, adding 10–15 minutes to the cook time, until golden and hot in the center.
Frequently Asked Questions
1. Can I use dried herbs instead of fresh?
Yes, but reduce the amount by about one-third since dried herbs are more concentrated in flavor.
2. What’s the best way to keep the pastry from getting soggy?
Make sure the filling is not watery. Roast chickpeas and sweet potato fully, and cook mushrooms until all moisture is evaporated before adding them to the mix.
3. Can I make this recipe gluten-free?
Absolutely. Use a gluten-free puff pastry and swap panko breadcrumbs for a gluten-free variety.
4. Is there a substitute for walnuts?
Yes — pecans, almonds, or sunflower seeds will work well and add a slightly different flavor profile.
5. Can I prepare this ahead of time?
Yes. You can make the filling a day in advance or assemble the entire wellington, refrigerate, and bake just before serving.
This recipe is inspired by plantbasedrdblog and has been carefully refined to enhance clarity, streamline preparation steps, and ensure accurate results. We’ve also included health benefits, nutritional highlights, and Must-Have Tools to help you get the best results every time you cook.
