All products are selected by our editorial team for quality. If you buy through our links, we may earn a small commission at no extra cost to you.
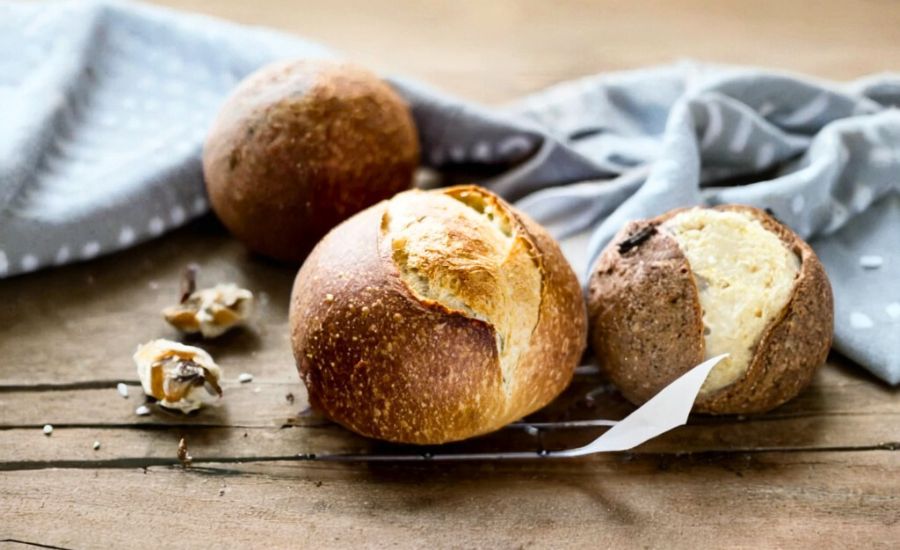
This artisan-style sourdough bread recipe offers a beginner-friendly gateway into the rewarding world of homemade bread.
With just five core ingredients—bread flour, water, salt, olive oil, and an active sourdough starter—it strikes a beautiful balance between simplicity and professional-quality results.
The addition of olive oil is a signature twist that elevates this recipe, creating a moist, tender crumb and a crisp, golden crust that’s perfect for slicing.
What sets this bread apart is its entirely plant-based composition, making it ideal for vegans and anyone seeking clean, wholesome ingredients.
Despite having no added sugars or preservatives, it delivers rich, complex flavors thanks to the long fermentation process.
It also provides a source of plant-based protein and dietary fiber, especially when paired with whole grain flours or nutrient-rich toppings like hummus or avocado.
The use of heart-healthy olive oil adds beneficial monounsaturated fats while keeping saturated fat low.
While sourdough may seem intimidating, this recipe breaks it down into manageable, clearly guided steps—even for first-timers.
The flexible prep schedule, from overnight bulk fermentation to optional stretch-and-folds, makes it both adaptable to your routine and ideal for meal prep.
Once baked, the loaf stays fresh for days and works beautifully for sandwiches, toast, or as a table centerpiece.
In short, this sourdough loaf is not only a joy to bake but also a nourishing, everyday staple you’ll be proud to make and share.
Must-Have Tools for Perfect Results
Digital Kitchen Scale
Accurately measure your flour, water, and starter to achieve perfect dough hydration ratios.
Precise measurement is critical in sourdough baking—especially when using grams.
A digital scale ensures consistent results and eliminates guesswork, making it essential for all baking tasks.
5.5–6 Quart Dutch Oven
Creates a steamy, high-heat environment for a crisp crust and high rise.
This heavy-duty pot is the gold standard for sourdough baking. It retains heat evenly and traps steam, giving your bread that gorgeous, golden artisan crust.
A must-have for baking everything from no-knead breads to braised stews.
Bench Scraper (Bench Knife)
Makes handling and shaping sticky dough much easier.
Great for scraping your work surface clean, dividing dough, or creating tension while shaping your loaf. It’s one of the most versatile tools in a baker’s kitchen.
Bread Lame or Sharp Serrated Knife
Allows you to score the dough just before baking for proper expansion.
A bread lame provides the clean, controlled cuts necessary for a beautiful, well-risen loaf. Bonus: it adds a rustic, professional finish to your bread.
Cloth-Lined Proofing Basket (Banneton)
Keeps wetter doughs from spreading during the final rise.
For high-hydration doughs, this basket supports shape retention while allowing air circulation. It helps form the signature round structure and beautiful surface texture of sourdough boules.
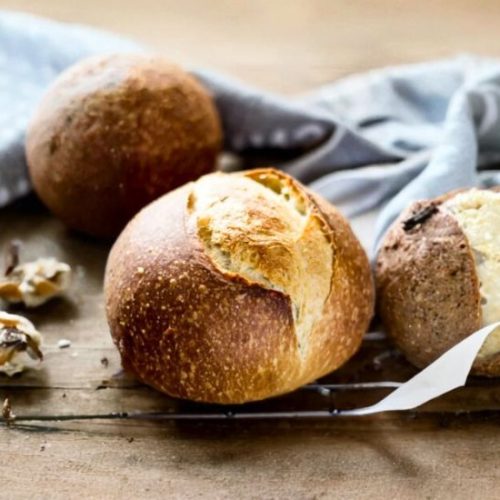
Sourdough Bread
Equipment
- 1 Digital Kitchen Scale – for accurate flour, water, and starter measurement
- 1 Large Mixing Bowl – to mix and ferment the dough
- 1 Bench Scraper – for shaping and handling dough
- 1 5.5–6 Quart Dutch Oven – for baking and steam retention
- 1 Proofing Basket or Cloth-Lined Bowl – optional, for structured second rise
- 1 Bread Lame or Serrated Knife – for scoring the dough
Ingredients
- 150 g 5.35 oz active sourdough starter
- 250 –325 g 8.8–11.5 oz warm filtered water (start with 250 g for firmer dough)
- 25 g 0.9 oz olive oil
- 500 g 17.65 oz bread flour (not all-purpose)
- 10 g 0.4 oz fine sea salt
- Fine cornmeal or parchment paper for dusting or lining
Instructions
- Mix the Dough: In a large mixing bowl, combine your sourdough starter, warm water, and olive oil. Stir together with a fork until blended. Add the bread flour and salt, and continue mixing until the dough thickens and becomes shaggy. Use your hands to press and squeeze the mixture together until no dry flour remains. Cover the bowl with a damp towel or plastic wrap and let it rest for 30 to 60 minutes to hydrate (a process called autolyse).
- Form a Rough Dough Ball: After resting, return to the bowl and gently shape the dough into a rough ball by folding and tucking the edges inward. This only takes about 15 seconds and helps begin the gluten development.
- Bulk Fermentation (First Rise): Cover the bowl tightly and let the dough rise in a warm spot (around 70–75°F or 21–24°C). Allow it to ferment until it looks puffy and has nearly doubled in size. This may take anywhere from 4 to 12 hours, depending on the temperature and strength of your starter.
- Optional: Strengthen with Stretch & Folds: To improve structure, you can perform 1–2 sets of stretch and folds during the first few hours of bulk fermentation. Simply lift one side of the dough, stretch it upward, and fold it over itself. Rotate and repeat on all sides to complete one set. Wait about an hour between sets.
- Shape the Dough: Turn the dough out onto a lightly floured surface. Avoid punching it down—gently handle it to preserve gas bubbles. If making two loaves, divide it now. To shape, fold the dough in sections toward the center until you form a round. Flip it seam-side down and use your hands to gently tighten the shape into a smooth ball.
- Second Rise (Proofing): Place the shaped dough into a Dutch oven lined with parchment or dusted with cornmeal. Alternatively, use a floured proofing basket. Let it rest for 30 minutes to 1 hour, covered, until slightly puffed but not doubled in size. Meanwhile, preheat your oven to 450°F (232°C).
- Score the Dough: Use a bread lame or sharp knife to make a shallow 2–3 inch slash across the top of the dough. This allows controlled expansion during baking.
- Bake the Bread: Place the Dutch oven into the hot oven, reduce the heat to 400°F (204°C), and bake with the lid on for 20 minutes. Remove the lid and continue baking for 35–40 minutes, or until the crust is deep golden brown and the loaf sounds hollow when tapped.For accuracy, the internal temperature should reach 205–210°F (96–98°C).
- Cool Before Slicing: Transfer the bread to a wire rack and let it cool for at least 1 hour before slicing. Cutting too soon may result in a gummy texture.
Notes
- Hydration Adjustment: For a more elastic, airy dough, increase water to 300–325 g. Higher hydration doughs should be proofed in a banneton to retain shape.
- Best Practice: Always weigh ingredients with a digital scale for consistent results—cups are not accurate for bread baking.
- Storage Tip: Store the loaf at room temperature in a paper bag or wrapped in a tea towel. Avoid plastic, which softens the crust.
- Flour Brands Tested: King Arthur Bread Flour, Gold Medal Bread Flour, and Pillsbury Bread Flour work reliably.
- Sourdough Timing: Rise times will vary greatly based on your room temperature and the activity of your starter. Always rely on visual cues rather than the clock.
Chef’s Secrets for Sourdough Success
Mastering sourdough bread is all about understanding the rhythm of your dough and adapting to its needs.
One of the key secrets to a great loaf lies in hydration control. Start with the lower end of the water range (250 g) if you’re new to sourdough—this yields a firmer dough that’s easier to handle.
More experienced bakers can experiment with higher hydration levels (up to 325 g) for a more open crumb and a chewier texture.
Equally important is the bulk fermentation time. Instead of relying solely on the clock, observe your dough: it should look airy, expanded, and soft, not dense or overly wet.
Temperature plays a big role too—slightly warm environments help speed things up, but cooler temps offer more flavor development.
Also, don’t skip the stretch-and-folds during the first rise.
They build gluten strength and improve oven spring without requiring kneading.
And lastly, use a Dutch oven for baking. It mimics a professional steam-injected oven, which is crucial for developing that signature crackly crust.
Serving Ideas for Every Occasion
Freshly baked sourdough is incredibly versatile, making it a standout choice for both everyday meals and special gatherings.
Serve it simply with a drizzle of extra virgin olive oil and balsamic vinegar for dipping, or pair slices with a hearty lentil soup, creamy tomato bisque, or rustic stew for a cozy meal.
Lightly toasted, it makes a sturdy base for avocado toast, bruschetta, or plant-based sandwiches loaded with roasted vegetables or hummus.
For breakfast, try it slathered with nut butter and a sprinkle of sea salt, or topped with fresh fruit and a drizzle of honey.
Its slightly tangy flavor and chewy texture also pair beautifully with cheeses, olives, and fresh greens on a charcuterie board.
Whether served warm or at room temperature, sourdough bread adds a comforting, wholesome touch to any meal.
Storage Tips to Keep Bread Fresh
To keep your sourdough loaf fresh and delicious for days, proper storage is key.
After the bread has cooled completely, wrap it in a clean tea towel or place it in a paper bag to preserve the crust while maintaining the inner softness.
Avoid storing it in plastic bags, which trap moisture and can cause the crust to go soggy.
At room temperature, the bread stays good for 2–3 days. For longer storage, slice the loaf and freeze it in a resealable bag with parchment paper between the slices.
This way, you can pull out individual pieces as needed for toasting.
To revive slightly stale bread, try gently reheating it in the oven at 300°F (150°C) for about 10 minutes to refresh the crust and texture.
Avoid refrigerating bread, as it dries out faster due to the cold environment.
Frequently Asked Questions and Answers
1. Why is my dough too sticky or wet?
If your dough feels overly sticky, it may have too much water or not enough development.
Start with 250 g water for a firmer dough until you’re comfortable with shaping wetter, higher-hydration doughs.
Also, make sure you’re using bread flour, which has a higher protein content and can absorb more moisture.
Can I use all-purpose flour instead?
You can use all-purpose flour in a pinch, but the result may be a softer loaf with less chew and structure.
Bread flour is preferred for its higher gluten content, which supports better rise, texture, and crumb in sourdough baking.
What if I don’t have a Dutch oven?
While a Dutch oven provides the best environment for crusty bread, you can still bake sourdough on a preheated baking stone or steel.
Place an oven-safe dish of hot water on the lower rack to create steam, which helps form a nice crust.
How do I know if the dough is ready to bake?
Before baking, the dough should be slightly puffy but not over-expanded.
Gently press a fingertip into the dough—if it springs back slowly and leaves a shallow indent, it’s ready. If it deflates or feels weak, it may be over-proofed.
Can I flavor this sourdough with herbs or add-ins?
Absolutely! Sourdough is a great base for creativity. Try adding fresh rosemary, roasted garlic, olives, or seeds during the mixing stage for added flavor and texture.
Just be sure add-ins are evenly distributed and not too wet, which can affect dough structure.
This recipe is inspired by Theclevercarrot and has been carefully refined to enhance clarity, streamline preparation steps, and ensure accurate results. We’ve also included health benefits, nutritional highlights, and Must-Have Tools to help you get the best results every time you cook.
