All products are selected by our editorial team for quality. If you buy through our links, we may earn a small commission at no extra cost to you.
This chocolate chip cookie recipe stands out because it perfectly balances simplicity and exceptional flavor without any complicated steps or obscure ingredients.
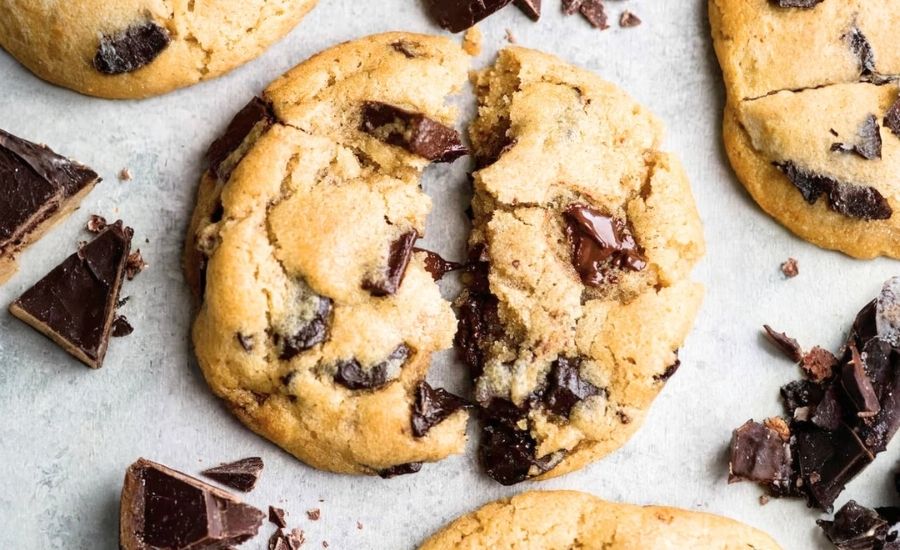
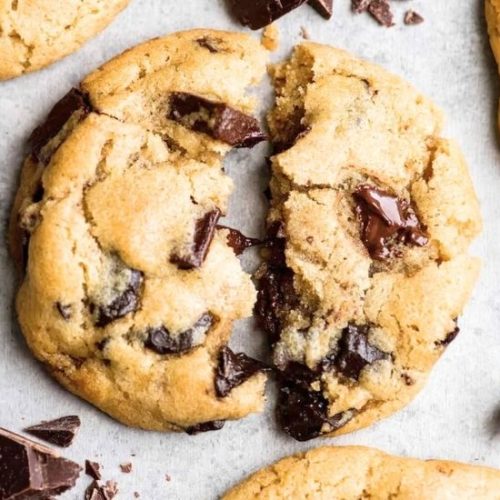
It produces cookies that are delectably doughy inside yet fully baked—a texture many bakers strive for but don’t always achieve.
Nutritionally, while a treat, these cookies offer a modest 2 grams of protein and 1 gram of fiber per serving, primarily from the eggs and flour.
The recipe uses real butter, supplying good fats that contribute to rich taste and satisfying mouthfeel.
With no chilling required and only about 10 minutes of prep plus 8 minutes of baking, it’s ideal for everyday baking or last-minute cravings.
It’s a straightforward, fuss-free recipe that yields consistent, crowd-pleasing results, making it perfect for beginners and seasoned bakers alike, as well as great for meal prep when freezing dough balls.
This recipe embodies the perfect go-to cookie for any occasion.
Must-Have Tools for Perfect Results
KitchenAid Mixer
This stand mixer effortlessly creams butter and sugars to the perfect fluffy consistency, ensuring even incorporation of ingredients.
Beyond cookies, it’s a versatile powerhouse for kneading dough, whipping creams, and mixing batters with ease.
Measuring Cups and Spoons
Accurate measurements are key to baking success.
This essential tool set guarantees precise ingredient quantities for consistent cookie texture and flavor, a must-have for any baking project.
Silicone Baking Mat
Providing a non-stick surface, this mat promotes even baking and easy cookie removal without greasing.
It’s reusable, eco-friendly, and perfect for roasting vegetables or rolling dough too.
Cookie Scoop
Ensures uniform cookie sizes for even baking and professional appearance.
This handy tool speeds up portioning and reduces mess during prep.
Parchment Paper
Creates a barrier that prevents sticking and makes cleanup effortless.
It’s also great for lining cake pans and baking delicate pastries.
Chocolate Chip Cookie
Equipment
- 1 KitchenAid Mixer (or stand mixer)
- Measuring cups and spoons
- 3 Baking sheets
- Parchment paper
- Silicone baking mat
- Cookie scoop
- Spatula
- Hand mixer (optional, if not using stand mixer)
Ingredients
- 1 cup 227g unsalted butter, softened
- 1 cup 200g granulated sugar
- 1 cup 220g packed light brown sugar
- 2 teaspoons pure vanilla extract
- 2 large eggs
- 3 cups 375g all-purpose flour
- 1 teaspoon baking soda
- ½ teaspoon baking powder
- 1 teaspoon fine sea salt
- 2 cups 340g semi-sweet chocolate chips
Instructions
- Step 1: Prepare Your Oven and Baking Sheets
- Preheat your oven to 375°F (190°C). Line three baking sheets with parchment paper or silicone baking mats to prevent sticking and ensure even baking. Set them aside for easy access.
- Step 2: Combine Dry Ingredients
- In a medium mixing bowl, whisk together the all-purpose flour, baking soda, baking powder, and sea salt until evenly blended. This ensures your cookies rise perfectly and have a balanced flavor.
- Step 3: Cream Butter and Sugars
- In a large bowl or stand mixer, beat the softened butter with both granulated and brown sugars until the mixture becomes light, fluffy, and well combined—this usually takes about 2-3 minutes on medium speed.
- Step 4: Add Eggs and Vanilla
- Add the eggs one at a time, mixing thoroughly after each addition. Then pour in the vanilla extract and continue to mix until the batter is smooth and slightly airy.
- Step 5: Incorporate Dry Ingredients
- Gradually add the flour mixture to the wet ingredients, mixing on low speed just until the dough forms and no streaks of flour remain. Avoid overmixing to keep your cookies tender.
- Step 6: Fold in Chocolate Chips
- Using a spatula, gently fold in the chocolate chips until evenly distributed throughout the dough, ensuring every cookie will have a generous amount of chocolate.
- Step 7: Portion the Dough
- Using a cookie scoop or spoon, portion out dough balls about 2-3 tablespoons each (depending on your preferred cookie size). Arrange them on the prepared baking sheets, spacing them about 2 inches apart to allow room for spreading.
- Step 8: Bake to Perfection
- Place one baking sheet at a time into the preheated oven. Bake for 8 to 10 minutes, watching closely for the edges to set and the tops to just begin turning golden—avoid overbaking to keep them soft inside.
- Step 9: Cool Before Moving
- Once baked, let the cookies rest on the baking sheet for 5 minutes. This resting period lets the cookies firm up slightly, making them easier to transfer without breaking.
- Step 10: Transfer to Cooling Rack
- Carefully move the cookies to a wire cooling rack to cool completely, which helps them achieve the perfect chewy texture.
Notes
- Do Not Overbake: The cookies may appear slightly underdone when you take them out, but this is key to their soft and chewy texture. They will continue to cook slightly while cooling.
- Butter Options: Feel free to substitute unsalted butter with salted butter, browned butter for a nutty flavor, or vegan butter alternatives to suit dietary preferences.
- Egg Substitutions: For egg-free versions, try flaxseed or chia egg replacements; however, texture may vary.
- Sugar Variations: Dark brown sugar can be used for a richer molasses flavor, but it will change the cookie’s taste slightly.
- Flour Choices: All-purpose unbleached flour works best. Gluten-free blends can be substituted but may alter texture.
- Freezing Dough: Portion and freeze dough balls in an airtight container for up to two months. Bake from frozen by lowering oven temperature to 350°F and baking for 15 minutes, or thaw and bake as usual.
- Storage: Keep cookies in an airtight container at room temperature for up to 5 days or freeze for longer storage.
Chef’s Secrets to Perfect Cookies
Achieving the perfect chocolate chip cookie lies in a few key techniques that elevate this simple recipe.
First, don’t rush the creaming process; beating the butter and sugars until light and fluffy creates air pockets that contribute to a tender, airy crumb.
Next, resist the temptation to overmix once you add the flour—overworking the dough develops gluten and results in tougher cookies.
The baking time is crucial: removing cookies when edges are just set but centers still look slightly underbaked ensures a soft, chewy texture.
Lastly, letting cookies cool on the baking sheet before transferring allows them to firm up gently, preventing breakage and preserving that perfect gooey center.
Using quality ingredients like real butter, fine sea salt, and your favorite chocolate chips can make a noticeable difference in flavor.
Serving Suggestions for Every Occasion
Chocolate chip cookies are wonderfully versatile and can be enjoyed in countless ways.
Serve them warm alongside a cold glass of milk or your favorite coffee for a classic pairing.
For a fun twist, sandwich two cookies with vanilla ice cream to make a delightful homemade ice cream sandwich.
They also pair beautifully with fresh berries or a drizzle of caramel or peanut butter for an indulgent treat.
For parties or gatherings, arrange them on a decorative platter or stack them in a jar for guests to grab easily.
Because these cookies keep well, they’re perfect for packing into lunchboxes or including as a sweet snack during picnics and road trips.
Storage Tips to Maintain Freshness
To keep your chocolate chip cookies tasting fresh and chewy, proper storage is essential.
Once fully cooled, store them in an airtight container at room temperature; they will stay delicious for up to five days.
For longer storage, freeze baked cookies in a single layer inside a freezer-safe container or zip-top bag for up to two months.
If you prefer freezing dough balls, wrap them tightly and bake directly from frozen, adjusting baking time slightly.
To revive slightly stale cookies, warm them briefly in the oven or microwave to restore softness.
Avoid refrigerating cookies as this tends to dry them out quickly and alters their texture.
Frequently Asked Questions Answered Clearly
Q1: Can I substitute ingredients like butter or flour?
Yes! Unsalted butter can replace salted butter, and plant-based or vegan butter alternatives work well.
For flour, unbleached all-purpose is best, but gluten-free blends can substitute with slight texture changes.
Q2: Why do my cookies spread too much?
Cookies spread excessively if the dough is too warm or if there’s too much butter.
Chill your dough briefly or reduce the butter slightly to prevent over-spreading.
Q3: How can I make these cookies crispier?
For a crisper cookie, bake a minute or two longer until edges are golden brown, or use a bit less brown sugar and slightly more granulated sugar.
Q4: Can I freeze the cookie dough?
Absolutely! Portion dough into balls and freeze in a single layer.
Bake directly from frozen by lowering oven temperature and adding a few extra minutes to the bake time.
Q5: How do I prevent cookies from sticking to the pan?
Using parchment paper or silicone baking mats creates a non-stick surface and makes cleanup easy.
Avoid greasing the pan, as it can cause cookies to spread unevenly.
This recipe is inspired by joyfoodsunshine and has been carefully refined to enhance clarity, streamline preparation steps, and ensure accurate results. We’ve also included health benefits, nutritional highlights, and Must-Have Tools to help you get the best results every time you cook.
