All products are selected by our editorial team for quality. If you buy through our links, we may earn a small commission at no extra cost to you.
This brioche bread recipe stands out for its irresistibly soft, rich, and buttery texture that melts in your mouth, making it a classic French indulgence accessible at home.
What makes it especially appealing is the balance of luxurious ingredients like eggs and butter, which not only create incredible flavor but also add beneficial nutrients such as high-quality protein and healthy fats.
While rich, brioche remains a nourishing choice with moderate carbohydrate content and low saturated fat when using unsalted butter.
The recipe’s step-by-step method breaks down the traditionally challenging brioche dough into manageable stages, making it suitable for home bakers with intermediate experience.
Thanks to the overnight chilling, the dough develops depth in flavor and easier handling, ideal for meal prep or leisurely weekend baking.
Its versatility makes it perfect for everything from breakfast toast to elegant sandwiches, proving that homemade brioche is both a satisfying and approachable everyday baking project.
Must-Have Tools for Perfect Results
Stand Mixer with Dough Hook Attachment
Essential for kneading the rich, buttery brioche dough efficiently, saving time and effort while ensuring smooth gluten development.
A versatile kitchen staple for mixing bread, pizza dough, and even cake batters.
Loaf Pans (8.5 x 4 inches or 9 x 5 inches)
Designed for shaping and baking the brioche loaves, these pans provide even heat distribution for a perfect golden crust.
Great for any bread, loaf cakes, or meatloaf preparations.
Pastry Brush
Used for applying egg wash evenly over the dough’s surface before baking, creating a shiny, appetizing crust.
A must-have for glazing pastries, breads, and roasting vegetables.
Dough Scraper/Cutter
Handy for dividing and shaping dough portions cleanly without tearing.
Useful in multiple baking tasks like shaping, portioning, and cleaning work surfaces.
Cooling Rack
Vital for allowing baked loaves to cool evenly and prevent sogginess from trapped steam.
A simple but essential tool to finish any baking project perfectly.

Mastering Brioche
Equipment
- 1 Stand mixer with dough hook attachment
- 2 Loaf pans, 8.5 x 4 inches (or 9 x 5 inches)
- 1 Pastry Brush
- 1 Dough scraper/cutter
- (1) Cooling rack
Ingredients
- 120 mL warm milk
- 9 g active dry yeast
- 10 mL honey
- 5 large eggs
- 1 large egg yolk or 2 yolks if using 4 eggs total
- 10 mL vanilla extract
- 60 g granulated sugar about 5 tablespoons
- 500 g all-purpose flour approximately 4 cups plus 2 tablespoons, spooned and leveled
- 1 ½ teaspoons fine sea salt
- 250 g unsalted butter softened and divided into four portions (about 1 cup plus 2 tablespoons)
Instructions
- Activate the Yeast: In a large mixing bowl, combine the warm milk, active dry yeast, and honey. Stir gently and allow the mixture to rest for 10 minutes, letting the yeast bloom and become frothy.
- Combine Wet Ingredients: Add the eggs and the additional egg yolk to the yeast mixture. Lightly whisk everything together to blend the eggs evenly.
- Add Dry Ingredients and Initial Mixing: Stir in the vanilla extract, sugar, all-purpose flour, and sea salt. Mix until the ingredients come together into a rough, shaggy dough.
- Begin Kneading the Dough: Attach the dough hook to your stand mixer and knead the dough on a low to medium speed (2 or 3) for about 3 to 5 minutes until it starts to form a cohesive mass.
- Incorporate Butter Gradually: Add the softened butter in four separate portions. After each addition, knead the dough for 2 to 3 minutes to fully absorb the butter. Be sure to stop occasionally to scrape down the sides and bottom of the bowl to keep the dough well-mixed.
- Develop the Dough’s Texture: Once all butter is incorporated, increase the mixer speed to medium-high (5 or 6) and knead for an additional 5 to 15 minutes. The dough should become smooth, elastic, and slightly tacky but not sticky, easily lifting off the bowl.
- Shape and First Rise: Lightly flour your work surface and hands. Turn the dough out and fold the edges inward, pressing gently. Flip the dough over and shape it into a tight ball using the heels of your palms. Place it back into a clean bowl, cover, and let it rise in a warm spot (around 72°F) for approximately 1 hour, or until doubled in size.
- Deflate and Chill: Gently punch down the risen dough to release gas. Repeat the folding and ball-shaping steps, then cover the bowl and refrigerate the dough for at least 8 hours or up to 24 hours to develop flavor and improve handling.
- Prepare Pans and Divide Dough: Lightly butter and flour two standard loaf pans (about 8.5 x 4 inches or 9 x 5 inches). Remove the chilled dough from the fridge and gently flatten it on a floured surface. Weigh the dough and divide it into two equal portions using a dough cutter or sharp knife.
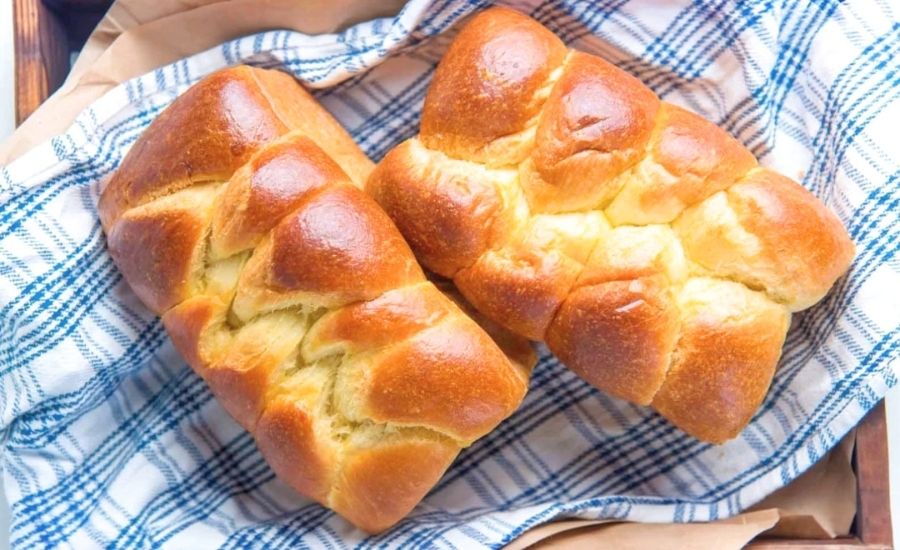
- Shape the Loaves: Option A: Nantaise Loaf — Divide one portion into eight equal pieces. Shape each into smooth balls by folding edges under and rolling with a cupped palm. Place the balls snugly in a loaf pan in a zig-zag pattern, flatten slightly.
- Option B: Braided Loaf — Divide a dough portion into three equal pieces. Roll each piece into 14-inch ropes, braid them tightly, pinch the ends, and place in the loaf pan.
- Option C: Traditional Loaf — Shape the dough into a classic loaf shape and place it into the prepared pan.
- Final Proof: Cover the pans with plastic wrap and let the dough rise at room temperature for about 2 hours or until nearly doubled and almost reaching the top of the pan.
- Bake to Perfection: Preheat the oven to 325°F (163°C). Brush the tops of the loaves with beaten egg wash. Optionally, sprinkle with pearl sugar for a sweet crunch. Bake for 35 to 45 minutes, or until golden brown and the internal temperature reaches 190°F (88°C).
- Cooling and Storage: Remove the loaves from the oven and cool for 5 minutes in the pans. Carefully turn out onto a wire rack to cool completely before slicing. Store in an airtight container to maintain freshness.
Notes
- Measuring Flour: For best results, weigh your flour rather than relying on volume measurements to ensure accuracy.
- Butter Temperature: Use unsalted butter that is very soft but not melted to incorporate smoothly into the dough.
- Overnight Chill: Refrigerating the dough overnight enhances flavor development and makes shaping easier.
- Proofing Environment: A warm, draft-free space around 72°F is ideal for rising; if your kitchen is cooler, allow extra time.
- Egg Wash Tip: For a deeper golden crust, apply a second egg wash halfway through baking.
Chef’s Insider Tips For Success
Mastering brioche requires patience and attention to detail, and a few expert tricks can elevate your loaf to bakery-quality.
First, be sure your yeast is fresh and the milk is warm—not hot—to encourage proper yeast activation without killing it.
Gradually incorporating soft butter into the dough is essential; adding it too quickly can overwhelm the gluten structure.
Kneading time matters, so don’t rush the dough’s development—look for a smooth, elastic, and slightly tacky texture that peels easily from the bowl.
Chilling the dough overnight not only develops flavor complexity but also makes the dough easier to shape.
Finally, don’t skip the egg wash before baking; it lends that beautiful golden sheen and helps toppings like pearl sugar stick.
With these secrets, you’ll achieve brioche loaves that are tender, buttery, and perfectly airy every time.
Delicious Ways To Serve Brioche
Brioche’s rich, buttery flavor and tender crumb make it incredibly versatile at the table.
Enjoy it simply toasted with a smear of high-quality butter or homemade jam for breakfast.
For a decadent treat, use thick slices to make French toast or bread pudding.
Its soft texture also works beautifully for sandwiches—whether classic ham and cheese, gourmet grilled cheese, or sweet spreads like Nutella and fresh fruit.
Brioche buns elevate burgers and sliders, offering a delicate balance to savory fillings.
For an elegant touch, slice brioche thinly to accompany soups or salads.
The slightly sweet undertone pairs well with both savory and sweet accompaniments, making this bread a crowd-pleaser for any meal or occasion.
Best Practices For Storing Brioche
To keep your brioche fresh and moist, proper storage is key.
Once completely cooled, wrap the loaf tightly in plastic wrap or store it in an airtight container to prevent drying out.
Brioche is best enjoyed within 2 to 3 days at room temperature. For longer storage, freeze the bread by wrapping it securely in foil or freezer-safe bags; it keeps well for up to three months.
When ready to eat, thaw brioche overnight in the fridge or at room temperature for a few hours.
Lightly toasting or warming slices before serving helps restore its soft texture and enhances the buttery aroma.
Avoid refrigerating brioche at room temperature as it can dry out faster.
Frequently Asked Questions About Brioche
1. Can I make brioche without a stand mixer?
Yes, but it requires more effort. You’ll need to knead the dough by hand for about 20-30 minutes to develop gluten properly. Use a large bowl and a sturdy surface, and be prepared for a bit of a workout!
2. Why does my brioche dough feel sticky?
Brioche dough is naturally soft and tacky due to its high butter and egg content. This is normal. If it’s extremely sticky and unmanageable, you might need to knead a bit longer or add a small pinch of flour, but avoid adding too much to keep it tender.
3. How important is the overnight chilling?
Chilling the dough overnight greatly improves flavor by allowing fermentation to develop slowly. It also firms the dough, making it easier to shape and resulting in a finer crumb. If short on time, you can proof without chilling, but the flavor and texture might be less nuanced.
4. Can I substitute whole wheat flour?
You can replace up to 25% of the all-purpose flour with whole wheat, but it will result in a denser loaf. For best results, stick to mostly all-purpose flour to maintain brioche’s light texture.
5. How do I know when the brioche is fully baked?
The loaf should be a deep golden brown and sound hollow when tapped. For accuracy, an instant-read thermometer should register about 190°F (88°C) in the center. Overbaking can dry the bread, so keep an eye on the time.
This recipe is inspired by theflavorbender and has been carefully refined to enhance clarity, streamline preparation steps, and ensure accurate results. We’ve also included health benefits, nutritional highlights, and Must-Have Tools to help you get the best results every time you cook.