All products are selected by our editorial team for quality. If you buy through our links, we may earn a small commission at no extra cost to you.
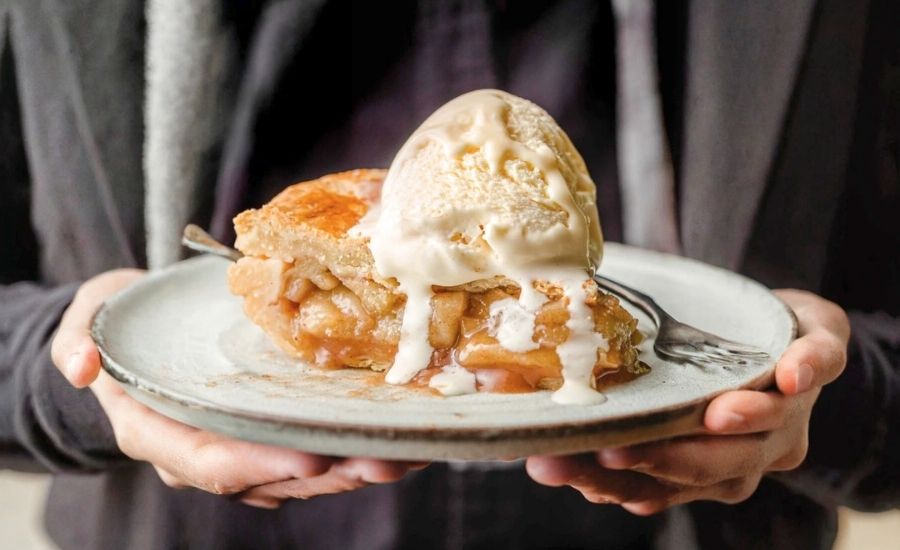
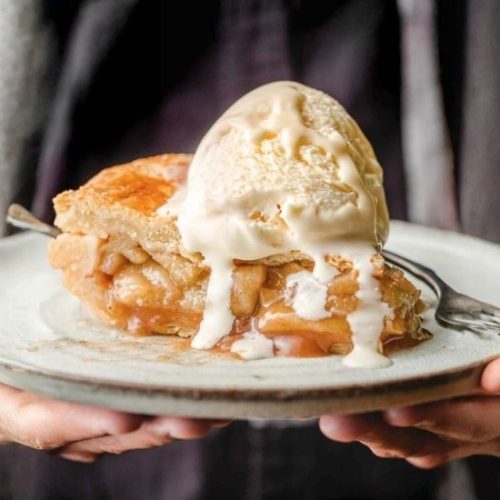
This Easy Apple Pie delivers timeless flavor with modern simplicity.
The use of Granny Smith apples brings a perfect balance of tartness and sweetness, ensuring each bite is bright and not overly sugary.
Warm spices like cinnamon and nutmeg offer cozy, nostalgic depth, while lemon juice and zest add fresh vibrancy.
Best of all, it’s approachable—even for beginners. Whether you make your own flaky homemade crust or use store-bought, the results are reliably delicious.
Nutritionally, this dessert offers 6g of fiber per serving thanks to the apples and their pectin-rich skins, which aid digestion and help regulate blood sugar.
While it’s a treat, it contains plant-based fats and only 4g of saturated fat, making it more heart-friendly than typical bakery pies.
With its prep-friendly steps and minimal cleanup, it’s a fantastic go-to for holidays, Sunday dinners, or anytime you’re craving a comforting dessert that looks and tastes impressive.
Must-Have Tools for Perfect Results
OXO Good Grips Apple Corer and Divider
Effortlessly core and slice apples into even pieces, making prep faster and more consistent. A time-saver that’s especially useful when working with large batches of fruit.
Pyrex 9.5-Inch Deep Dish Glass Pie Plate
This sturdy dish provides even heat distribution and visibility so you can check doneness. It’s ideal for deep-dish pies and versatile enough for quiches and casseroles.
Joseph Joseph Adjustable Rolling Pin
With removable rings for thickness control, this rolling pin ensures your crust rolls out evenly every time—essential for achieving that tender, flaky pie base and top.
Silicone Pie Crust Shield by Talisman Designs
Protect your pie edges from over-browning without struggling with foil. A must-have for beautiful golden crusts and stress-free baking.
Nordic Ware Natural Aluminum Baking Sheet
Place your pie on this sheet to catch drips and prevent messes. Its even heat conduction also helps avoid soggy bottoms.
Apple Pie
Equipment
- 2 (9") Pie Crusts – for top and bottom layers
- 1 Deep Dish 9" Pie Plate – for baking the pie
- 1 Large Mixing Bowl – to mix the apple filling
- 1 Rolling Pin – to roll out crusts evenly
- 1 Sharp Knife – for slicing slits into top crust
- 1 Pastry Brush – for applying the egg wash
- 1 Baking Sheet – to catch drips during baking
- 1 Pie Shield or Foil Strip – to protect crust edges
- 1 Citrus Zester – for fresh lemon zest
- 1 Measuring Cup & Spoons Set – to measure sugars, flour, and spices
Ingredients
- 2 round 9-inch pie crusts (store-bought or homemade)
- 7 large Granny Smith apples peeled, cored, and sliced into ½-inch wedges
- ½ cup granulated white sugar
- ½ cup packed light brown sugar
- 2 tablespoons all-purpose flour
- 1 teaspoon ground cinnamon
- ⅛ teaspoon ground nutmeg
- 1 tablespoon fresh lemon juice
- Zest of ½ a lemon
- 1 large egg lightly beaten (for egg wash)
- 2 tablespoons coarse sanding sugar optional, for topping
Instructions
- Prepare the Crust: If you're making your own crust, be sure to chill the dough for at least 1 hour in the refrigerator before rolling. Let it sit at room temperature for 5–10 minutes before working with it. If using pre-made pie dough, follow the package directions.
- Mix the Spiced Apple Filling: In a large bowl, combine the apple slices with the white sugar, brown sugar, flour, cinnamon, nutmeg, lemon juice, and lemon zest. Toss everything thoroughly so each slice is well coated in the sugary-spice mixture. Let this sit while you roll out your crust.
- Assemble the Bottom Crust: Lightly flour your surface and roll one disc of pie dough into a 12-inch circle, about ⅛ inch thick. Gently transfer the dough to a deep-dish 9-inch pie plate, pressing it into the bottom and up the sides.
- Fill the Pie: Spoon the apple filling evenly into the pie shell, leaving behind any extra juice in the bowl to avoid a soggy crust.
- Top with Second Crust: Roll out the second pie dough to the same thickness and size. Drape it over the filling. Trim any excess dough hanging over the edges with a sharp knife. Seal the edges by folding them under and pressing them together gently, then crimp or flute as desired.
- Vent and Finish the Crust: Cut 4 small slits into the top crust to allow steam to escape. Brush the top with the beaten egg, making sure to coat evenly. Sprinkle with sanding sugar for a sparkling finish, if using.
- Protect and Bake: Cover the pie’s edge with a pie shield or strips of aluminum foil to prevent over-browning. Place the pie on a baking sheet and bake in a preheated 400°F (204°C) oven for 25 minutes.
- Lower Heat and Continue Baking: Carefully remove the pie shield or foil. Reduce the oven temperature to 375°F (190°C) and continue baking for another 30–35 minutes, or until the crust is golden brown and the filling is bubbling through the slits.
- Cool Before Serving: Remove from the oven and let the pie cool at room temperature for at least 3 hours to allow the filling to set properly before slicing.
Notes
- Apple Variety Tip: Granny Smith apples work best due to their tart flavor and firm texture, which holds up well during baking. You can also mix with Honeycrisp or Braeburn for added depth.
- Avoid Soggy Bottoms: Discard any excess juice left in the mixing bowl before filling the pie. This prevents the bottom crust from getting too wet.
- Crust Shine: The egg wash helps create a glossy, golden crust and helps sanding sugar stick better.
- Make Ahead: You can prepare the apple filling a few hours in advance and refrigerate it. You can also make the pie crust the day before.
- Storage: Once baked and cooled, cover and store the pie at room temperature for up to 2 days, or refrigerate for up to 4 days.
Chef’s Secrets for Perfect Apple Pie
The secret to a truly exceptional apple pie lies in balance, texture, and technique.
Start by selecting the right apples—Granny Smith is ideal due to its tartness and firmness, which helps maintain shape during baking.
For even better depth, mix in a sweeter variety like Honeycrisp or Fuji.
When tossing the apples with sugar and spices, let the mixture sit briefly so the flavors begin to meld, but always drain excess juice to avoid a soggy crust.
Chilling your pie dough before rolling helps retain its shape and gives you that golden, flaky texture.
During baking, protect the pie’s edges with a pie shield or foil to prevent overbrowning.
And always let the pie cool for a few hours post-baking—this allows the filling to thicken naturally, making for clean, neat slices.
Serving Suggestions for Any Occasion
This classic apple pie shines in both casual and festive settings.
Serve it warm with a scoop of vanilla ice cream, a dollop of fresh whipped cream, or a drizzle of salted caramel sauce for an indulgent dessert.
For a cozy brunch or afternoon tea, pair it with a hot mug of cinnamon chai or strong black coffee.
It also complements savory meals beautifully—think roasted turkey, baked ham, or hearty casseroles—making it a perfect end to holiday feasts.
For a fun twist, try serving leftover slices cold the next morning; the chilled texture highlights the fruitiness and spice in a new way.
Storage Tips to Keep Pie Fresh
To preserve your apple pie’s flavor and texture, allow it to cool completely at room temperature before covering loosely with foil or plastic wrap.
It can be stored on the counter for up to 2 days, but for longer freshness, refrigerate it for up to 4 days.
If you plan to make it ahead, the unbaked pie can be assembled, wrapped tightly in foil and plastic wrap, and frozen for up to 3 months—just bake directly from frozen, adding an extra 10–15 minutes to the bake time.
Baked pies also freeze well; slice and wrap individual portions for quick desserts later.
Frequently Asked Apple Pie Questions
1. Can I use a different type of apple?
Yes! While Granny Smith is the most reliable for structure and tartness, combining it with sweeter varieties like Honeycrisp, Pink Lady, or Fuji can enhance flavor complexity without compromising texture.
2. How do I know when the pie is fully baked?
The crust should be a deep golden brown, and you should see bubbling juices through the slits in the top crust. If the top is browning too quickly, tent it with foil and continue baking until the filling is bubbly.
3. Can I make the pie crust in advance?
Absolutely. Homemade pie dough can be made ahead and kept in the fridge for up to 3 days or frozen for up to 3 months. Just thaw in the fridge overnight before using.
4. Why is my bottom crust soggy?
A soggy crust is often caused by excess moisture. Be sure to discard any juice from the apple mixture before filling the pie, and bake the pie on a preheated baking sheet for better bottom heat.
5. Can I skip the egg wash?
You can, but it’s highly recommended. The egg wash adds shine and helps browning, giving your pie a professional, golden finish. If you’re egg-free, use milk or a dairy-free alternative instead.
This recipe is inspired by littlespoonfarm and has been carefully refined to enhance clarity, streamline preparation steps, and ensure accurate results. We’ve also included health benefits, nutritional highlights, and Must-Have Tools to help you get the best results every time you cook.
