All products are selected by our editorial team for quality. If you buy through our links, we may earn a small commission at no extra cost to you.
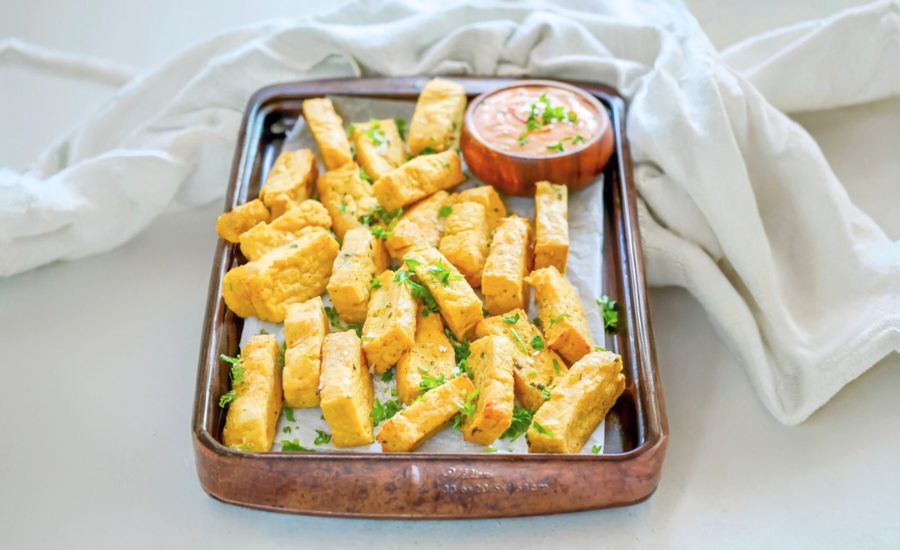
Crispy Chickpea Fries, also known as Panisse, offer a delicious twist on traditional fries with a nutritious, plant-based punch.
These fries are naturally vegan, gluten-free, and high in protein, thanks to the chickpea flour base.
With 14 grams of protein and 7 grams of fiber per serving, they support muscle health and promote digestive wellness, while being low in saturated fat (only 1 gram).
The inclusion of heart-healthy olive oil and fresh herbs elevates both flavor and nutritional value, making them a guilt-free indulgence.
This recipe is perfect for everyday cooking because it is simple to prepare, oven-baked (no deep frying!), and meal-prep friendly—the panisse can be made in advance and refrigerated for up to a week.
Whether served as a snack, appetizer, or side dish, these crispy, golden fries satisfy cravings while providing lasting energy and wholesome nutrients.
Must-Have Tools for Perfect Results
9 x 13 Baking Sheet
Essential for evenly spreading the chickpea batter to set and bake. Its large surface area ensures uniform thickness for consistent cooking. Beyond this recipe, it’s a versatile staple for roasting vegetables, baking casseroles, and making sheet-pan dinners.
Large Pot
Ideal for whisking and cooking the chickpea flour mixture to a thick, smooth batter. A sturdy pot with good heat conduction ensures even cooking without scorching. It’s indispensable in any kitchen for boiling, simmering, and preparing sauces.
Whisk
Crucial for blending the chickpea flour into boiling water smoothly, preventing lumps. A quality whisk speeds up mixing and aerates batters and sauces, making it a fundamental tool for many cooking and baking tasks.
Parchment Paper or Silpat
Provides a non-stick surface for baking the fries, enabling easy turning and cleanup. Both options protect your baking sheet and promote even browning. Parchment is a kitchen essential for baking cookies, roasting, and steaming foods.
Pastry Brush
Used to evenly coat the fries with olive oil before and during baking to achieve that signature crispy texture. A silicone brush is easy to clean and perfect for glazing, basting, and greasing pans.
Baked Chickpea Fries
Equipment
- 1 large pot
- 1 Whisk
- 1 9 x 13 inch baking sheet
- Parchment paper or Silpat liner (1 sheet)
- Pastry brush
Ingredients
- 6 cups water
- 3 cups chickpea flour also known as gram flour or besan
- 1 teaspoon salt or to taste
- 1 teaspoon freshly ground black pepper
- 3 tablespoons extra virgin olive oil divided
- 2 tablespoons fresh parsley finely chopped
- 2 tablespoons fresh oregano finely chopped
Instructions
- Prepare the Baking Pan: Lightly grease a 9 x 13-inch baking dish with a tablespoon of olive oil to prevent sticking. Set aside while you prepare the chickpea batter.
- Heat and Whisk Chickpea Mixture: Bring 6 cups of water to a rolling boil in a large, heavy-bottomed pot over medium-high heat. Once boiling, reduce heat to medium. Slowly pour the chickpea flour into the pot in a thin stream, whisking continuously to avoid lumps.
- Cook Until Thickened: Keep whisking the mixture constantly for about 10 minutes. The batter will gradually thicken into a smooth, creamy paste. It’s normal to have a few small lumps; they won’t affect the final texture.
- Add Flavor and Oil: Remove the pot from heat. Stir in 2 tablespoons of olive oil, the chopped parsley and oregano, and season with salt and pepper to taste. Mix well to incorporate all flavors evenly.
- Spread and Chill Batter: Pour the thickened chickpea mixture into the prepared baking dish. Spread it evenly with a spatula to about a 1-inch thickness. Let the mixture cool to room temperature, then cover tightly with plastic wrap and refrigerate for at least 1 hour, or overnight for best firmness.
- Preheat Oven and Prepare Fries: Preheat your oven to 400°F (200°C). Line a large baking sheet with parchment paper or a silicone baking mat. Remove the chilled chickpea slab from the fridge and carefully lift it out of the baking dish.
- Slice and Oil Fries: Using a sharp knife, cut the firm chickpea slab into fry-shaped sticks, about 1/2 to 3/4 inch wide. Arrange the fries on the lined baking sheet in a single layer without crowding. Brush the tops lightly with the remaining olive oil.
- Bake Until Crispy: Place the fries in the oven and bake for 10 minutes. Then, flip each fry, brush the other side with olive oil, and bake for an additional 10 minutes. The fries should turn golden brown and develop a crisp exterior.
- Final Touches and Serving: Once baked, remove fries from the oven and sprinkle with a pinch of salt while still warm. Serve immediately with your favorite dipping sauce and enjoy with a chilled glass of rosé or your preferred beverage.
Notes
- Advance Preparation: The chickpea batter can be prepared up to one week ahead and kept refrigerated, making this recipe very convenient for meal prep.
- Reheating: To reheat, place cooked fries back in a preheated oven at 400°F (200°C) for 5-7 minutes to regain their crispiness.
- Texture Tips: If you want firmer fries, chill the batter overnight before slicing. For a softer interior, reduce chilling time slightly.
- Herb Variations: Feel free to experiment with fresh thyme, rosemary, or basil instead of parsley and oregano for different flavor profiles.
- Serving Ideas: These fries are delicious on their own or paired with garlic aioli, tahini sauce, or a spicy harissa dip.
Chef’s Secrets for Crispy Perfection
Achieving the perfect crispy texture in chickpea fries hinges on a few key techniques.
First, it’s crucial to whisk the chickpea flour mixture continuously while cooking to avoid lumps and ensure smoothness.
Don’t rush this step — a thick, creamy batter is the foundation for firm fries. After cooking, chilling the batter thoroughly in the fridge is essential; this step allows the panisse to set properly, making it easier to slice without crumbling.
Using fresh herbs like parsley and oregano adds vibrant flavor and freshness, balancing the earthy chickpea base.
When baking, applying olive oil before and after flipping helps create a golden, crunchy crust without deep frying.
Finally, slicing the fries evenly ensures they cook uniformly, giving you consistent crispness every time.
Serving Suggestions to Elevate Your Fries
Crispy Chickpea Fries are incredibly versatile and pair beautifully with a variety of dips and accompaniments.
For a classic French street-food vibe, serve with a tangy garlic aioli or a zesty lemon tahini sauce.
They also work well alongside a fresh green salad or roasted vegetables for a balanced meal.
For gatherings or snacks, these fries shine as a crowd-pleasing appetizer with spicy harissa or cool cucumber yogurt dip.
Don’t hesitate to experiment with dipping sauces — a smoky chipotle mayo or a simple ketchup alternative made with fresh herbs can bring exciting flavors.
Serve them warm to maintain their crisp texture, and consider garnishing with a sprinkle of flaky sea salt or fresh herbs for an extra touch of elegance.
Storage Tips for Maintaining Freshness
To keep your chickpea fries tasting their best, proper storage is key.
The cooked fries can be stored in an airtight container in the refrigerator for up to 3 days.
When ready to enjoy, reheat them in a preheated oven at 400°F (200°C) for 5 to 7 minutes — this restores their crispy exterior much better than microwaving.
If you’ve prepared the panisse batter in advance, keep it tightly covered in the fridge for up to one week, allowing you to slice and bake fries as needed without hassle.
For longer storage, the baked fries can be frozen in a single layer on a baking sheet, then transferred to a freezer-safe container for up to 2 months.
Reheat from frozen in the oven to revive their crispness.
Frequently Asked Questions About Chickpea Fries
Q1: Can I use canned chickpeas instead of chickpea flour?
A: This recipe specifically relies on chickpea flour for its smooth batter and firm texture. While canned chickpeas are delicious in many recipes, they won’t create the same panisse consistency.
Q2: Are chickpea fries gluten-free and vegan?
A: Yes! Using chickpea flour naturally avoids gluten, and since the recipe contains no animal products, it is completely vegan-friendly.
Q3: How do I get the fries extra crispy?
A: Brush olive oil generously on both sides before baking, and make sure to flip halfway through. Using a convection setting in your oven helps circulate air for enhanced crispiness.
Q4: Can I add other spices or herbs?
A: Absolutely! Feel free to customize with your favorite herbs like thyme, rosemary, or spices such as smoked paprika or cumin to suit your taste.
Q5: Is it necessary to chill the batter before slicing?
A: Chilling is very important — it firms up the chickpea mixture, making it easier to cut and helping the fries hold their shape during baking.
This recipe is inspired by heynutritionlady and has been carefully refined to enhance clarity, streamline preparation steps, and ensure accurate results. We’ve also included health benefits, nutritional highlights, and Must-Have Tools to help you get the best results every time you cook.