All products are selected by our editorial team for quality. If you buy through our links, we may earn a small commission at no extra cost to you.
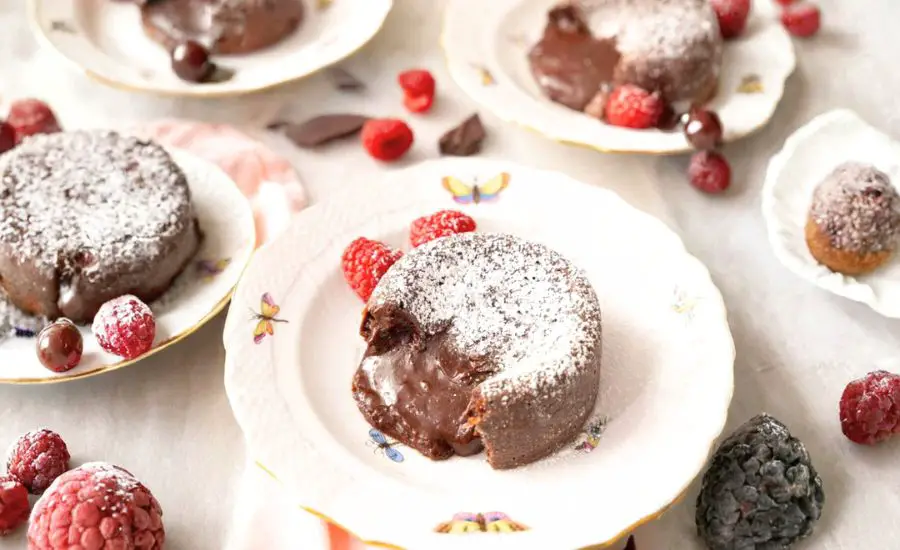
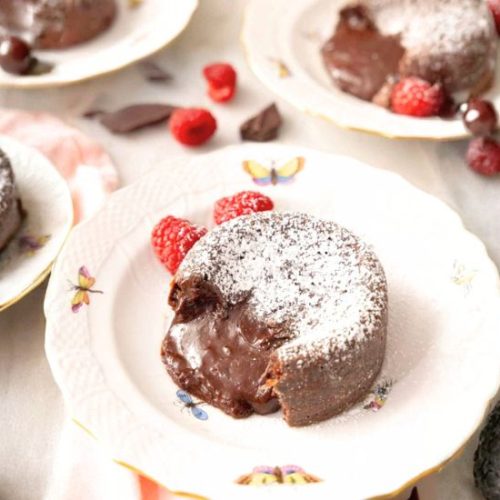
This Chocolate Lava Cake recipe is a perfect balance of elegance and simplicity, making it a delightful treat for both special occasions and everyday indulgence.
The luscious molten center provides a rich, gooey texture that contrasts beautifully with the firm cake edges, creating a sensational chocolate experience.
From a nutritional standpoint, this dessert offers moderate protein from eggs and a touch of fiber from the chocolate, though it is indulgently rich in good fats from butter and bittersweet chocolate.
While it’s not low-calorie, it’s a satisfying dessert that can easily be portion-controlled.
The recipe’s quick prep and brief bake time make it ideal for last-minute entertaining or a cozy night in.
Plus, it’s a crowd-pleaser that feels fancy without complicated steps, making it a fantastic option for home bakers looking to impress effortlessly.
Must-Have Tools for Perfect Results
Ramekins
Essential for shaping each individual lava cake with perfectly defined edges.
Their heat-resistant ceramic ensures even baking and elegant presentation. Great for soufflés, custards, and individual desserts.
Double Boiler
Provides gentle, controlled melting of chocolate and butter without scorching, preserving smooth texture and rich flavor. A kitchen staple for delicate melts and tempering chocolate.
Electric or Stand Mixer
Makes whisking eggs and sugar effortless, achieving the light, airy batter needed for a tender cake. Its versatility extends to mixing batters, doughs, and whipping creams.
Baking Sheet
Serves as a stable base to carry multiple ramekins into the oven, ensuring even heat distribution. A must-have for roasting, baking, and catching drips or spills in the oven.
Mixing Bowls
Durable bowls to combine ingredients smoothly and fold batter gently. Ideal for all mixing tasks, from whipping to marinating, they are indispensable in any kitchen.
Chocolate Lava Cake
Equipment
- 6 ramekins (4- to 5-ounce size)
- 1 Baking Sheet
- 1 double boiler (or microwave-safe bowl for melting)
- 1 electric or stand mixer
- Mixing bowls (medium and large)
Ingredients
- ½ cup 113g unsalted butter
- 6 ounces 168g bittersweet chocolate, chopped
- 2 large whole eggs
- 2 large egg yolks
- ¼ cup 50g granulated sugar
- ⅛ teaspoon salt
- 2 tablespoons all-purpose flour
Instructions
- Prepare the Ramekins: Begin by greasing six 4- to 5-ounce ramekins thoroughly with butter. Lightly dust each ramekin with flour to prevent sticking, tapping out any excess. Arrange the ramekins on a baking sheet to make handling easier during baking.
- Melt Butter and Chocolate: Using a double boiler, gently melt the butter and chopped bittersweet chocolate together over low heat. Stir continuously until the mixture is completely smooth and glossy. Alternatively, you can melt the butter and chocolate in short bursts in the microwave, stirring every 30 seconds until fully combined.
- Whip Eggs and Sugar: In a large mixing bowl, whisk the whole eggs, egg yolks, sugar, and salt using an electric mixer on medium speed. Continue beating until the mixture becomes thick, creamy, and pale yellow in color, indicating enough air has been incorporated for a tender cake.
- Combine Chocolate and Flour: Carefully fold the melted chocolate mixture into the whipped eggs. Then sift the flour over the batter and gently fold it in just until no streaks remain. Avoid over-mixing to keep the batter light and airy.
- Fill and Bake: Evenly divide the batter into the prepared ramekins, filling each about three-quarters full. Place the baking sheet with ramekins into a fully preheated oven at 450°F (232°C). Bake for 6 to 8 minutes, watching closely—the edges should be set and firm while the centers remain soft and slightly wobbly.
- Unmold and Serve: Once baked, let the cakes cool in their ramekins for about one minute. Then, place a dessert plate on top of each ramekin and carefully invert to release the cakes. Allow them to sit briefly, then lift off the ramekins. Dust with powdered sugar and garnish with fresh berries if desired. Serve immediately for the best molten effect.
Notes
- When measuring flour, avoid packing it into the spoon. Instead, fluff it up and gently spoon it into the measuring spoon to keep the correct light texture in your batter.
- Ensure your oven reaches full temperature before baking to achieve the perfect contrast of a firm exterior and gooey center.
- Use eggs at room temperature to help them blend smoothly into the batter and maintain the ideal texture. If your eggs are cold, place them in warm water for a few minutes before use.
- Keep a close eye on the cakes during baking to prevent overcooking—the center should stay soft and jiggly for that signature lava effect.
- Serve the cakes immediately after unmolding to enjoy the rich molten chocolate center at its best.
Chef’s Secrets for Perfect Chocolate Lava
Achieving the ideal molten center in a chocolate lava cake requires careful attention to temperature and timing.
Use high-quality bittersweet chocolate for a rich, deep flavor that balances sweetness without overpowering.
Melting the chocolate gently in a double boiler preserves its smooth texture, preventing it from becoming grainy.
Be sure to whip the eggs and sugar until pale and fluffy—this aeration creates the tender cake exterior that contrasts beautifully with the gooey inside.
Another insider tip is to watch your oven closely; even a minute too long can set the center, losing that luscious lava flow.
For best results, prepare ramekins thoroughly with butter and flour to ensure easy unmolding and keep the presentation flawless.
Creative Serving Suggestions for Indulgence
Chocolate lava cake is a versatile dessert that pairs beautifully with a variety of accompaniments.
Serve it warm with a scoop of vanilla bean ice cream or a dollop of freshly whipped cream to complement the intense chocolate flavor with creamy, cool contrasts.
Fresh berries such as raspberries or strawberries add a bright, tart note and pop of color that balances the richness.
For a sophisticated touch, drizzle a bit of raspberry coulis or sprinkle crushed toasted nuts on top for added texture.
Whether for an intimate dinner or a festive gathering, this dessert can be dressed up or kept simple, making it an impressive and satisfying finale.
Smart Storage Tips for Leftovers
While chocolate lava cake is best enjoyed immediately to experience its molten core, leftovers can be stored with care.
Cool any uneaten cakes completely before wrapping them tightly in plastic wrap or placing them in an airtight container.
Store in the refrigerator for up to two days. To reheat, warm gently in the microwave for about 15–20 seconds until just heated through—avoid overheating, as this can alter texture and dry out the cake edges.
For longer storage, you can freeze individual cakes by wrapping them well; thaw overnight in the fridge before reheating gently.
Keep in mind, the molten center will be less pronounced after refrigeration or freezing, but the cake remains delicious.
Frequently Asked Questions Answered Clearly
1. Can I prepare the batter ahead?
It’s best to bake the lava cakes right after making the batter for optimal rise and molten center. If needed, you can refrigerate the batter for a few hours but bring it back to room temperature before baking.
2. What chocolate is best for this recipe?
Use bittersweet or dark chocolate with at least 60% cocoa for rich flavor and good melting quality. Avoid overly sweet or milk chocolates which can affect texture and taste.
3. How do I prevent the cakes from sticking?
Thoroughly butter and lightly flour each ramekin, ensuring you cover every surface. Tapping out excess flour prevents a gritty finish while helping easy release.
4. Can I make these gluten-free?
Yes! Substitute the all-purpose flour with a gluten-free flour blend suitable for baking. Just be mindful that texture might vary slightly but the flavor remains wonderful.
5. Why is my lava cake fully cooked inside?
Most likely it baked too long or the oven temperature was too low. Make sure your oven is preheated fully to 450°F and watch closely during the 6-8 minute bake window. The center should jiggle slightly when done.
This recipe is inspired by preppykitchen and has been carefully refined to enhance clarity, streamline preparation steps, and ensure accurate results. We’ve also included health benefits, nutritional highlights, and Must-Have Tools to help you get the best results every time you cook.
