All products are selected by our editorial team for quality. If you buy through our links, we may earn a small commission at no extra cost to you.
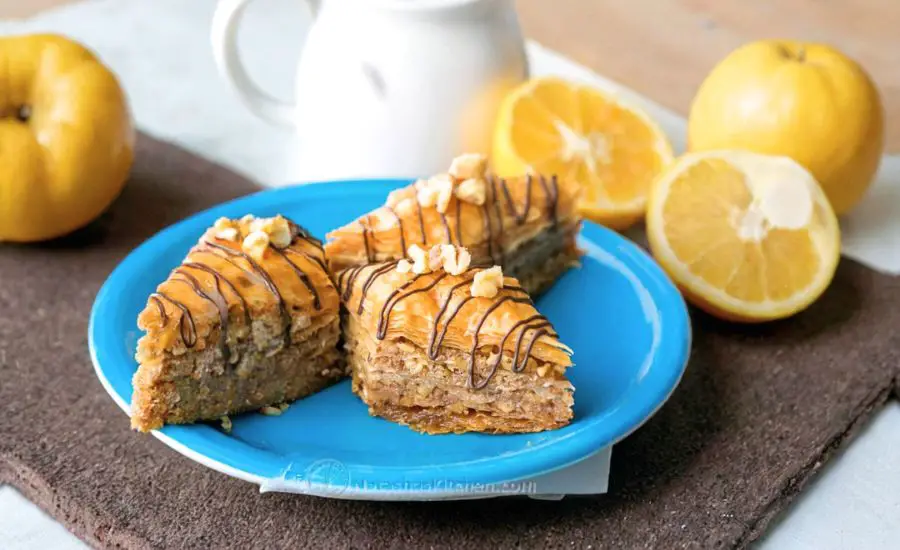
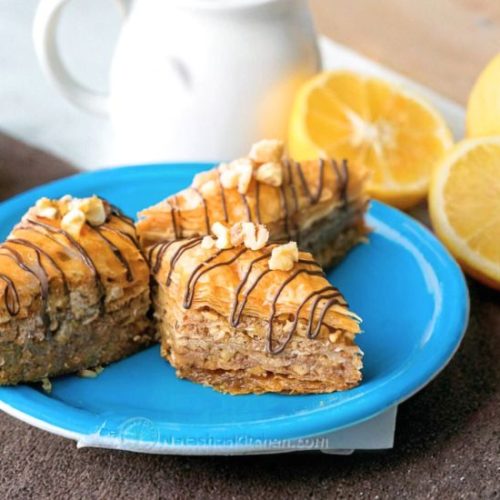
This homemade baklava recipe stands out for its perfectly balanced sweetness and delightfully flaky texture.
Unlike many store-bought versions that can be overwhelmingly sugary or soggy, this recipe achieves a tender, crisp bite thanks to the careful layering of buttered phyllo and finely chopped walnuts combined with a honey-lemon syrup that’s vibrant but not overpowering.
Health-wise, baklava offers a good dose of plant-based protein and healthy fats from walnuts, which are rich in omega-3 fatty acids and fiber.
Although it is an indulgent dessert, the moderate use of sugar and natural honey keeps it from being cloyingly sweet.
This recipe shines as a rewarding yet approachable treat for special occasions or meal prep when you want an impressive dessert that holds well at room temperature.
While it requires some time and patience, the straightforward steps and wholesome ingredients make it accessible for everyday bakers looking to elevate their dessert game.
Must-Have Tools for Perfect Results:
13×9 Non-Stick Baking Pan
Essential for even baking and easy cleanup, this pan perfectly fits the layered phyllo sheets, ensuring crisp edges and uniform cooking. Its non-stick surface helps the delicate baklava release effortlessly after baking.
Food Processor
Quickly pulses walnuts to the ideal coarseness, saving time and ensuring even nut texture. This versatile tool is invaluable for chopping, pureeing, and mixing in countless kitchen tasks beyond baklava.
Pastry Brush
Crucial for evenly coating each phyllo sheet with melted butter, preventing dryness and promoting flakiness. A good quality brush makes butter application smooth and precise, useful for many baked goods.
Medium Saucepan
Used to prepare the honey-lemon syrup with precise heat control. A sturdy saucepan is indispensable for making syrups, sauces, and reducing liquids efficiently.
Sharp Chef’s Knife
For cutting baklava into neat diamond shapes before baking. A sharp knife ensures clean cuts without tearing the fragile phyllo layers and is a kitchen staple for all slicing tasks.
Baklava
Equipment
- 1 Non-stick 13×9 inch baking pan
- 1 Food processor
- 1 Pastry Brush
- 1 Medium saucepan
- 1 Sharp Chef’s Knife
Ingredients
- 16 ounces phyllo dough thawed according to package instructions
- 1 ¼ cups 10 ounces unsalted butter, melted
- 1 pound walnuts finely chopped (about 4 1/4 cups)
- 1 teaspoon ground cinnamon
- 1 cup granulated sugar
- ½ cup honey
- ¾ cup water
- 2 tablespoons fresh lemon juice about half a lemon
- Optional: melted chocolate chips and extra chopped walnuts for garnish
Instructions
- Prepare the Phyllo Dough: Begin by thawing the phyllo dough as directed on the packaging, ideally overnight in the refrigerator. Before assembling, bring the dough to room temperature by leaving it on the counter for about an hour. Trim the sheets to fit your 13×9-inch baking dish. Keep the unused sheets covered with a damp towel to prevent drying out.
- Butter the Baking Pan: Using melted butter, generously coat the bottom and sides of your non-stick baking dish. This step helps prevent sticking and contributes to the crispness of the final baklava.
- Make the Honey-Lemon Syrup: In a medium saucepan, combine sugar, honey, lemon juice, and water. Bring the mixture to a boil over medium-high heat, stirring until the sugar dissolves completely. Then reduce the heat to medium-low and let it simmer gently without stirring for 4 minutes. Remove from heat and allow the syrup to cool while you prepare the baklava layers.
- Prepare the Nut Filling: Pulse the walnuts in a food processor about 10 times or chop finely by hand until coarsely ground. Transfer to a bowl and mix in the ground cinnamon until well combined.
- Layer the Phyllo and Nuts: Start by placing 10 sheets of phyllo dough into the baking dish, brushing each sheet lightly with melted butter before adding the next. Spread approximately 3/4 cup of the walnut mixture evenly over the layered phyllo. Then add 5 more buttered phyllo sheets on top. Repeat this process of layering nuts and phyllo sheets four times, finishing with a final layer of 10 buttered phyllo sheets on top. Brush the surface generously with butter.
- Score the Baklava: Using a sharp knife, carefully cut the layered pastry into 1.5-inch wide strips, then slice diagonally to create diamond-shaped pieces. This scoring will help the baklava bake evenly and make serving easier.
- Bake to Golden Perfection: Place the baklava in a preheated oven at 325°F (163°C) and bake for about 1 hour and 15 minutes, or until the top is golden brown and crisp.
- Add the Syrup: Once removed from the oven, immediately pour the cooled honey-lemon syrup evenly over the hot baklava. The sizzling sound confirms that the syrup is soaking into the layers, keeping the pastry crisp rather than soggy.
- Cool and Serve: Allow the baklava to cool completely at room temperature, uncovered. For optimal flavor and texture, let it rest for 4 to 6 hours or overnight, allowing the syrup to fully permeate the layers. Optionally, garnish with extra chopped walnuts or drizzle with melted chocolate before serving.
Notes
- Layering is Key: Ensure each phyllo sheet is brushed with melted butter to achieve that signature flaky texture and prevent dryness.
- Keep Phyllo Covered: Always keep unused phyllo sheets under a damp cloth to avoid cracking or drying out.
- Syrup Timing: Pour syrup over the baklava while it’s hot for the best texture contrast between crisp pastry and sweet, moist filling.
- Storage Tips: Store baklava at room temperature covered loosely with a clean tea towel for up to two weeks—avoid refrigeration as it can soften the crispness.
- Serving Suggestion: For an elegant touch, drizzle with melted chocolate or sprinkle extra chopped walnuts just before serving.
Chef’s Secrets for Flaky Baklava Success
The key to making perfect baklava lies in layering and moisture control.
Always brush each phyllo sheet generously with melted butter—this creates the signature flaky texture and prevents the delicate sheets from drying or cracking.
Keep unused phyllo covered with a damp towel throughout assembly to maintain pliability.
The nut mixture should be finely chopped but not powdered, preserving some texture and bite.
When it comes to the syrup, letting it cool completely before pouring over hot baklava is essential to avoid sogginess; the contrast between hot pastry and cool syrup locks in crispness while infusing flavor.
Scoring the baklava before baking ensures even cooking and neat serving pieces.
Patience is your friend here—letting the finished baklava rest for several hours or overnight allows the syrup to penetrate fully, mellowing the sweetness and softening the layers just right.
Serving Suggestions to Impress Guests
Baklava is a wonderfully versatile dessert that pairs beautifully with a variety of beverages and accompaniments.
Serve it alongside a strong, freshly brewed coffee or rich Turkish tea to balance the sweetness with a hint of bitterness.
For festive occasions, consider garnishing each piece with a sprinkle of finely chopped pistachios or a light drizzle of melted dark chocolate to add depth and visual appeal.
Baklava also works well as a part of a dessert platter, paired with fresh fruit like figs or citrus slices to add brightness.
For a decadent touch, serve slightly warmed with a dollop of lightly whipped cream or a scoop of vanilla ice cream to complement its crunchy layers and honeyed syrup.
Storage Tips for Maintaining Freshness
To keep your baklava tasting fresh and crisp, store it at room temperature covered loosely with a clean kitchen towel or parchment paper.
Avoid sealing it in an airtight container, which can trap moisture and soften the phyllo layers.
Properly stored, baklava can stay fresh for up to two weeks, making it an excellent make-ahead dessert.
If you live in a particularly humid environment, consider storing baklava in a cool, dry place but avoid refrigeration, as the cold can cause the butter to harden and the pastry to lose its crispness.
When ready to serve, you can briefly warm baklava in a low oven to refresh its flaky texture.
Frequently Asked Questions About Baklava
1. Can I use other nuts besides walnuts?
Absolutely! Pistachios, almonds, or a mix of nuts work wonderfully. Just make sure to finely chop them to maintain texture and blend well with the spices.
2. How long does baklava last once made?
Stored properly at room temperature, baklava stays fresh and crisp for up to two weeks. Avoid refrigeration to keep the phyllo layers flaky.
3. Can I make baklava ahead of time?
Yes! Baklava actually tastes better after sitting for several hours or overnight, allowing the syrup to soak in and flavors to meld perfectly.
4. How do I prevent phyllo dough from drying out?
Keep unused sheets covered with a damp kitchen towel while assembling. Work quickly and avoid exposing phyllo to air for too long.
5. Is there a way to make baklava less sweet?
You can reduce the sugar in the syrup slightly or increase the lemon juice for a brighter, tangier flavor, balancing sweetness with acidity.
This recipe is inspired by natashaskitchen and has been carefully refined to enhance clarity, streamline preparation steps, and ensure accurate results. We’ve also included health benefits, nutritional highlights, and Must-Have Tools to help you get the best results every time you cook.
