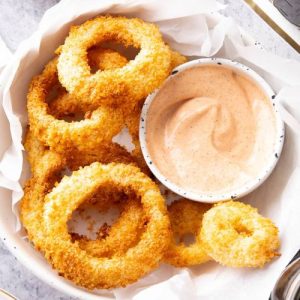
Crispy, golden, and irresistibly flavorful, these Air Fryer Onion Rings are a healthier twist on a classic favorite.
Using minimal oil and panko crumbs, they deliver a satisfying crunch without the extra calories.
High in fiber and low in saturated fat, they’re perfect for quick weeknight snacks, appetizers, or meal prep.
Enjoy a guilt-free indulgence that’s both easy to make and utterly addictive.
Air Fryer Onion Rings
Equipment
- 1 Air Fryer
- 3 Shallow Mixing Bowls
- Measuring spoons
- Whisk
- Nonstick
Ingredients
Onion:
- 1 medium-large sweet onion about 250g, sliced into ½-inch rings
Dry Mixture:
- ½ cup all-purpose flour
- 1 tsp salt
- ½ tsp paprika
- ½ tsp garlic powder optional
- ½ tsp onion powder optional
- Pinch cayenne pepper optional
Egg Mixture:
- ⅔ cup buttermilk
- 2 large eggs
Bread Crumb Mixture:
- 1 ½ cups panko bread crumbs
- 1 tbsp olive oil or vegetable oil
Other:
- Nonstick spray for air fryer basket
- Seasoned salt or garlic salt for sprinkling
- Dipping sauces such as onion ring sauce BBQ, garlic aioli, or tartar sauce
Instructions
- Prepare the Onion Rings: Peel the sweet onion and trim both ends. Slice the onion horizontally into ½-inch thick rounds.Gently separate each round into individual rings, keeping them intact as much as possible. This ensures the rings hold their shape while cooking. Set them aside on a clean plate, ready for the coating process. Handling them carefully now will make for a visually appealing and evenly cooked final result.
- Mix the Dry Coating: In a shallow bowl, combine ½ cup flour, 1 teaspoon salt, ½ teaspoon paprika, ½ teaspoon garlic powder (optional), ½ teaspoon onion powder (optional), and a pinch of cayenne (optional). Whisk thoroughly until the ingredients are evenly blended. This seasoned flour forms the first layer of coating, adding a subtle kick of flavor and helping the batter stick to the onions during the subsequent steps.
- Prepare the Wet Egg Mixture: In a second shallow bowl, whisk together 2/3 cup buttermilk and 2 large eggs until smooth and uniform. The buttermilk tenderizes the onion rings, while the eggs help the coatings adhere evenly. Make sure there are no streaks of egg or buttermilk left unblended, as a consistent mixture ensures a perfect bond between the onion and the breading.
- Prepare the Bread Crumb Mixture: In a third shallow bowl, mix 1 ½ cups panko bread crumbs with 1 tablespoon olive or vegetable oil. Stir until the oil is evenly distributed throughout the crumbs. This coating will provide the signature golden-brown crunch without overloading the onion rings with oil, making them lighter, crispier, and more enjoyable.
- Coat the Onion Rings – First Dip: Take one onion ring at a time and submerge it fully in the egg mixture, ensuring it is evenly coated. Gently tap the ring against the side of the bowl to remove excess liquid. This step prevents clumps of wet mixture from forming, which could lead to uneven breading during cooking.
- Coat the Onion Rings – Dry Layer: Immediately place the egg-coated onion ring into the seasoned flour mixture. Turn it gently so that every surface is covered. Shake off any excess flour to avoid a thick, heavy crust. This layer provides structure and flavor, giving the onion rings a sturdy base for the next coatings.
- Coat the Onion Rings – Second Wet Layer: Dip the flour-coated ring back into the egg mixture. This second wet layer ensures the bread crumbs stick properly and creates an even, cohesive coating. It also prevents the crumbs from falling off during air frying, resulting in a perfectly crunchy exterior.
- Coat the Onion Rings – Final Bread Crumb Layer: Transfer the ring into the panko mixture and press gently so that the crumbs adhere evenly on all sides.Place the finished ring on a plate in a single layer. Repeat this multi-step coating process for all onion rings, making sure none overlap. This method guarantees every ring will have a consistent golden crust.
- Preheat the Air Fryer: Preheat your air fryer to 350°F (175°C) for 3–5 minutes. Preheating ensures that the onion rings begin crisping immediately when placed inside and prevents them from becoming soggy. A properly preheated air fryer guarantees even cooking and a perfect crunchy texture.
- Arrange Onion Rings in the Air Fryer: Place a single layer of coated onion rings in the basket, spacing them evenly so they are not touching. This allows hot air to circulate around each ring, ensuring uniform crispiness. Lightly spray the tops with nonstick cooking spray to enhance golden browning. Overcrowding the basket will reduce crispiness, so cook in batches if necessary.
- Air Fry the Onion Rings – First Side: Cook at 350°F for 10 minutes. The rings should begin to turn golden brown around the edges. The circulating hot air crisps the panko crumbs while gently cooking the onions inside. Keep an eye on them to avoid overcooking or burning, as air fryers may vary slightly in temperature.
- Flip and Finish Cooking: After 10 minutes, carefully flip each onion ring using tongs. Spray lightly with nonstick spray again to help the second side achieve the same golden-brown color. Cook for an additional 3–5 minutes, checking for deep golden crispiness and ensuring the onions are tender inside.
- Season the Onion Rings: Immediately after removing from the air fryer, sprinkle with seasoned salt or garlic salt while they are still hot. This step allows the seasoning to adhere better and intensifies the overall flavor. Adjust seasoning to taste for maximum satisfaction.
- Serve and Enjoy: Transfer the crispy onion rings to a serving plate and serve immediately with your choice of dipping sauces, such as BBQ, garlic aioli, tartar sauce, or a classic onion ring sauce. Enjoy them fresh for the ultimate crunch. Leftovers can be cooled and stored in an airtight container for reheating later.
- Optional Storage Tip: To store, let the onion rings cool completely, then place them in a freezer-safe airtight container. They can be frozen for 1–3 months. Reheat in the air fryer to restore crispiness, making them a convenient make-ahead snack or side dish.
Notes
- Use sweet onions for natural sweetness and crisp texture.
- Slice onions evenly to ensure all rings cook at the same rate.
- Optional spices like garlic powder, onion powder, and cayenne can be adjusted to taste.
- Don’t overcrowd the air fryer basket—cook in batches for best crispiness.
- Lightly spraying the coated rings with oil helps achieve a golden, crunchy exterior.
- For extra crunch, use panko breadcrumbs instead of regular breadcrumbs.
- Serve immediately for the best texture; reheated onion rings may be slightly less crispy.
Chef’s Secrets For Perfect Rings
To achieve the ultimate crispy and golden onion rings, preparation is key.
Start by slicing the onions evenly—about ½ inch thick—so they cook uniformly.
The multi-layer coating method, alternating between wet and dry ingredients, ensures a perfect crust that sticks without falling off.
Using panko bread crumbs mixed with a little oil guarantees a light, crunchy texture that air frying alone might not fully achieve.
Preheating the air fryer is another secret step that prevents soggy rings, giving them that coveted crisp.
Lastly, handling the rings gently throughout the coating and cooking process preserves their shape and ensures each bite is tender on the inside and perfectly crunchy on the outside.
Serving Suggestions To Impress Guests
These Air Fryer Onion Rings are wonderfully versatile and pair beautifully with a variety of dips and meals.
Serve them as a side with classic burgers, grilled chicken, or fish for a crunchy complement.
For parties or casual gatherings, plate them in a basket lined with parchment paper and offer a trio of sauces such as tangy BBQ, creamy garlic aioli, and zesty tartar sauce.
They also work as a snack on their own, making them perfect for movie nights or game day.
For a fun twist, sprinkle some fresh herbs like parsley or chives over the hot rings just before serving to elevate the presentation and add a subtle flavor boost.
Storage Tips For Maintaining Freshness
To keep your onion rings crisp and flavorful, allow them to cool completely before storing.
For short-term storage, place them in an airtight container in the refrigerator for up to 2 days.
Reheat in the air fryer for 2–3 minutes at 350°F to restore their crunch.
For long-term storage, freeze the cooled rings in a single layer on a baking sheet, then transfer to a freezer-safe container or bag.
They can last 1–3 months in the freezer.
Avoid microwaving, as it can make the coating soggy; the air fryer or oven method is always preferable to maintain crispiness.
Frequently Asked Questions
1. Can I use regular breadcrumbs instead of panko?
Yes, but panko breadcrumbs are recommended for a lighter, crunchier texture. Regular breadcrumbs tend to create a denser coating and may absorb more oil, resulting in slightly less crispiness.
If using regular breadcrumbs, consider toasting them lightly in a pan or mixing with a small amount of oil to improve crunch.
2. Can I make this recipe vegan?
Absolutely! Replace the eggs and buttermilk with plant-based alternatives such as unsweetened almond milk or oat milk mixed with a teaspoon of vinegar, and use a flax or chia “egg” as a binder.
The panko coating will still crisp beautifully in the air fryer.
3. How do I prevent the onion rings from sticking together?
Ensure the rings are spaced apart in the air fryer basket, with a little room between each. Coating each ring evenly with the multi-step wet and dry layers also helps prevent clumping.
If cooking multiple batches, let the first batch cool slightly before stacking to avoid sticking.
4. Can I prepare onion rings ahead of time?
Yes! You can coat the onion rings in advance and refrigerate them for up to a few hours before air frying. For longer storage, freeze the fully coated rings on a baking sheet first, then transfer to a freezer-safe container.
Cook directly from frozen, adding an extra 2–3 minutes to ensure thorough crisping.
5. Why aren’t my onion rings crispy?
Common reasons include overcrowding the air fryer basket, insufficient preheating, or skipping the oil spray step. Make sure the rings are in a single layer with space to circulate, preheat the air fryer, and lightly spray the rings before cooking.
Using panko breadcrumbs and following the multi-step coating method also makes a significant difference in crispiness.
