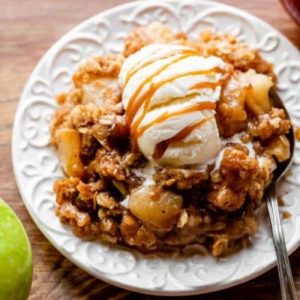
This apple crisp blends tender, cinnamon-spiced apples with a crunchy oat and brown sugar topping, creating a comforting dessert that’s naturally fiber-rich and packed with whole grains.
With good fats from butter and protein from oats, it’s a balanced treat perfect for everyday baking.
Quick to assemble and versatile, it works beautifully for weeknight desserts or meal-prep-friendly servings.
Classic Apple Crisp
Equipment
- 1 × 9×13-inch baking pan (or 3.5–4 qt baking dish)
- 1 × Large mixing bowl
- 1 × Medium mixing bowl
- 1 × Whisk
- 1 × pastry cutter or fork
- 1 × Vegetable Peeler
- 1 × Cooling Rack
Ingredients
Filling:
- 8 medium apples peeled and cut into 1-inch chunks (approx. 10 cups / 1200g)
- ½ cup 100g packed brown sugar (light or dark)
- ¼ cup 31g all-purpose flour
- 1 tsp pure vanilla extract
- 1 tsp ground cinnamon
- ½ tsp ground nutmeg
- ¼ tsp salt
Topping:
- ¾ cup 94g all-purpose flour
- ¾ cup 150g packed brown sugar (light or dark)
- 1 tsp ground cinnamon
- ½ cup 113g / 8 Tbsp unsalted butter, cold and cubed
- 1 cup 85g old-fashioned rolled oats
Optional Serving:
- Salted caramel
- Vanilla ice cream
Instructions
- Preheat and Prepare: Begin by preheating your oven to 350°F (177°C). Lightly grease a 9×13-inch baking pan with butter or cooking spray to prevent sticking. You can also use any baking dish around 3.5–4 quarts. Preparing the pan first ensures that the filling and topping won’t stick and makes cleanup easier. Set the pan aside while you prepare the filling and topping.
- Prepare the Apples (Filling Base): Peel, core, and cut 8 medium apples into roughly 1-inch chunks. The chunks should be thick enough to hold their shape during baking, around ¼–½ inch thick. Place the apple pieces in a large mixing bowl. This is the heart of your crisp, providing natural sweetness, fiber, and moisture.
- Mix the Apple Filling: Add ½ cup (100g) packed brown sugar, ¼ cup (31g) all-purpose flour, 1 teaspoon pure vanilla extract, 1 teaspoon ground cinnamon, ½ teaspoon ground nutmeg, and ¼ teaspoon salt to the apples. Use a large spoon or spatula to gently toss the mixture until each apple piece is evenly coated with sugar, spices, and flour. The flour helps thicken the natural juices released during baking, while the cinnamon and nutmeg add warmth and aroma.
- Transfer Filling to the Pan: Once mixed, evenly spread the apple mixture into the prepared baking dish. Smooth the top slightly with the back of a spoon to create an even layer. This ensures that the topping will sit uniformly and bake evenly, resulting in a consistent texture throughout the crisp.
- Prepare the Topping (Crumble Creation): In a medium mixing bowl, whisk together ¾ cup (94g) all-purpose flour, ¾ cup (150g) packed brown sugar, and 1 teaspoon ground cinnamon. Make sure the ingredients are thoroughly combined, creating a uniform base for your crumble topping.
- Incorporate the Butter: Cut ½ cup (113g / 8 Tbsp) cold, cubed unsalted butter into the flour-sugar mixture. Use a pastry cutter, fork, or your fingertips to rub the butter into the dry ingredients until the mixture forms coarse crumbs. The butter should remain in small chunks, which will melt in the oven to create a rich, golden, and slightly crispy topping.
- Add the Oats: Stir in 1 cup (85g) old-fashioned rolled oats into the crumbly butter mixture.The oats add a delightful chewiness and whole-grain goodness, giving the crisp its signature texture. Mix gently so that the oats are evenly distributed without breaking them down too much.
- Sprinkle Topping over Apples: Evenly scatter the oat crumble mixture over the apple filling in the pan. Press lightly with your fingers or the back of a spoon to ensure that some crumbs adhere to the apples, but don’t compress it too much—you want the topping to stay light and crunchy as it bakes.
- Bake to Perfection: Place the baking pan in the preheated oven and bake for approximately 45 minutes. You’re looking for a golden-brown topping and bubbling apple juices around the edges. The aroma of cinnamon, nutmeg, and caramelized sugar should fill your kitchen—a sign that your crisp is perfectly baked. If the topping browns too quickly, loosely cover the pan with foil for the remaining bake time.
- Cool and Set: Remove the apple crisp from the oven and transfer it to a wire cooling rack. Let it cool for at least 5 minutes before serving. This brief resting period allows the juices to thicken slightly, preventing the dessert from being too runny while still staying moist and tender.
- Serve and Enjoy: Serve warm, at room temperature, or even chilled, depending on your preference. Optionally, top with salted caramel or a scoop of vanilla ice cream for extra indulgence. Each bite should deliver a perfect balance of tender, spiced apples and buttery, crunchy oat topping.
- Store Leftovers: Cover any leftover crisp with plastic wrap or foil and store in the refrigerator for up to 5 days. You can also freeze baked apple crisp for up to 3 months. To enjoy later, thaw overnight in the refrigerator and reheat in a 350°F (177°C) oven for 30 minutes or until warmed through.
Notes
- Apple Selection: A mix of tart and sweet apples, such as Granny Smith and Pink Lady or Jazz, works best for flavor balance and texture. Avoid very soft apples that become mushy when baked.
- Oat Substitutions: Whole rolled oats are ideal for a chewy topping. Quick oats can be used as a substitute, but the topping will be slightly more powdery.
- Nuts Option: For extra crunch and flavor, stir in 1 cup of chopped pecans or walnuts into the topping before baking.
- Make-Ahead Tips: You can assemble the crisp up to step 8, cover, and refrigerate for up to 1 day before baking.
- Freezing Tips: Baked crisp can be frozen for up to 3 months. Thaw overnight in the refrigerator and reheat at 350°F (177°C) for 30 minutes. Unbaked crisp can also be frozen; allow it to thaw overnight and extend bake time slightly.
- Topping Texture: Do not reduce flour in the topping; it prevents greasiness and ensures a golden, crunchy layer.
- Half Recipe Option: To make a smaller batch, halve all ingredients and use a 9-inch square or round baking dish. Reduce baking time to 30–35 minutes.
Chef’s Secrets For Perfect Crisp
Achieving the perfect apple crisp is all about balance and technique.
Start by cutting apples into uniform chunks to ensure even cooking.
Toss the apples with flour and sugar to thicken natural juices and enhance sweetness.
Keep the butter cold and cut it into the topping until it forms coarse crumbs—this prevents a greasy texture and creates a delightfully crunchy topping.
Using a mix of tart and sweet apples adds depth of flavor, while sprinkling a pinch of extra cinnamon over the top just before baking enhances aroma and visual appeal.
Finally, resist the temptation to overbake—the topping should be golden brown, and the filling should remain juicy, not dry.
Serving Suggestions For Maximum Enjoyment
Apple crisp is incredibly versatile and can be served in many ways.
Enjoy it warm straight from the oven for a comforting, cozy dessert, or allow it to cool slightly for a firmer texture that’s perfect for plating.
For an indulgent treat, top with a scoop of vanilla ice cream or drizzle with salted caramel sauce.
You can also pair it with whipped cream or Greek yogurt for a lighter option.
This dessert works beautifully for casual weeknight dinners, special holiday gatherings, or even brunch, and leftovers can be reheated for a quick sweet snack any time.
Storage Tips For Long-Lasting Crisp
To keep your apple crisp fresh, cover the cooled dessert tightly with plastic wrap or aluminum foil and store it in the refrigerator for up to 5 days.
For longer-term storage, freeze baked crisp in a freezer-safe container for up to 3 months.
If freezing unbaked, prepare the crisp completely and cover tightly, then thaw overnight in the refrigerator before baking.
When reheating, cover with foil for the first 20 minutes to prevent the topping from over-browning.
Proper storage ensures that the topping stays crisp and the apple filling remains juicy, so your dessert tastes fresh every time.
Frequently Asked Questions
1. Can I use frozen apples instead of fresh?
Yes, but make sure to thaw and drain any excess liquid first. Frozen apples release more moisture, so toss them with extra flour to prevent a watery filling.
2. Can I make this recipe vegan?
Absolutely! Substitute butter with coconut oil or a plant-based vegan butter. The topping may be slightly less rich, but it will still achieve a crisp texture.
3. Can I use a different sweetener instead of brown sugar?
Yes, coconut sugar, maple sugar, or even a blend of granulated sugar and honey can work. Adjust sweetness to taste, keeping in mind that brown sugar adds moisture and depth of flavor.
4. How do I prevent the topping from getting soggy?
Use cold butter cut into coarse crumbs and avoid pressing the topping too firmly onto the apples. Baking uncovered ensures a golden, crunchy texture.
5. Can I add other fruits?
Certainly! Pears, peaches, or berries can be combined with apples for variety. Adjust sugar and spices according to the sweetness and flavor of additional fruits to maintain balance.
