All products are selected by our editorial team for quality. If you buy through our links, we may earn a small commission at no extra cost to you.
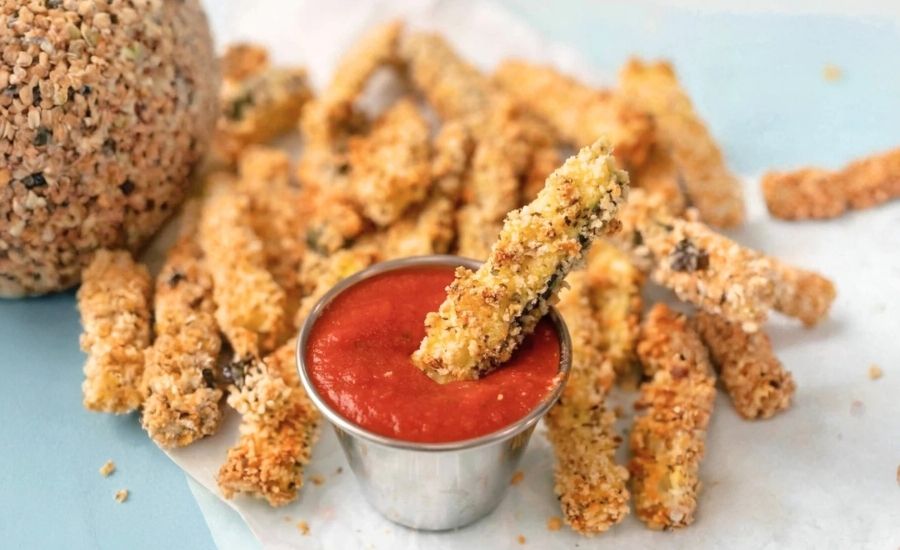
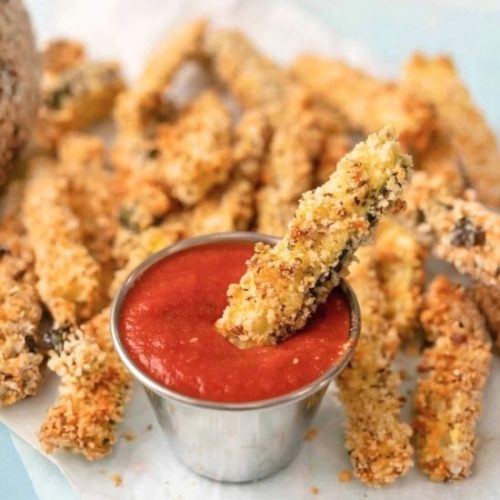
Baked Zucchini Fries are a nutritious, crave-worthy twist on traditional fried sides—light, crispy, and packed with flavor.
This recipe turns a common summer veggie into a crunchy treat using minimal oil and no deep frying.
Each serving delivers just 165 calories, with 9g of protein, 3g of fiber, and only 5g of fat, making it a great high-volume, low-calorie snack.
The Parmesan and Italian seasoning give these fries an herby, cheesy depth, while the panko creates that satisfying crunch.
As a bonus, it’s low in saturated fat, making it heart-friendly and great for those watching their fat intake.
It’s also vegetarian-friendly and can be easily adapted for meal prep or a quick weeknight side.
The use of whole ingredients and oven-baking method keeps it clean, light, and satisfying—perfect for health-conscious snackers and veggie lovers alike.
Must-Have Tools for Perfect Results
Enamelware Sheet Pan
This sturdy, warp-resistant baking sheet promotes even heat distribution for perfectly crisp zucchini fries. Its enamel coating makes cleanup a breeze, especially with baked-on cheese and breadcrumbs.
Wire Cooling Racks
Placed over the sheet pan, these racks lift the fries off the surface, allowing hot air to circulate for a uniformly crispy finish without flipping. Also ideal for roasting or glazing baked goods.
Chef’s Knife
Essential for cutting zucchini into uniform matchsticks, a sharp chef’s knife ensures clean, even slices that cook evenly. A reliable tool for daily chopping, slicing, and dicing needs.
Mixing Bowls (Set of 3)
Used for preparing the egg wash, breadcrumb mix, and tossing the zucchini in flour. A quality nesting bowl set is invaluable for prep work in any home kitchen.
Silicone Baking Mat (optional)
Though not used directly in this recipe, lining the pan under the wire rack helps catch crumbs and makes cleanup easier. Reusable and eco-friendly.
Baked Zucchini Fries
Equipment
- 1 Enamelware Sheet Pan
- 1–2 Wire Cooling Racks
- 1 Chef’s knife
- 3 Mixing Bowls
- 1 Measuring Spoon Set
Ingredients
- 1 pound zucchini approximately 2 medium
- 2 large eggs
- 1 cup panko breadcrumbs
- ¼ cup grated Parmesan cheese
- 1 tablespoon Italian seasoning blend
- ½ teaspoon salt divided
- 2 tablespoons all-purpose flour
- ½ cup pizza sauce for dipping
Instructions
- Prep the Oven and Zucchini: Preheat your oven to 425°F (220°C). While it heats, rinse and dry the zucchini. Cut each zucchini into uniform matchstick-sized pieces—about ½ inch wide and 3 inches long. This ensures even baking and a crispy texture.
- Make the Coating Mixtures: Crack the eggs into a shallow bowl and beat them well. In a separate bowl, mix together the panko breadcrumbs, Parmesan cheese, Italian seasoning, and ¼ teaspoon salt. Stir until evenly combined and set aside.
- Dust the Zucchini with Flour: Place the sliced zucchini into a large bowl. Sprinkle the flour and the remaining ¼ teaspoon salt over the zucchini. Gently toss until all pieces are lightly coated. This helps the egg stick to the zucchini better.
- Bread the Zucchini Fries: Set up a breading station: one bowl with egg, one with the breadcrumb mixture. Working a few pieces at a time, dip the floured zucchini sticks into the egg, letting excess drip off. Then, press them into the breadcrumb mixture to coat all sides thoroughly.
- Arrange for Even Crisping: Place a wire cooling rack on top of a large rimmed baking sheet. Arrange the breaded zucchini sticks in a single layer on the rack, spacing them slightly apart. This setup allows hot air to circulate around the fries, making them crisp on all sides without turning.
- Bake to Golden Perfection: Transfer the tray to the preheated oven. Bake for 20 minutes, or until the coating is golden brown and crispy. No flipping required, thanks to the elevated rack.
- Serve with Dipping Sauce: Remove the fries from the oven and serve immediately while hot and crisp. Pair them with warm pizza sauce for a deliciously tangy dip.
Notes
- Uniform Cuts Matter: Cutting the zucchini evenly ensures consistent baking and prevents undercooked or mushy pieces.
- Use Fine Grated Parmesan: Finely grated cheese clings better to the breadcrumbs, helping with even browning and better flavor.
- Rack-Free Option: If you don’t have a wire rack, place the fries directly on a parchment-lined baking sheet and flip them halfway through baking.
- Make It Gluten-Free: Swap the panko and all-purpose flour for gluten-free alternatives to accommodate dietary needs.
- Crispier Texture Tip: Lightly toast the panko breadcrumbs in a skillet for 2–3 minutes before breading for an even crunchier finish.
Chef’s Secrets for Crispy Success
The key to getting crispy, oven-baked zucchini fries lies in a few smart techniques.
First, make sure to cut the zucchini uniformly—this ensures even baking and avoids some fries being undercooked while others get too soft.
Second, don’t skip the flour dusting step—it helps the egg adhere better, which in turn makes the breadcrumb coating stick more effectively.
Using a wire rack over a baking sheet is another game-changer.
It allows hot air to circulate all around the zucchini, preventing any soggy bottoms and ensuring a crisp finish.
For an extra golden crunch, you can lightly toast the panko breadcrumbs in a dry skillet for 2–3 minutes before breading.
And always serve these fries fresh from the oven—zucchini holds moisture, so they’re at their crispiest when hot.
Serving Suggestions for Any Occasion
These zucchini fries are incredibly versatile.
They make a fantastic appetizer, snack, or side dish, especially when paired with classic pizza sauce or your favorite marinara.
For a Mediterranean twist, serve them with garlic yogurt dip or tzatziki. They’re a fun alternative to traditional fries and pair beautifully with grilled meats, veggie burgers, or pasta dishes.
Hosting a party? Arrange them on a platter with a trio of dips—like ranch, spicy aioli, and pesto—for an easy crowd-pleaser.
You can even serve them over a salad for added crunch or alongside a soup or sandwich for a complete, balanced meal.
Storage Tips for Fresher Leftovers
While zucchini fries are best enjoyed fresh, you can store leftovers if needed.
Let them cool completely before transferring to an airtight container lined with paper towels to absorb excess moisture.
They’ll keep in the refrigerator for up to 2 days, but be aware that they’ll lose some of their crispness.
To reheat, skip the microwave and instead warm them in a 375°F (190°C) oven for 5–7 minutes or in an air fryer for a quicker crisp-up.
Freezing is not recommended due to the high water content in zucchini, which can make them mushy upon thawing.
Frequently Asked Questions Answered
1. Can I make these gluten-free?
Yes! Simply substitute the all-purpose flour and panko breadcrumbs with gluten-free versions. There are excellent gluten-free panko brands available that still offer a crispy finish.
2. Why are my zucchini fries soggy?
Sogginess usually happens when the zucchini releases too much water. Avoid overbaking and make sure to use a wire rack. Also, don’t crowd the fries on the pan—give them space so they bake, not steam.
3. Can I air fry these instead of baking?
Absolutely! Place the breaded zucchini in a single layer in your air fryer basket and cook at 400°F for about 10–12 minutes, shaking halfway through. You’ll get an even crispier result with less time.
4. What other sauces go well with this?
Besides pizza sauce, try ranch, chipotle mayo, garlic aioli, honey mustard, or even a spicy sriracha dip. The neutral flavor of zucchini pairs well with bold and creamy sauces.
5. Can I prepare them in advance?
You can slice the zucchini and prepare the breading mixture a few hours in advance. However, it’s best to bread and bake right before serving to maintain maximum crispness. Pre-breaded fries tend to get soggy if left sitting too long.
This recipe is inspired by budgetbytes and has been carefully refined to enhance clarity, streamline preparation steps, and ensure accurate results. We’ve also included health benefits, nutritional highlights, and Must-Have Tools to help you get the best results every time you cook.
