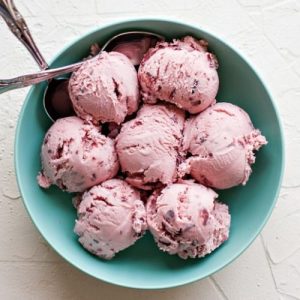
Indulge in this creamy Black Cherry Ice Cream, bursting with natural cherry flavor and velvety texture—no cooking or egg yolks required!
Made with wholesome ingredients like fresh cherries, whole milk, and rich cream, it’s high in protein and provides healthy fats while keeping sugar content balanced.
Quick to prepare and freezer-friendly, it’s a satisfying, nutrient-rich treat perfect for everyday enjoyment or summer dessert cravings.
Quick & Creamy Black Cherry Ice Cream
Equipment
- 1 medium mixing bowl
- 1 large mixing bowl
- 1 Food Processor or Blender
- 1 Whisk
- 1 Ice Cream Maker
- 1 Airtight Freezer-Safe Container
Ingredients
- 3 cups fresh or frozen cherries pitted
- 1 cup granulated sugar divided
- 2 tablespoons lemon juice
- ¾ cup whole milk
- 2¼ cups heavy whipping cream
- 1 teaspoon vanilla extract
Instructions
- Prepare the Cherries: Start by washing your fresh cherries thoroughly under cold water.If using frozen cherries, allow them to thaw slightly. Remove the pits carefully using a cherry pitter or small knife. Once pitted, place the cherries in a food processor or blender. Pulse gently until the cherries are finely chopped, but not completely pureed—you want small chunks that will give the ice cream texture. This ensures each bite has bursts of natural cherry flavor.
- Macerate the Cherries: Transfer the chopped cherries into a medium-sized mixing bowl. Sprinkle ⅓ cup of the sugar over them, followed by 2 tablespoons of fresh lemon juice. Gently stir to coat all the cherry pieces evenly. Let the mixture sit at room temperature for 20–30 minutes. This maceration process helps draw out the cherries’ natural juices and intensifies their flavor, while also keeping them tender so they won’t freeze rock-hard in your ice cream.
- Combine Sugar and Milk: In a large mixing bowl, add the remaining ⅔ cup of sugar to ¾ cup of whole milk. Whisk the mixture vigorously until the sugar is completely dissolved. This step ensures that there are no grainy sugar crystals in your final ice cream, giving it a smooth and creamy base. Taking a little extra time here makes a noticeable difference in texture.
- Add Cream and Flavoring: Pour 2¼ cups of heavy whipping cream into the milk-sugar mixture. Add 1 teaspoon of vanilla extract to enhance the overall flavor. Use a whisk to gently but thoroughly blend the ingredients until the mixture is uniform. The heavy cream provides richness, smoothness, and the fat needed for a perfectly scoopable ice cream.
- Fold in the Cherries: Carefully add the macerated cherries, along with all the juice they released, into the cream mixture. Use a spatula to gently fold everything together. Take your time to ensure the cherries are evenly distributed throughout the mixture. This step is crucial because it ensures that every scoop has a balanced combination of creamy base and fruity cherry pieces.
- Chill the Mixture (Optional but Recommended): For best results, cover the bowl with plastic wrap and refrigerate the ice cream mixture for 20–30 minutes. Chilling the mixture slightly before churning helps it freeze faster and more evenly in the ice cream maker, creating a creamier texture. This step is optional, but highly recommended if you want smooth, velvety ice cream.
- Churn the Ice Cream: Prepare your ice cream maker according to the manufacturer’s instructions. Pour the chilled mixture into the machine, taking care not to overfill. Churn the ice cream for approximately 20–30 minutes, or until it reaches a soft-serve consistency. If your ice cream maker is small, you may need to churn in two separate batches. During churning, the mixture will thicken and increase in volume, turning into a creamy, dreamy ice cream base.
- Transfer to Freezer Container: Once churning is complete, transfer the soft ice cream into an airtight, freezer-safe container. Use a spatula to smooth the surface. Press a piece of parchment paper or plastic wrap directly on top of the ice cream to prevent ice crystals from forming. This careful handling preserves the texture and keeps the ice cream creamy.
- Freeze for Firmness: Place the container in the freezer for at least 2 hours, or ideally overnight, to allow the ice cream to set fully. If you prefer soft-serve consistency, you can enjoy it immediately after churning. Let the ice cream sit at room temperature for 5–10 minutes before scooping to make serving easier and to enhance the texture.
- Serve and Enjoy: Scoop the ice cream into bowls, cones, or dessert cups. Optionally, garnish with fresh cherries, chocolate drizzle, or mint leaves. Serve immediately and savor the creamy texture and natural cherry flavor. Store any leftovers in the freezer in an airtight container for up to 2–4 weeks, taking care to minimize exposure to air to prevent ice crystals.
Notes
- Macerating cherries with sugar and lemon juice helps retain their softness and natural flavor.
- Use high-quality, ripe cherries for the best taste; frozen cherries can be used if fresh aren’t available.
- Ensure the sugar is fully dissolved in the milk before adding cream for a smooth texture.
- Chill the ice cream mixture in the refrigerator for 30 minutes before churning to improve creaminess.
- This recipe can be made in two batches if your ice cream maker has limited capacity.
- Soft-serve ice cream can be enjoyed immediately, but freezing for at least 2 hours enhances firmness.
- Optional: fold in chocolate chips or grated dark chocolate for a cherry-chocolate variation.
Chef’s Secrets For Creamiest Results
Achieving perfectly creamy ice cream starts with the right balance of fat and sugar.
Using full-fat milk and heavy cream ensures a rich, smooth texture that won’t freeze too hard.
Macerating the cherries with sugar and lemon juice not only enhances their flavor but prevents them from turning icy in the freezer.
For extra creaminess, chill the base mixture for at least 30 minutes before churning.
Avoid over-churning, as this can create an overly dense texture, and always transfer the ice cream to an airtight container promptly to minimize ice crystals.
Serving Suggestions For Sweet Enjoyment
Black Cherry Ice Cream shines on its own, but pairing it with complementary flavors elevates the experience.
Serve scoops over a warm brownie, alongside a crisp cookie, or in a waffle cone for a classic treat.
Fresh mint leaves or a drizzle of dark chocolate sauce add elegance for entertaining.
For a lighter option, pair with fresh berries or a handful of toasted nuts to add texture and visual appeal.
It’s equally delightful in a sundae, milkshake, or layered dessert parfait.
Storage Tips To Maintain Freshness
Store your ice cream in an airtight container in the coldest part of your freezer, ideally toward the back.
Press a piece of parchment or plastic wrap directly onto the surface to prevent ice crystals from forming.
For optimal texture, let the ice cream sit at room temperature for 5–10 minutes before scooping.
Homemade ice cream is best enjoyed within 2 weeks, though it can safely last up to a month if stored properly.
Avoid repeated thawing and refreezing to preserve flavor and creaminess.
Frequently Asked Questions
1. Can I substitute low-fat milk?
Yes, but low-fat or skim milk increases water content, making the ice cream icier and less creamy. Using full-fat milk is recommended for a rich, scoopable texture.
2. Can I use frozen cherries instead?
Absolutely! Frozen cherries work well, though they may release extra liquid. Thaw slightly and drain excess juice before macerating to maintain the right consistency.
3. How do I keep cherries soft in ice cream?
Maceration is key—sugar and lemon juice draw out natural juices while tenderizing the cherries. This prevents them from freezing rock-hard in the final dessert.
4. Can I make this sugar-free?
Sugar substitutes can be tricky because sugar helps with freezing and texture.
Using natural sweeteners may change consistency and scoopability, so adjustments or specialized ice cream sweeteners are recommended.
5. Can I add mix-ins like chocolate?
Yes! Fold in chocolate chips, shavings, or swirls during the last few minutes of churning. Avoid adding too early, or they may sink to the bottom of the container.
