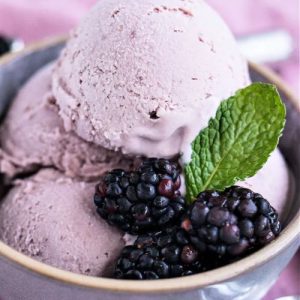
This homemade Blackberry Vanilla Ice Cream blends creamy richness with the natural sweetness of fresh blackberries, making it a refreshing yet wholesome treat.
Packed with antioxidants from blackberries, a good dose of protein from egg yolks, and healthy fats from cream, this dessert is both satisfying and nourishing.
Low in artificial ingredients and high in flavor, it’s a simple, make-ahead recipe perfect for everyday indulgence or weekend meal prep.
Blackberry Vanilla Ice Cream
Equipment
- 1 Medium saucepan
- Saucepan
- 1 Fine mesh strainer
- 1 blender (or immersion blender)
- 2 mixing bowls (medium + large)
- 1 Whisk
- 1 Ice Cream Maker
- 1 airtight storage container
Ingredients
For the ice cream base:
- 1 cup whole milk
- 2 cups heavy cream divided
- ½ cup granulated sugar
- ⅛ teaspoon salt
- 4 large egg yolks
- 2 teaspoons pure vanilla extract
For the blackberry swirl:
- 2 cups fresh blackberries
- ¼ cup granulated sugar
Instructions
- Prepare the Blackberry Purée: Place the fresh blackberries and ¼ cup of sugar into a small saucepan. Set the pan over medium heat and cook gently, stirring occasionally, until the berries soften, release their natural juices, and begin to break down. This will take about 7–8 minutes. The mixture should thicken slightly and take on a jam-like consistency. Once cooked, remove the pan from the heat. Carefully transfer the mixture to a blender or use an immersion blender to purée until completely smooth. For the best texture, pour the purée through a fine-mesh strainer into a bowl to remove the seeds. Set aside to cool.
- Heat the Dairy Base: In a medium saucepan, combine the whole milk, 1 cup of the heavy cream, ½ cup of sugar, and the pinch of salt. Stir the mixture well to dissolve the sugar. Place the pan over medium heat and warm the liquid until it is steaming but not boiling. Small bubbles will begin to form around the edges—this means it’s ready. Immediately remove from the heat to prevent scalding.
- Temper the Egg Yolks: In a separate medium mixing bowl, whisk the egg yolks until smooth and lightly golden. Slowly, and very carefully, drizzle a small amount of the warm milk mixture into the yolks while whisking constantly. This process is called tempering and prevents the eggs from scrambling. Continue adding the warm liquid little by little until about half of the milk mixture has been incorporated into the yolks.
- Cook the Custard Base: Pour the tempered yolk mixture back into the saucepan with the remaining milk and cream. Set the pan over medium heat again. Stir continuously with a heatproof spatula or wooden spoon, making sure to scrape the bottom of the pan to avoid sticking. Cook gently until the mixture thickens slightly and reaches about 170°F (77°C). The custard should coat the back of a spoon but should never come to a boil. Once it reaches the correct thickness, remove it from the heat immediately.
- Blend Custard with Blackberry Purée: Stir the cooled blackberry purée into the hot custard mixture until fully combined. The base should now have a beautiful lavender or deep purple hue with a fruity aroma.
- Strain and Add Cream: Place the remaining 1 cup of cold heavy cream into a large mixing bowl. Set a fine-mesh strainer on top.Carefully pour the custard-blackberry mixture through the strainer to catch any lumps or bits of cooked egg. Stir gently to combine the strained custard with the cold cream. Mix in the vanilla extract at this stage for a fragrant, balanced flavor.
- Chill the Ice Cream Base: Cover the bowl tightly with plastic wrap, pressing the wrap directly against the surface of the mixture to prevent a skin from forming. Place the bowl in the refrigerator and chill until the base is completely cold. This step usually takes between 4 to 6 hours, but for best results, chill overnight. The colder the base, the creamier the ice cream will be.
- Churn the Ice Cream: Once the mixture is thoroughly chilled, give it a gentle stir to make sure the blackberry purée hasn’t settled. Pour the base into your ice cream maker and churn according to the manufacturer’s instructions. The mixture will gradually thicken and transform into a soft, creamy ice cream texture within 20–25 minutes, depending on your machine.
- Freeze Until Firm: Transfer the freshly churned ice cream into an airtight freezer-safe container. Smooth the top with a spatula, then cover with a lid. For the best scoopable texture, freeze the ice cream for at least 6–8 hours or overnight until firm.
- Serve and Enjoy: When ready to serve, allow the ice cream to sit at room temperature for 2–3 minutes to soften slightly, making it easier to scoop.Enjoy in bowls, cones, or as a topping for cakes and pies. This creamy blackberry vanilla ice cream offers a luscious balance of sweet berries and smooth vanilla, making it a refreshing treat for any occasion.
Notes
- Use ripe, fresh blackberries for the best natural sweetness and vibrant color. Frozen berries can be used, but thaw and drain excess liquid first.
- When tempering the egg yolks, pour the warm milk slowly and whisk constantly to prevent scrambling.
- Straining the custard ensures a silky-smooth texture free of lumps or seeds.
- Chilling the ice cream base thoroughly before churning improves creaminess and prevents icy textures.
- For a stronger vanilla flavor, use high-quality pure vanilla extract or scrape seeds from a vanilla bean.
- If you prefer a softer ice cream, serve directly after churning; for firmer scoops, allow it to freeze fully.
- Adjust sweetness in the blackberry purée according to the berries’ natural sweetness.
Chef’s Secrets To Perfect Ice Cream
Creating creamy, velvety ice cream starts with the custard base.
Use full-fat cream and whole milk for optimal richness, and avoid boiling the mixture—steam is enough to extract flavor without curdling eggs.
Tempering the yolks slowly is essential for a smooth custard.
Straining the mixture through a fine-mesh sieve eliminates any lumps or seeds, giving your ice cream a luxurious texture.
Additionally, chilling the base thoroughly before churning helps it freeze evenly, preventing ice crystals and ensuring a soft, scoopable consistency.
Always use fresh ingredients, especially blackberries, for the brightest flavor and color.
Serving Suggestions For Maximum Enjoyment
This Blackberry Vanilla Ice Cream pairs beautifully with a variety of desserts.
Serve it alongside warm fruit cobblers, drizzled with chocolate or caramel sauce, or atop a slice of pound cake for an elegant touch.
For a refreshing summer treat, scoop into waffle cones and garnish with fresh berries or mint leaves.
It can also be layered in parfaits with granola and yogurt for breakfast or brunch indulgence.
Adding a few toasted nuts or dark chocolate shavings provides delightful texture contrasts that complement the creamy, fruity flavor.
Storage Tips For Longevity
Store the ice cream in an airtight container in the freezer to maintain its creamy texture and prevent freezer burn.
Place a layer of plastic wrap directly on the surface of the ice cream before sealing the lid to minimize ice crystals.
Homemade ice cream is best consumed within 1–2 weeks, although it can last up to a month if stored properly.
If the ice cream becomes too firm, allow it to sit at room temperature for 5–10 minutes before scooping to soften slightly.
Avoid repeated thawing and refreezing, as this can alter texture and flavor.
Frequently Asked Questions
1. Can I use frozen blackberries instead of fresh?
Yes, frozen blackberries work well, but make sure to thaw them completely and drain excess liquid.
This ensures the purée doesn’t dilute the custard and maintains a rich, creamy consistency.
2. Can I make this recipe dairy-free or vegan?
You can substitute full-fat coconut milk and coconut cream for the dairy, and use a plant-based egg replacer like aquafaba or a cornstarch-thickened mixture.
Keep in mind the flavor and texture may vary slightly from the classic version.
3. How do I prevent ice crystals in my ice cream?
Chill the custard base completely before churning, and avoid overfilling the ice cream maker.
Straining the base and using high-fat dairy helps achieve a smooth texture. Proper airtight storage also prevents ice crystals from forming during freezing.
4. Can I add mix-ins like chocolate or nuts?
Absolutely! Fold in chocolate chips, crushed cookies, or toasted nuts during the last 5 minutes of churning.
Adding mix-ins too early may affect the ice cream’s texture or prevent even freezing.
5. How long can I store homemade ice cream?
Homemade ice cream is best enjoyed within 1–2 weeks for optimal flavor and creaminess.
Properly stored in an airtight container with a layer of plastic wrap on top, it can last up to a month. Thaw slightly before serving for easy scooping.
