
All products are selected by our editorial team for quality. If you buy through our links, we may earn a small commission at no extra cost to you.
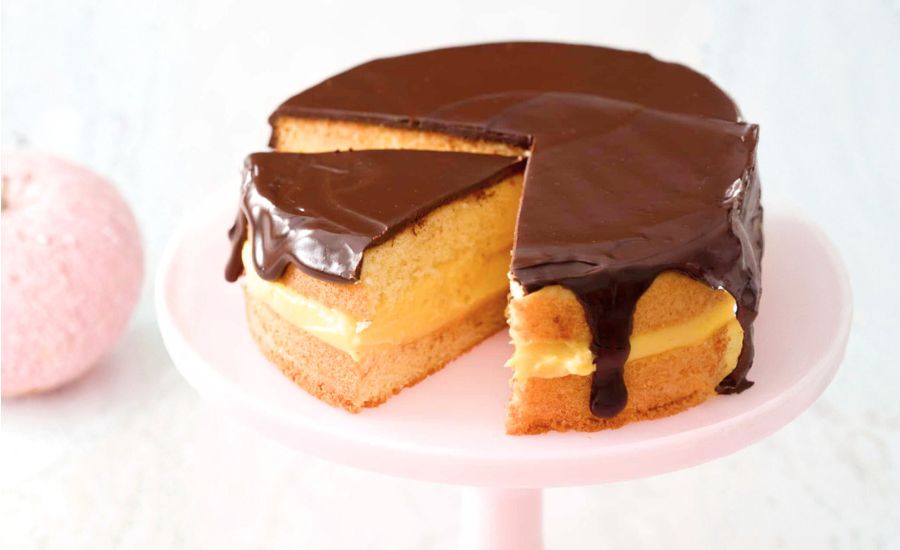
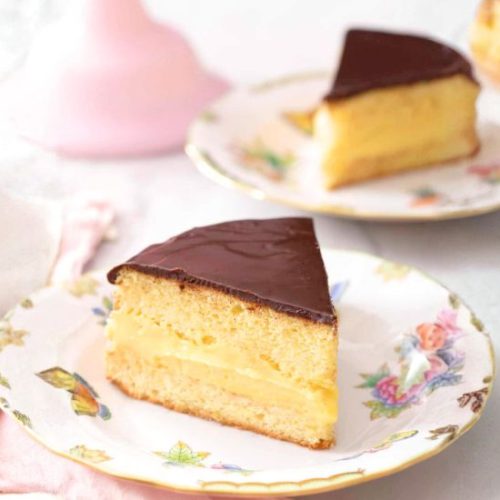
Boston Cream Pie is an enduring classic that perfectly balances light, airy sponge cake with creamy, luscious filling and rich chocolate ganache.
This dessert stands out for its elegant presentation and satisfying combination of textures: the soft cake, smooth pastry cream, and glossy chocolate topping create a treat that’s both visually stunning and indulgent.
Despite being a dessert, it provides modest nutritional benefits—offering a source of high-quality protein from eggs and dairy, healthy fats from butter and cream, and a touch of fiber from flour.
Its approachable recipe makes it an excellent choice for both casual home bakers and special occasions, and with straightforward steps and common pantry ingredients, it’s ideal for weekend baking sessions, meal prepping desserts, or impressing guests with a show-stopping sweet treat.
Must-Have Tools for Perfect Results
8-Inch Cake Pan
Essential for baking the sponge evenly. Its compact size ensures perfect layers and is versatile for any round cake recipes.
Whisk
Perfect for creating smooth pastry cream and aerated cake batter. Its precision makes mixing effortless and is invaluable for sauces, dressings, and emulsions.
Medium Saucepan
Ideal for heating milk and cooking pastry cream. Beyond this recipe, it’s perfect for sauces, custards, and small-batch soups.
Stand Mixer (or Hand Mixer)
Provides consistent, fluffy cake batter and whipped ingredients with minimal effort. Great for baking, whipping cream, or mixing doughs in everyday cooking.
Wire Cooling Rack
Allows cakes to cool evenly and prevents sogginess. It’s versatile for baking cookies, roasting vegetables, and cooling bread.
Classic Boston Cream Pie
Equipment
- 1 8-inch cake pan
- 1 Whisk
- 1 Medium saucepan
- 1 Bowls (various)
- 1 Stand mixer or hand mixer
- 1 Wire cooling rack
Ingredients
For the Cake:
- 2 large eggs room temperature
- 1 cup cane sugar 200g
- ½ cup whole milk 120mL
- 5 tablespoons unsalted butter 70g
- 1 cup all-purpose flour plus 2 tablespoons 140g
- 1¼ teaspoons baking powder
- ¼ teaspoon kosher salt
- 2 teaspoons vanilla extract
For the Ganache:
- ¼ cup heavy whipping cream 60mL
- 4 ounces bittersweet chocolate chopped
For the Pastry Cream:
- 6 egg yolks room temperature
- ⅔ cup sugar
- ¼ cup corn starch
- 1 tablespoon vanilla extract
- 2 cups whole milk 480mL
- 1 tablespoon butter 15g
Instructions
- Prepare the Pastry Cream: Start by heating the milk in a medium saucepan over medium heat until it just begins to boil, then remove from the heat.In a large mixing bowl, whisk together the egg yolks and sugar until the mixture becomes pale, thick, and creamy. Gradually sift in the cornstarch, whisking continuously to avoid any lumps. Temper the egg mixture by adding about ¼ cup of the hot milk and whisking until smooth. Slowly incorporate the remaining milk, ensuring a silky, lump-free texture.Pour the mixture back into the saucepan through a fine-mesh strainer to remove any remaining bits. Return to medium-high heat and cook while whisking constantly until the cream thickens and reaches a gentle boil. Continue cooking for an additional 1–2 minutes to ensure it’s fully set. Remove from heat and stir in the butter and vanilla extract. Cover the surface with plastic wrap, pressing it gently onto the cream to prevent a skin from forming, and chill in the refrigerator until firm.
- Preheat and Prepare the Cake Pan: Preheat your oven to 350°F (175°C). Grease an 8-inch round cake pan with baking spray or butter, then lightly flour the surface.Line the bottom with a round piece of parchment paper and spray the parchment lightly as well. This preparation ensures the sponge releases easily from the pan and maintains its perfect shape.
- Mix Dry Ingredients: In a medium bowl, combine the all-purpose flour, baking powder, and kosher salt. Whisk them thoroughly to ensure the leavening agent is evenly distributed. Set aside—this dry mixture will be gradually incorporated into the egg mixture for a consistent cake texture.
- Whip Eggs and Sugar: In a stand mixer fitted with a whisk attachment (or a large mixing bowl if using a hand mixer), add the eggs and sugar. Beat on medium speed for approximately 4 minutes until the mixture is pale, thick, and fluffy.You should be able to lift the whisk and see a ribbon of batter fall slowly, indicating that enough air has been incorporated to create a light sponge.
- Combine Milk and Butter: In a microwave-safe measuring cup, combine the milk and butter. Heat in 30-second intervals until the butter is fully melted and the milk is hot but not boiling. Stir to ensure even mixing. This warm mixture will help create a moist, tender cake when folded into the batter.
- Incorporate Dry Ingredients: With the mixer on low speed, gradually add the flour mixture to the whipped eggs and sugar. Beat just until the flour is fully incorporated—overmixing can lead to a denser cake. Ensure all dry pockets are blended, but the batter should remain airy.
- Add Vanilla and Milk-Butter Mixture: Stir the vanilla extract into the hot milk-butter mixture, then slowly pour it into the batter while mixing on low speed. Continue mixing until the batter is smooth and uniform. At this stage, the batter will resemble thick pancake batter with small bubbles forming on the surface.Scrape the sides of the bowl and fold gently to ensure everything is fully combined.
- Bake the Sponge Cake: Pour the batter into the prepared cake pan and smooth the top with a spatula. Bake in the preheated oven for approximately 33 minutes, or until a toothpick inserted in the center comes out clean and the cake starts pulling away from the sides of the pan. Remove from the oven and allow to cool in the pan for 5–10 minutes. Then, invert the cake onto a wire cooling rack and let it cool completely.
- Slice the Cake for Filling: Once the cake is fully cooled, use a serrated knife to carefully slice it horizontally into two even layers. To guide your cut, insert toothpicks around the circumference of the cake at equal intervals—this ensures a straight, level slice.
- Assemble the Cake with Pastry Cream: Place the bottom cake layer, cut side up, on a serving plate.Spread the chilled pastry cream evenly over the surface, leaving about a 1-inch border around the edges to prevent overflow. Carefully place the top cake layer over the filling, gently pressing down to level the layers.Chill the assembled cake in the refrigerator for at least 2 hours or overnight for best results.Cover with plastic wrap or a cake dome to prevent drying.
- Prepare the Chocolate Ganache: When ready to serve, heat the heavy cream (and optional corn syrup) in a microwave-safe bowl until steaming, about 1 minute. Add the chopped bittersweet chocolate and let sit for 5 minutes to soften.Stir gently until fully smooth and glossy.
- Finish and Serve: Pour the ganache over the top of the chilled cake, spreading it carefully to cover the edges and create a smooth, even layer.For clean slices, warm a non-serrated knife slightly before cutting. Serve immediately or keep refrigerated until ready to enjoy.
Notes
- Use room temperature eggs for both the cake and pastry cream to ensure proper aeration and smooth texture.
- A serrated knife is essential for evenly slicing the cake; toothpicks can serve as a helpful guide.
- Chilling the assembled cake for at least 2 hours allows the pastry cream to set and makes slicing easier.
- For shiny, glossy ganache, add a tablespoon of corn syrup when melting chocolate with cream.
- High-quality chocolate enhances both flavor and appearance; bittersweet or special dark chocolate is recommended.
- Allow the cake to cool completely before assembling to prevent the filling from melting.
Chef’s Secrets for Perfect Results
Achieving the ideal Boston Cream Pie requires attention to both technique and ingredients.
Whipping the eggs and sugar until light and fluffy ensures a sponge that is airy yet moist.
When cooking the pastry cream, continuous whisking is crucial to avoid lumps and achieve a silky, smooth texture.
For the chocolate ganache, letting the cream sit for a few minutes after adding the chocolate allows it to melt gently, creating a glossy finish.
Small details like warming the knife before slicing and using parchment-lined cake pans can dramatically improve presentation and ease of assembly.
Serving Suggestions for Elegant Presentation
Boston Cream Pie is versatile enough for casual gatherings or special occasions.
Serve chilled slices with a dusting of powdered sugar or a few fresh berries for added color.
Pair with coffee, tea, or a light dessert wine to complement the rich cream and chocolate flavors.
For a brunch twist, cut mini individual portions and serve on small dessert plates to impress guests.
The balanced layers of cake, cream, and ganache make it visually appealing, so simple plating techniques work best to highlight its elegance.
Storage Tips to Keep Fresh
Store the assembled Boston Cream Pie in the refrigerator, covered with plastic wrap or a cake dome, for up to 3 days.
The pastry cream will continue to set slightly over time, making slices even cleaner.
Ganache may firm up in the fridge; briefly warm the knife for neat servings.
Avoid freezing the filled cake, as the texture of the pastry cream may separate upon thawing.
If storing pre-baked cake layers, wrap tightly in plastic and refrigerate for up to 2 days or freeze for up to a month, defrosting completely before assembly.
Frequently Asked Questions About Recipe
1. Can I make this cake ahead of time?
Yes! Both the sponge and pastry cream can be prepared a day in advance. Assemble the cake and chill overnight to allow the cream to set for easier slicing.
2. Can I use a different type of chocolate?
Absolutely. Bittersweet chocolate provides depth, but semisweet or dark chocolate bars work as well. Avoid milk chocolate, which may be too soft for the ganache.
3. Can I use a different milk type?
Whole milk is preferred for richness, but 2% milk can be used. Non-dairy alternatives like oat or almond milk are possible, though the creaminess may be slightly reduced.
4. How can I ensure the cake slices cleanly?
Use a serrated knife and warm it slightly in hot water before slicing. Cut slowly and wipe the blade between cuts for perfect layers.
5. Can I make this recipe gluten-free?
Yes! Substitute the all-purpose flour with a 1:1 gluten-free baking blend. Be mindful that the texture may vary slightly, but the flavor will remain rich and delicious.
This recipe is inspired by preppykitchen and has been carefully refined to enhance clarity, streamline preparation steps, and ensure accurate results. We’ve also included health benefits, nutritional highlights, and Must-Have Tools to help you get the best results every time you cook.
