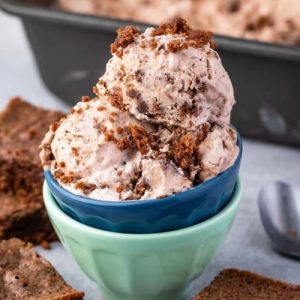
Indulge in a decadent dessert with this no-churn Brownie Batter Ice Cream!
Creamy, rich, and packed with chocolatey goodness, it combines homemade brownie chunks with a smooth, whipped ice cream base.
With protein from heavy cream and fiber from cocoa, it’s a satisfying treat that’s easy to make, perfect for everyday indulgence, and ideal for quick dessert prep.
Creamy Brownie Batter Ice Cream
Equipment
- 1 medium mixing bowl
- 1 Loaf pan (9×5 inches)
- Measuring cups and spoons
- Hand mixer or whisk
- Spatula
- Freezer-Safe Container
Ingredients
For the Brownies:
- 2 cups 263 g brownie mix (from a 9×13 family-size box)
- 1 large egg
- ¼ cup 59 ml vegetable oil
- 2 tablespoons 30 ml water
For the Ice Cream:
- 2 cups 474 ml heavy whipping cream
- 14 ounces sweetened condensed milk
- 1½ cups 197 g brownie mix (dry, powder form)
Instructions
- Preheat and Prepare the Oven: Begin by setting your oven to 350°F (175°C) to ensure it reaches the perfect temperature for baking. While the oven is heating, lightly spray a 9×5-inch loaf pan with nonstick cooking spray. This will prevent the brownies from sticking and allow you to remove them easily after baking. You can also line the pan with parchment paper for extra ease in handling.
- Mix the Brownie Batter: In a medium-sized mixing bowl, combine 2 cups (263 g) of brownie mix from your family-size box, 1 large egg, ¼ cup (59 ml) oil, and 2 tablespoons (30 ml) of water. Using a spatula or wooden spoon, stir all the ingredients together until fully incorporated. Aim for smooth, even batter with no dry pockets. Approximately 50 strokes should give you the right consistency. The batter should be thick but pourable.
- Pour and Bake the Brownies: Carefully pour the brownie batter into the prepared loaf pan, spreading it evenly so that it reaches all corners. Place the pan in the preheated oven and bake for 20–25 minutes. Keep an eye on the brownies as baking times may slightly vary depending on your oven. To check doneness, insert a toothpick into the center; it should come out with a few moist crumbs but not wet batter. Once baked, remove the pan from the oven and allow the brownies to cool completely at room temperature.
- Prepare the Whipped Cream Base: While your brownies are cooling, pour 2 cups (474 ml) of heavy whipping cream into a large, chilled mixing bowl. Using an electric hand mixer or stand mixer, beat the cream on medium-high speed until stiff peaks form. This means that when you lift the beaters, the cream holds firm peaks without collapsing. Whipped cream creates a light and airy texture that is essential for smooth, creamy ice cream.
- Combine Sweetened Condensed Milk with Brownie Powder: In a separate bowl, mix 14 ounces of sweetened condensed milk with 1½ cups (197 g) of dry brownie mix. Stir thoroughly until the mixture is uniform, making sure there are no lumps. This combination forms the flavorful chocolate base that gives the ice cream its rich brownie taste.
- Fold the Chocolate Mixture into the Whipped Cream: Gently fold the sweetened condensed milk and brownie powder mixture into the whipped cream. Use a spatula and a careful folding motion: scoop from the bottom of the bowl and lift over the top, rotating the bowl as you go. This preserves the light, airy texture of the whipped cream while incorporating the chocolatey base evenly.Take your time to ensure it’s smooth without overmixing, which can deflate the cream.
- Add Crumbled Brownies for Extra Texture: Once the ice cream base is combined, crumble the cooled brownies into bite-sized pieces. Decide how much you want to include; using about half of the loaf gives a generous distribution of brownie chunks throughout the ice cream. Gently fold the brownie pieces into the mixture, making sure every scoop of ice cream will have chunks of baked goodness. This step adds both texture and bursts of rich chocolate flavor.
- Transfer to Freezer-Safe Container: Pour the finished ice cream mixture into a freezer-safe container, smoothing the top with a spatula. You can cover it with a lid or plastic wrap to prevent ice crystals from forming. For an extra touch, sprinkle a few reserved brownie crumbs on top for garnish.
- Freeze Until Firm: Place the container in the freezer and allow the ice cream to set for at least 4 hours. For best results, freeze overnight. The ice cream will harden fully and develop the creamy, scoopable texture you expect. Avoid opening the freezer frequently during this time, as temperature fluctuations can affect consistency.
- Serve and Enjoy: When ready to serve, remove the ice cream from the freezer for 5–10 minutes to soften slightly for easier scooping. Use an ice cream scoop to serve generous portions, ensuring each serving contains a perfect balance of creamy base and brownie chunks. Enjoy as a dessert after meals, for a special occasion, or a sweet treat anytime!
Notes
- You can substitute 2 (8-ounce) containers of Cool Whip for the heavy cream to simplify preparation.
- Fat-free or low-fat sweetened condensed milk can be used for a lighter version.
- Crumble brownies to your preferred size—larger chunks give more texture, smaller pieces blend into the ice cream.
- For a more intense chocolate flavor, consider adding 1–2 tablespoons of cocoa powder to the ice cream base.
- If desired, sprinkle a pinch of sea salt on top before freezing to enhance the chocolate flavor.
Chef’s Secrets For Perfect Texture
Achieving the ideal texture for brownie batter ice cream is all about the folding technique and whipped cream consistency.
Always whip your cream until stiff peaks form; this ensures your ice cream stays light and creamy, even without an ice cream maker.
When folding in the chocolate mixture and brownie chunks, use gentle motions to avoid deflating the cream.
For added richness, slightly chill the mixing bowl and beaters before whipping the cream.
Also, let the baked brownies cool completely before crumbling them; this prevents melting into the ice cream base and maintains delightful chunks throughout each scoop.
Serving Suggestions To Impress Guests
Brownie Batter Ice Cream is versatile and pairs wonderfully with a variety of treats.
Serve a scoop in a dessert bowl with a drizzle of chocolate or caramel sauce for extra indulgence.
Top with fresh berries or a sprinkle of chopped nuts to add texture and color.
For a creative twist, layer the ice cream with cookie crumbs or brownie crumbles to make a mini ice cream parfait.
It also works beautifully alongside a warm dessert, like a brownie or fruit crisp, where the contrast of hot and cold delights the palate.
Storage Tips For Long-Term Enjoyment
Store your homemade brownie batter ice cream in an airtight, freezer-safe container to prevent ice crystals from forming.
Keep it in the back of the freezer where the temperature is most stable.
Ideally, consume within 2–3 weeks for the best flavor and texture. If the ice cream hardens too much, allow it to sit at room temperature for 5–10 minutes before scooping.
Avoid refreezing melted portions, as this can alter texture.
Labeling your container with the date of preparation helps you track freshness and ensures a consistently enjoyable dessert.
Frequently Asked Questions
1. Can I use store-bought brownie pieces instead?
Yes, pre-baked brownie chunks work perfectly if you’re short on time. Just cut them into small, uniform pieces before folding them into the ice cream base to ensure even distribution.
2. Can I make this recipe dairy-free?
You can replace heavy cream with coconut cream and use a plant-based sweetened condensed milk alternative. Keep in mind the flavor and texture may vary slightly, but the result will still be creamy and delicious.
3. How can I make it more chocolatey?
For extra chocolate flavor, stir in 2–3 tablespoons of unsweetened cocoa powder or fold in mini chocolate chips along with the brownie chunks. This enhances both taste and texture.
4. Do I need an ice cream maker?
No ice cream maker is required! This recipe is specifically designed as a no-churn ice cream. Whipped cream provides the structure and creaminess typically achieved by churning.
5. Can I prepare this ahead of time for a party?
Absolutely! Make the ice cream a day or two in advance and store it in the freezer until needed. It holds well and serves as an impressive, hassle-free dessert for gatherings.
