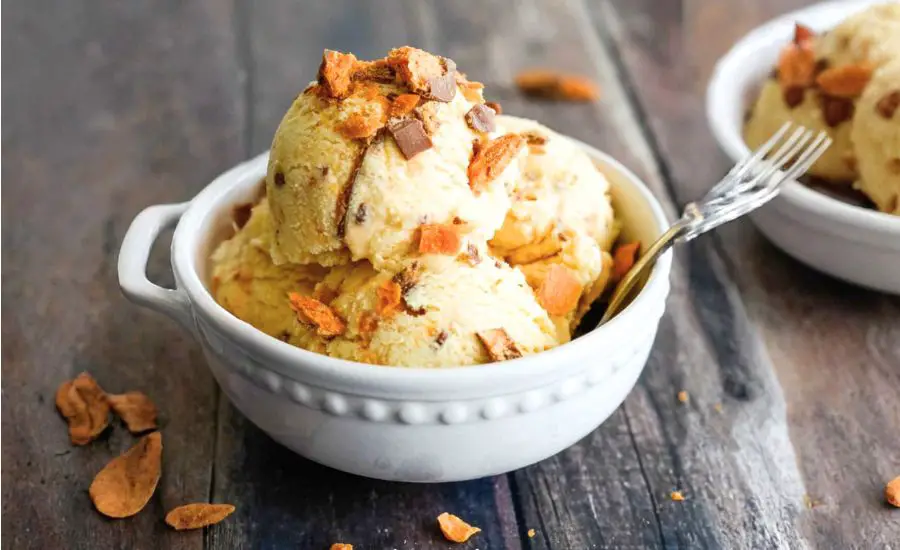
This ultra-creamy vanilla ice cream takes indulgence to a new level with chunks of buttery, crunchy candy bars folded in for a delightful texture contrast.
The combination of whole milk, heavy cream, and evaporated milk creates a luxuriously smooth base, while instant pudding adds an extra layer of richness and stability, ensuring a soft, scoopable consistency straight from the freezer.
Beyond its decadent flavor, this ice cream includes calcium and protein from the dairy, offering a small nutritional boost in each serving.
Quick to prepare and hands-free in an ice cream maker, it’s perfect for weekend treats, family gatherings, or simply a satisfying sweet craving.
The mix of creamy and crunchy textures makes it a crowd-pleaser, while the simple ingredients and easy preparation make it accessible for everyday dessert lovers.
Must-Have Tools for Perfect Results
Ice Cream Maker
Essential for churning the mixture into creamy perfection. Its continuous motion incorporates air and prevents large ice crystals, ensuring a smooth, restaurant-quality texture. Ideal for all homemade frozen desserts.
Large Mixing Bowl
Provides ample space to whisk together dairy, pudding mix, and sugar evenly. A versatile kitchen staple for mixing, marinating, or even prepping salads.
Whisk
Crucial for fully blending ingredients to a uniform consistency and breaking up lumps of pudding powder. Whisks are perfect for baking, sauces, and emulsifying dressings.
Measuring Cups & Spoons
Ensures precise measurement of milk, sugar, and vanilla for consistent results. Accurate measurement tools are essential for both baking and everyday cooking precision.
Airtight Freezer Container
Stores the churned ice cream safely while maintaining texture and flavor. Multipurpose for storing leftovers, soups, and frozen meals.

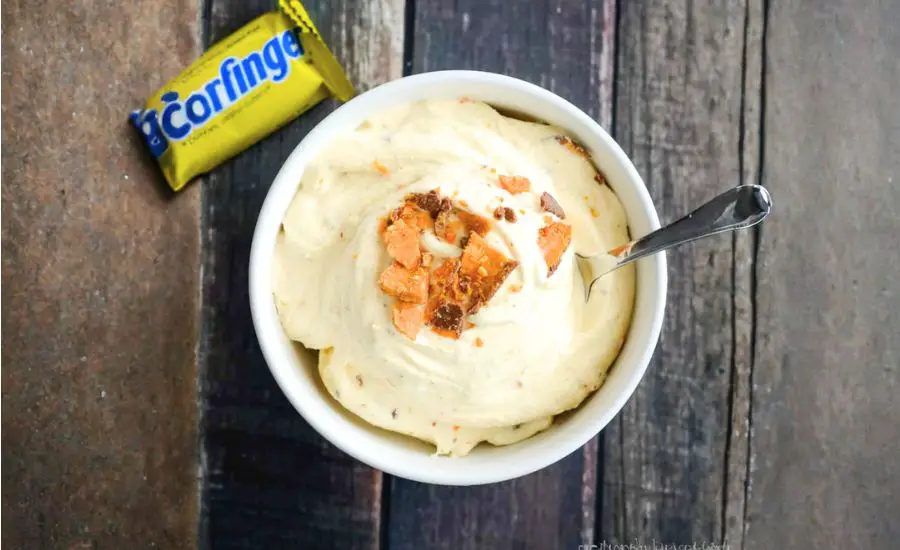
Creamy Homemade Butterfinger Ice Cream
Equipment
- 1 large mixing bowl
- 1 Whisk
- Ice Cream Maker
- Measuring cups and spoons
- 1 Airtight Freezer-Safe Container
Ingredients
- 1 pint heavy cream
- 1 12 oz can evaporated milk
- 1 14 oz can sweetened condensed milk
- 4 cups whole milk
- 1 3.4 oz box vanilla instant pudding
- ¾ cup sugar
- 4 tablespoons vanilla extract
- 5 1.9 oz Butterfinger bars, crushed
Instructions
- Gather and Prepare Ingredients: Before starting, lay out all your ingredients on the countertop for easy access. Measure out the heavy cream, whole milk, evaporated milk, sweetened condensed milk, sugar, and vanilla extract. Crush the Butterfinger bars into small, bite-sized pieces using a rolling pin or the back of a spoon, keeping them in a small bowl. Open the vanilla instant pudding and have it ready for whisking. Prepping everything in advance ensures a smooth workflow and prevents mistakes while mixing.
- Combine the Dairy Base: In a large mixing bowl, pour in the heavy cream, whole milk, evaporated milk, and sweetened condensed milk. Whisk gently but thoroughly to create a smooth and even mixture. Take your time here—this step ensures that the ice cream base will have a creamy, uniform consistency without any lumps.
- Incorporate Dry Ingredients: Sprinkle the vanilla instant pudding powder and sugar evenly over the milk mixture. Using a whisk, slowly fold the powders into the liquid, ensuring each scoop is fully blended. Whisk for 2–3 minutes until the mixture is thickened slightly and completely smooth. Add the vanilla extract and give a final gentle whisk to evenly disperse the flavor throughout the base.
- Chill the Mixture Thoroughly: Cover the mixing bowl tightly with plastic wrap or a lid and place it in the refrigerator. Allow the mixture to chill for 2–3 hours, or until it is very cold to the touch. Chilling is crucial—it ensures the ice cream churns properly, develops a creamy texture, and prevents icy crystals from forming.
- Prepare the Ice Cream Maker: While the mixture is chilling, set up your ice cream maker according to the manufacturer’s instructions. Make sure the bowl is properly frozen (if using a freezer bowl) and all parts are clean and ready. This step is important to guarantee smooth and creamy churning without any delays once the base is ready.
- Churn the Ice Cream: Pour the fully chilled mixture into the prepared ice cream maker. Turn on the machine and allow it to churn, following the recommended time in your model’s manual—usually 20–30 minutes. The churning incorporates air, thickens the base, and prevents large ice crystals from forming, resulting in a soft, creamy texture.
- Add Butterfinger Chunks: During the last 5 minutes of churning, slowly sprinkle the crushed Butterfinger pieces into the ice cream. Let the machine evenly distribute the candy pieces throughout the creamy base, so each scoop will have delightful bursts of chocolatey, crunchy texture.
- Transfer and Freeze for Firmness: Once churning is complete, transfer the ice cream into an airtight freezer-safe container. Smooth the top with a spatula, seal tightly, and freeze for at least 2 hours to allow the ice cream to firm up to the perfect scoopable consistency.
- Serve and Enjoy: When ready to enjoy, scoop the ice cream into bowls or cones. For an extra touch, garnish with additional Butterfinger pieces or a drizzle of chocolate syrup. The ice cream is now perfectly creamy, delightfully crunchy, and ready to satisfy any sweet craving.
Notes
- Use full-fat dairy for the creamiest texture; low-fat alternatives will produce a less rich ice cream.
- Chill the base thoroughly before churning to prevent icy crystals and ensure smoothness.
- Crush Butterfinger bars into uneven chunks for the best texture contrast—some small, some slightly larger pieces.
- For extra flavor, try lightly toasting the candy pieces in the oven for 3–4 minutes before adding.
- Serve immediately for soft-serve texture, or freeze longer for a firmer scoopable consistency.
- Always store ice cream in an airtight container to prevent freezer burn and maintain flavor.
- Experiment with mix-ins like chocolate chips or caramel swirls for creative variations.
Chef’s Secrets for Maximum Creaminess
Achieving the perfect, creamy texture starts with patience and quality ingredients.
Always chill your ice cream base for several hours before churning—this step prevents ice crystals and promotes a smooth, luscious consistency.
Using a combination of heavy cream, whole milk, and evaporated milk enhances richness without relying solely on sugar.
Adding instant pudding mix not only boosts flavor but also stabilizes the ice cream, making it soft and scoopable straight from the freezer.
When folding in the Butterfinger chunks, do it near the end of churning to maintain the candy’s crunch.
Small adjustments, like using freshly crushed candy and a high-quality vanilla extract, can elevate this simple dessert to a show-stopping treat.
Serving Suggestions for Sweet Enjoyment
This Butterfinger ice cream shines on its own, served in bowls or cones.
For a dessert twist, pair it with warm chocolate or caramel sauce, or use it as a filling for homemade ice cream sandwiches.
Adding crushed nuts, sprinkles, or a drizzle of peanut butter complements the candy pieces beautifully.
It’s a perfect treat for family gatherings, summer parties, or as a decadent ending to a cozy dinner.
Individual servings can be garnished with extra Butterfinger chunks to impress guests and enhance texture.
Storage Tips for Longevity and Quality
Store this ice cream in an airtight, freezer-safe container to prevent ice crystals and freezer burn.
Keep it in the coldest part of your freezer rather than the door for more stable temperature and consistent texture.
Homemade ice cream is best enjoyed within two weeks for peak freshness, though it can last up to a month if stored properly.
To make scooping easier, let the ice cream sit at room temperature for 5–10 minutes before serving.
Avoid refreezing previously melted portions to maintain smoothness and flavor.
Frequently Asked Questions About Recipe
1. Can I make this ice cream without an ice cream maker?
Yes! Pour the chilled mixture into a freezer-safe container and stir every 30–45 minutes for 3–4 hours. This manual method mimics churning and helps maintain a creamy texture, though the ice cream will be slightly less smooth than machine-churned.
2. Can I use other candy bars instead of Butterfinger?
Absolutely! Snickers, Heath bars, or Twix work well. Choose candy with both crunch and flavor to preserve texture in the ice cream.
3. Can this recipe be made dairy-free?
Yes, substitute full-fat coconut milk for heavy cream and sweetened condensed coconut milk for the condensed milk. Use plant-based instant vanilla pudding to keep the texture creamy.
4. How do I prevent the ice cream from being icy?
Ensure the base is thoroughly chilled before churning, and avoid over-freezing. Incorporating pudding mix and using full-fat dairy both help keep ice crystals at bay.
5. Can I prepare this ice cream in advance for a party?
Definitely! Make the base a day ahead, store it chilled, and churn just before serving. Churned ice cream can be frozen for up to two weeks, making it ideal for entertaining.
This recipe is inspired by creationsbykara and has been carefully refined to enhance clarity, streamline preparation steps, and ensure accurate results. We’ve also included health benefits, nutritional highlights, and Must-Have Tools to help you get the best results every time you cook.
