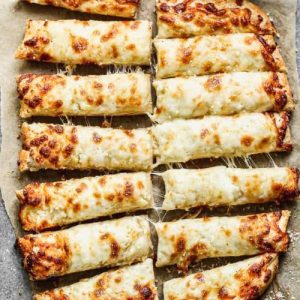
These Cheesy Garlic Breadsticks are soft, golden, and loaded with gooey cheese, making them an irresistible treat for any occasion.
High in protein from mozzarella and parmesan, and providing a modest dose of healthy fats from olive oil, they’re a satisfying, fiber-friendly snack or side dish.
Quick, easy, and perfect for everyday meals or gatherings, they’re a kitchen must-have.
Cheesy Breadsticks
Equipment
- Large mixing bowl (1)
- Stand mixer (optional) – 1
- Measuring cups and spoons (1 set)
- Rolling pin (optional) – 1
- Parchment paper – 1 large sheet
- Pizza stone or upside-down cookie sheet – 1
- Small bowl (1)
Ingredients
Dough:
- 1 ⅛ tsp active dry yeast
- 1 tsp granulated sugar
- ¾ cup warm water
- 1 ½ tbsp olive oil
- ¾ tsp salt
- ½ tsp white vinegar
- 1 ½ – 2 cups bread flour or all-purpose flour
Topping:
- 1 ½ tbsp salted butter melted
- 2 cloves garlic minced
- ⅓ cup freshly grated parmesan cheese
- 1 ¼ cups shredded mozzarella cheese
Instructions
- Activate the Yeast: Begin by preparing your yeast mixture. In a large mixing bowl, combine ½ cup of warm water (make sure it’s comfortably warm, around 105–110°F) with 1 teaspoon of granulated sugar. Sprinkle in 1 1/8 teaspoons of active dry yeast. Gently stir with a spoon until the yeast and sugar dissolve. Allow this mixture to sit for 5 minutes. You’ll notice the yeast begin to foam and bubble—this indicates it’s active and ready to work its magic in the dough.
- Combine the Wet Ingredients: Once the yeast is activated, add the remaining ¼ cup of warm water, 1 ½ tablespoons of olive oil, ¾ teaspoon salt, and ½ teaspoon white vinegar to the yeast mixture. Stir gently to combine all the ingredients. The olive oil adds richness, while the vinegar helps improve the dough’s texture and tenderness.
- Mix and Knead the Dough: Gradually incorporate the flour into the wet mixture. Start with 1 ½ cups of bread flour (or all-purpose flour) and add more if necessary. If using a stand mixer, attach the dough hook and mix on medium-low speed until the dough comes together. Then knead for 5–7 minutes until it becomes smooth, elastic, and slightly sticky. If kneading by hand, turn the dough onto a lightly floured surface and knead using the heel of your hand, folding and pressing repeatedly. The dough should spring back when touched lightly but not stick excessively to your fingers.
- First Rise: Shape the dough into a smooth ball and place it back into the mixing bowl. Cover the bowl with a clean, dry towel and set it in a warm, draft-free area. Let the dough rise for approximately 1 hour or until it doubles in size. This resting period allows the yeast to ferment and develop a light, airy texture in your breadsticks.
- Preheat the Oven: While the dough is rising, preheat your oven to 475°F (245°C). Place a pizza stone in the center of the oven or turn an upside-down cookie sheet inside out. Preheating the stone or sheet ensures a crisp, golden crust on the bottom of your breadsticks.
- Prepare the Dough for Shaping: Once the dough has doubled in size, gently punch it down to release excess air. Lay a large piece of parchment paper on your countertop. Using your hands, stretch and press the dough into a rectangle roughly ⅓ inch thick. You can use a rolling pin if preferred, but hand-shaping allows for better control and prevents overworking the dough. Make sure the rectangle is even in thickness to ensure uniform baking.
- Make the Garlic Butter Topping: In a small bowl, combine 1 ½ tablespoons of melted butter with 2 cloves of minced garlic. Mix thoroughly so the garlic is evenly dispersed in the butter. This mixture will infuse the breadsticks with a fragrant, savory flavor as it bakes.
- Add the Cheeses: Brush the garlic butter evenly over the entire surface of the dough, making sure to cover every corner. Sprinkle 1/3 cup of freshly grated parmesan cheese over the buttered surface, followed by 1 ¼ cups of shredded mozzarella cheese. Spread the cheeses evenly for consistent melting and browning.
- Transfer to the Oven: Carefully lift the parchment paper with the dough on top and place it onto the preheated pizza stone or upside-down cookie sheet. The hot surface will give the breadsticks a crisp exterior while keeping the interior soft and tender.
- Bake to Golden Perfection: Bake the breadsticks in the preheated oven for 8–12 minutes, keeping a close eye as oven temperatures can vary. You’re looking for a bubbly, golden-brown top and a slightly firm bottom. The cheese should be fully melted and lightly browned.
- Serve Warm: Remove the breadsticks from the oven using oven mitts and carefully transfer them to a cutting board. Slice into individual sticks and serve immediately. For an extra touch, pair with marinara sauce, ranch, or your favorite dipping sauce. These breadsticks are best enjoyed warm, with the cheese still gooey and the garlic aroma filling the kitchen.
- Storage and Make-Ahead Tips: If preparing ahead, the dough can be made 3–4 hours before baking. Simply refrigerate instead of letting it rise at room temperature. For longer storage, place the dough in a freezer-safe bag after spraying lightly with cooking spray and freeze for 2–3 months. Thaw overnight in the fridge, then bring to room temperature for 30 minutes before shaping and baking.
Notes
- Yeast Activation: Ensure water is warm but not hot (105–110°F) to properly activate the yeast without killing it.
- Flour Measurement: Start with 1 ½ cups flour and add gradually; dough should be slightly sticky but workable.
- Cheese Choice: Freshly grated parmesan melts better and has a more intense flavor than pre-grated.
- Oven Temperature: Preheat thoroughly to ensure a golden crust and evenly melted cheese.
- Serving: Best enjoyed fresh out of the oven for maximum gooeyness and crispiness.
Chef’s Secrets For Perfect Breadsticks
Achieving the perfect cheesy garlic breadstick comes down to a few key techniques.
First, never skip the yeast activation step—allow the mixture to foam fully before combining with flour, which ensures a light, airy texture.
Knead the dough until smooth and elastic to develop gluten for a soft interior with a slight chew.
Using parchment paper prevents sticking while making transfer to a hot pizza stone effortless.
Finally, brush the edges generously with garlic butter to achieve an irresistible golden-brown crust.
Small adjustments, like allowing the dough to rest briefly after refrigeration, can make the difference between good breadsticks and bakery-quality perfection.
Serving Suggestions For Any Occasion
Cheesy garlic breadsticks are incredibly versatile and pair wonderfully with a wide variety of meals.
Serve them alongside pasta dishes like spaghetti or lasagna for a comforting Italian-inspired dinner.
They also make a perfect appetizer with dips such as marinara, ranch, or even a zesty pesto aioli.
For game nights or casual gatherings, plate them as finger food with small bowls of dipping sauces.
You can also slice them into bite-sized sticks for a party platter.
Their gooey, cheesy texture makes them an irresistible crowd-pleaser any time.
Storage Tips For Best Freshness
If you have leftover breadsticks, store them in an airtight container at room temperature for up to 2 days to maintain their softness.
For longer storage, allow the breadsticks to cool completely, then wrap them tightly in foil and freeze for up to 2 months.
To reheat, bake in a preheated oven at 350°F (175°C) for 5–7 minutes until warmed through, or microwave briefly for convenience.
If freezing dough instead of baked breadsticks, remember to thaw overnight in the refrigerator and let it sit at room temperature for 30 minutes before shaping and baking to achieve optimal texture.
Frequently Asked Questions About
1. Can I use all-purpose flour instead of bread flour?
Yes! All-purpose flour works well for this recipe, though bread flour creates a slightly chewier texture due to higher gluten content.
Start with 1 ½ cups and add more gradually if needed to reach the right dough consistency.
2. How can I make these breadsticks ahead of time?
Prepare the dough and store it in the refrigerator for 3–4 hours before baking.
For even longer storage, freeze the dough for up to 2–3 months, then thaw overnight and let it rest at room temperature before baking.
3. Can I use a different cheese?
Absolutely! While mozzarella and parmesan provide classic flavors and melt beautifully, you can experiment with cheddar, provolone, or a blend of Italian cheeses.
Just be mindful of melt and salt levels to avoid overpowering the breadsticks.
4. How do I know when the breadsticks are done?
The breadsticks are ready when the cheese is melted, bubbly, and slightly golden, and the edges of the dough have a light golden-brown color.
The bottom should feel firm and lightly crisp when tapped.
5. Can I make these breadsticks vegan or dairy-free?
Yes! Replace butter with plant-based margarine or olive oil and use vegan mozzarella and parmesan alternatives.
The dough itself is naturally plant-based, so these substitutions keep the breadsticks soft, cheesy, and flavorful without dairy.
