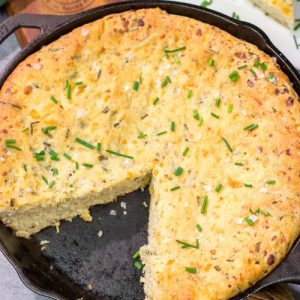
Warm, savory, and packed with flavor, this Cheesy Chive Bread is a wholesome twist on classic skillet bread.
Made with cottage cheese and fresh chives, it’s rich in protein, fiber-friendly, and lower in carbs compared to traditional loaves.
The combination of melted Monterey Jack cheese and herbs creates a comforting, nutritious bread that pairs perfectly with soups or stews.
Simple to prepare, it’s an everyday crowd-pleaser ideal for family meals or meal prep.
Cheesy Chive Bread
Equipment
- 1 Medium microwave-safe bowl
- 1 large mixing bowl
- 1 Wooden Spoon
- 1 Cast iron skillet (9-inch) or deep pie plate
- 1 Plastic wrap or kitchen towel
- 1 Wire rack
Ingredients
- 16 oz cottage cheese
- 1 Tbsp granulated sugar
- 3 Tbsp unsalted butter room temperature (divided)
- 1½ tsp kosher salt divided
- ½ cup warm water
- 4½ tsp active dry yeast or 2 packets, ¼ oz each
- 1 tsp dried oregano
- ½ tsp dried rosemary
- ½ cup fresh chives minced (plus extra for garnish)
- 1 large egg
- 1 cup shredded Monterey Jack cheese
- 2½ cups all-purpose flour
Instructions
- Prepare the Cottage Cheese Mixture: In a medium, microwave-safe bowl, combine the cottage cheese, granulated sugar, 2 tablespoons of the butter, and 1 teaspoon of the kosher salt. Stir until all ingredients are evenly blended. This creates the creamy, slightly sweet, and savory base that enriches the dough.
- Warm the Mixture: Heat the bowl in the microwave in short bursts of 15 seconds, stirring between each interval, until the mixture is pleasantly warm but not hot.The warmth helps activate the yeast later while keeping the mixture smooth and spreadable. Once warmed, transfer the mixture into a large mixing bowl, giving yourself enough space to work in the next steps.
- Activate and Combine: Into the warm cottage cheese mixture, add the water, yeast, oregano, rosemary, minced chives, egg, and shredded Monterey Jack cheese. Stir thoroughly until everything is well incorporated. The herbs and cheese infuse flavor at this stage, while the yeast begins to awaken in the warm liquid.
- Form the Dough: Add the all-purpose flour gradually into the bowl, mixing with a sturdy wooden spoon until a sticky, shaggy ball of dough forms. The mixture should cling together but still feel soft and slightly tacky to the touch.
- Develop the Dough with Folds: Lightly flour your work surface and turn the dough out onto it. Shape it into a rough square. Fold one half of the dough over the other, press lightly, then rotate the dough by 90°. Repeat this folding-and-rotating motion 8–10 times. This technique builds structure and elasticity without heavy kneading. If the dough feels excessively sticky, sprinkle in a little more flour as you work.
- First Rise: Lightly oil a large clean bowl and place the folded dough inside. Cover the bowl loosely with plastic wrap or a kitchen towel. Let the dough rise in a warm, draft-free environment for 40–45 minutes, or until it has visibly puffed up and nearly doubled in size. A simple trick is to place the bowl in your oven with just the oven light on, which creates the perfect gentle warmth.
- Shape and Prepare for Second Rise: Transfer the dough back onto a lightly floured surface. Fold it a few more times, again rotating between folds, to gently deflate the air and strengthen the dough. Shape it into a round loaf and place it in a 9-inch cast iron skillet. If you don’t have a skillet, a deep pie plate works just as well. Cover the dough loosely with plastic wrap and let it rest for another 35–40 minutes. During this second rise, the dough develops its final shape and texture.
- Preheat the Oven: While the dough finishes rising, preheat your oven to 350°F (175°C). Make sure to remove the skillet or pie plate from the oven before turning it on if you used it as a warm resting spot.
- Bake the Bread: Place the skillet with the risen dough into the preheated oven.Bake for 25 minutes, then carefully cover the top of the bread with a piece of foil to prevent over-browning. Continue baking for an additional 25–30 minutes, until the bread is golden brown and firm on the outside.
- Finish with Butter and Chives: Once baked, remove the skillet from the oven.Immediately brush the surface of the bread with the remaining 1 tablespoon of butter. Sprinkle the top with the reserved ½ teaspoon of salt and a scattering of fresh minced chives for a burst of flavor and color.
- Cool and Serve: Transfer the bread from the skillet onto a wire cooling rack. Allow it to cool completely before slicing—this resting time helps the interior set and makes slicing easier. Once cooled, cut into thick wedges or slices and enjoy alongside soups, stews, or chili.
Notes
- Use room-temperature ingredients to help the dough rise evenly.
- Don’t overheat the cottage cheese mixture; it should be warm, not hot.
- A cast iron skillet gives the bread a beautiful golden crust, but a pie dish also works.
- Folding (instead of kneading) strengthens the dough gently and prevents toughness.
- If your kitchen is cool, let the dough rise in the oven with just the light on.
- Tent the bread with foil halfway through baking to prevent over-browning.
- Always cool the bread completely before slicing for the best texture.
- Fresh chives on top add color, aroma, and flavor—don’t skip this garnish.
- For extra cheesy flavor, sprinkle more Monterey Jack over the dough before baking.
- Leftover bread can be toasted the next day for an even richer flavor.
Chef’s Secrets for Perfect Bread
The secret to this bread’s light yet hearty texture lies in the folding method.
Unlike heavy kneading, folding layers the dough, traps air, and builds structure without overworking the gluten.
Using cottage cheese is another hidden trick—it adds protein and moisture, resulting in a soft crumb that stays tender for days.
Finally, baking in a cast iron skillet ensures an even bake with a rustic, crisp crust that home ovens often struggle to achieve.
Serving Suggestions and Pairing Ideas
This bread is wonderfully versatile and can elevate almost any meal.
Serve warm slices alongside a comforting bowl of soup, such as tomato bisque or creamy potato chowder.
For heartier dinners, pair it with chili, stews, or roasted meats. It also makes an excellent base for sandwiches or grilled cheese.
Hosting brunch? Simply serve with butter and a drizzle of honey for a sweet-savory treat.
The fresh chives bring a herbal freshness that complements rich, cheesy flavors.
Storage Tips for Freshness Retained
To keep your bread fresh, allow it to cool completely before storing.
Wrap the loaf tightly in foil or plastic wrap, then keep it at room temperature for up to 2 days.
For longer storage, refrigerate in an airtight container for up to 5 days, though the texture may firm slightly.
To restore softness, warm slices briefly in the oven or toaster.
For extended storage, freeze individual slices in freezer-safe bags for up to 2 months—simply thaw at room temperature or reheat directly from frozen.
Frequently Asked Questions
1. Can I use a different cheese?
Yes! While Monterey Jack provides a mild, creamy flavor, you can swap it for cheddar, mozzarella, or even pepper jack for a spicier kick. Just avoid hard cheeses like Parmesan, which won’t melt as smoothly.
2. Do I have to use a cast iron skillet?
Not at all. A 9-inch deep pie dish or even a cake pan will work. However, a cast iron skillet provides superior heat retention and creates that irresistible golden-brown crust.
3. Can I make the dough ahead of time?
Yes. After the first rise, cover the dough tightly and refrigerate overnight. When ready to bake, let it rest at room temperature for about 30–40 minutes before shaping and proceeding with the second rise.
4. How do I know when the bread is fully baked?
The bread should sound hollow when tapped on the bottom, and the internal temperature should register around 190–200°F if you’re using a food thermometer. The crust will be golden brown, and the loaf should feel firm.
5. Can I make this bread gluten-free?
Yes, but it requires adjustments. Replace the all-purpose flour with a 1:1 gluten-free flour blend designed for baking. Keep in mind the texture may be slightly denser, so folding carefully and ensuring proper rises are especially important.
