These Cheesy Garlic Breadsticks stand out as a delicious and satisfying homemade alternative to take-out, offering a perfect blend of rich cheeses, fresh garlic, and a soft, slightly chewy bread base.
Beyond their incredible flavor, they provide a modest boost of protein (7g per serving) and are a comfort food that’s surprisingly approachable for everyday cooking.
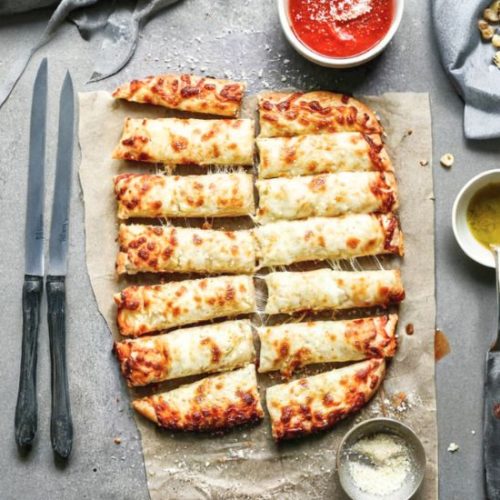
Homemade Cheesy Garlic Breadsticks
Equipment
- 1 Stand Mixer with Dough Hook (or large mixing bowl for hand kneading)
- 1 Pizza Stone or Upside-Down Cookie Sheet
- 1 Rolling Pin or hands for shaping dough
- 1 Small Mixing Bowl (for garlic butter)
- Measuring cups and spoons
Ingredients
For the Dough:
- 1 ⅛ teaspoons active dry yeast
- 1 teaspoon granulated sugar
- ¾ cup warm water about 110°F / 43°C
- 1 ½ tablespoons olive oil
- ¾ teaspoon salt
- ½ teaspoon white vinegar
- 1 ½ to 2 cups bread flour or all-purpose flour
For the Topping:
- 1 ½ tablespoons salted butter melted
- 2 cloves garlic finely minced
- ⅓ cup freshly grated Parmesan cheese
- 1 ¼ cups shredded mozzarella cheese
Instructions
- Activate the Yeast: In a large mixing bowl or the bowl of a stand mixer, combine 1/2 cup of the warm water with the sugar and yeast. Stir gently and allow it to sit for about 5 minutes until the mixture becomes frothy, indicating the yeast is active.
- Mix the Dough Ingredients: Add the remaining 1/4 cup warm water, olive oil, salt, and vinegar to the yeast mixture. Begin mixing on low speed, gradually incorporating 1 1/2 cups of flour. Continue kneading for several minutes, either with a stand mixer dough hook or by hand, until the dough feels smooth and elastic but slightly tacky. Add more flour, a little at a time, if the dough is too sticky, up to 2 cups total.
- First Rise: Cover the bowl loosely with a clean kitchen towel and place it in a warm, draft-free spot. Let the dough rise for about 1 hour, or until it has doubled in size.
- Preheat Your Oven: Set your oven to 475°F (245°C). Place a pizza stone or an inverted baking sheet on the middle rack while the oven heats to ensure a hot surface for baking.
- Shape the Dough: After the dough has risen, gently punch it down to release air. Transfer it onto a large sheet of parchment paper. Using your hands (or a rolling pin if preferred), press and stretch the dough into a roughly rectangular shape about 1/3 inch thick.
- Prepare the Garlic Butter: In a small bowl, mix together the melted butter and minced garlic until combined.
- Add Toppings: Brush the garlic butter evenly over the entire surface of the dough, reaching all the edges.Sprinkle the grated Parmesan cheese first, followed by the shredded mozzarella, distributing them evenly.
- Bake the Breadsticks: Using the parchment paper as a sling, carefully transfer the dough onto the preheated pizza stone or baking sheet in the oven. Bake for 8 to 12 minutes, or until the crust is golden brown and the cheese is melted and bubbly.
- Serve Warm: Remove from the oven and let cool slightly. Slice into sticks and serve immediately with your favorite dipping sauces such as marinara or ranch.
Notes
- Make-Ahead Tip: You can prepare the dough 3 to 4 hours ahead and let it rise slowly in the refrigerator instead of at room temperature. Just bring it to room temp before shaping.
- Freezing Dough: After kneading, spray the dough with non-stick spray and seal it in an airtight freezer bag. Freeze for up to 3 months. Thaw overnight in the fridge, then let sit at room temperature for 30 minutes before shaping.
- Flour Variations: Bread flour will yield a chewier texture, while all-purpose flour creates a slightly softer breadstick. Both work well.
- Garlic Flavor: For a milder garlic taste, reduce the minced garlic or lightly sauté it before mixing into the butter.
- Cheese Options: Feel free to experiment with different cheeses like provolone or asiago for a unique twist.
Made primarily with simple pantry staples like flour, yeast, and olive oil, these breadsticks are also fiber-rich and feature good fats from olive oil and butter, balancing indulgence with nutrition.
Their quick preparation time and adaptability to make-ahead or freezer-friendly methods make them a fantastic option for busy households looking to add a warm, inviting side to meals or snacks.
Whether served as a party appetizer or paired with soups and salads, these breadsticks are an easy crowd-pleaser that delivers both taste and wholesome value.
Must-Have Tools for Perfect Results
Stand Mixer with Dough Hook Attachment
This tool effortlessly kneads the dough to the perfect smooth, elastic texture without tiring your hands. It’s invaluable for consistent bread and pizza doughs, saving time and ensuring reliable results.
Pizza Stone
Essential for achieving a crisp, golden crust with even heat distribution, the pizza stone mimics the effect of a traditional pizza oven. Its use elevates your baking to professional-quality breadsticks every time.
Parchment Paper
This kitchen staple allows easy transfer of the shaped dough to the hot pizza stone without sticking. It also simplifies cleanup, making baking less stressful and more efficient.
Measuring Cups and Spoons
Precision is key when working with yeast doughs. Accurate measuring tools guarantee the right balance of ingredients, leading to consistent texture and flavor.
Small Mixing Bowl
Perfect for blending the garlic butter topping evenly before spreading. This simple tool helps distribute flavors perfectly across your breadsticks for that irresistible garlic aroma.
Chef’s Secrets for Ultimate Flavor
To achieve perfectly soft yet slightly chewy breadsticks with a golden crust, the key lies in careful dough handling and proper oven heat.
Activating the yeast with warm water and sugar ensures a lively rise, creating air pockets that make the breadsticks light and fluffy.
Using olive oil adds a subtle richness and helps tenderize the dough. Don’t rush the rising process—allow the dough to double in size at a warm, draft-free spot to develop maximum flavor and texture.
When shaping the dough, spreading it evenly and not too thick ensures an ideal bake.
Preheating the pizza stone or inverted baking sheet is crucial, as it provides an instant burst of heat that crisps the bottom crust beautifully.
Finally, spreading the garlic butter before adding the cheese allows the flavors to meld, giving a fragrant, savory finish that beats any takeout.
Serving Suggestions for Crowd Pleasers
These cheesy garlic breadsticks shine as a versatile side dish or appetizer that pairs beautifully with a wide range of meals.
Serve them alongside a hearty bowl of marinara or Alfredo pasta for an indulgent Italian-inspired feast.
They also complement fresh salads or soups, such as tomato bisque or minestrone, adding a satisfying, cheesy crunch to each bite.
For a casual snack or party spread, slice them into manageable sticks and offer dipping sauces like ranch, garlic aioli, or pesto for extra flavor variety.
They’re perfect warm out of the oven but also delicious at room temperature, making them a fantastic option for potlucks and family gatherings.
Storage Tips for Freshness and Flavor
To keep your cheesy garlic breadsticks fresh, store any leftovers in an airtight container at room temperature for up to two days.
For longer storage, wrap them tightly in aluminum foil or plastic wrap and refrigerate for up to a week.
When ready to enjoy, reheat them in the oven at 350°F (175°C) for 5–7 minutes to revive their crisp crust and melted cheese.
If you want to freeze the breadsticks after baking, place them in a freezer-safe bag and store for up to 2 months.
Thaw overnight in the fridge and warm gently in the oven before serving. Avoid microwaving, as it can make the breadsticks soggy and chewy.
Frequently Asked Questions Answered Clearly
Q1: Can I use all-purpose flour instead of bread flour?
Yes! All-purpose flour works well and will produce a slightly softer texture. Bread flour yields chewier breadsticks, but both options are delicious.
Q2: How do I know if my yeast is still good?
If your yeast doesn’t foam after mixing with warm water and sugar within 5–10 minutes, it may be expired or inactive. Always use fresh yeast for best results.
Q3: Can I make this recipe dairy-free or vegan?
You can substitute the butter with plant-based margarine and use dairy-free cheeses or omit the cheese altogether for a dairy-free version. The dough itself is vegan-friendly.
Q4: What’s the best way to reheat leftover breadsticks?
Reheating in a conventional oven at 350°F (175°C) for a few minutes is best to restore crispness. Avoid microwaving as it can make them soggy.
Q5: Can I add herbs or spices to the topping?
Absolutely! Adding dried oregano, basil, or red pepper flakes to the garlic butter is a great way to customize the flavor to your liking.
