All products are selected by our editorial team for quality. If you buy through our links, we may earn a small commission at no extra cost to you.
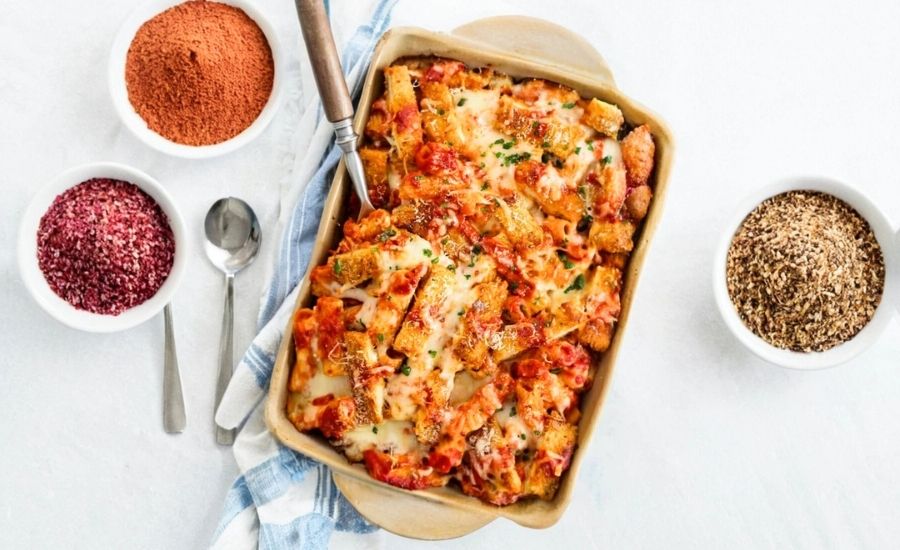
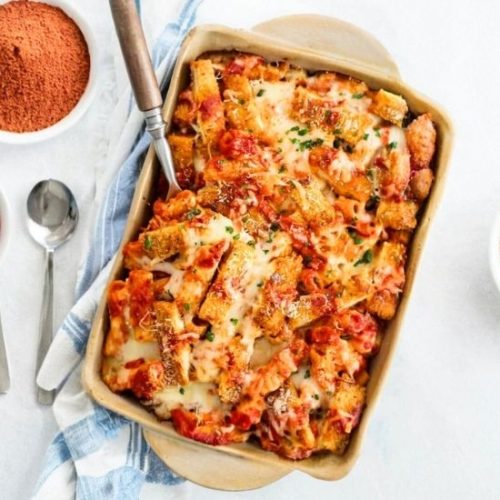
This Chicken Parmesan Casserole delivers the bold, comforting flavors of the classic dish but in an easier, family-style bake.
It’s hearty, high-protein, and layered with cheesy, saucy goodness, making it a satisfying and convenient weeknight dinner or meal-prep option.
With 35g of protein per serving, it fuels your day while still offering rich flavor from melty mozzarella and crispy chicken.
The use of rigatoni adds a rustic bite, and the casserole format makes it far simpler than traditional stovetop chicken Parmesan.
You can customize it for convenience—use frozen chicken tenders or rotisserie chicken for time-saving shortcuts.
It’s also a fiber-rich meal (4g per serving) thanks to the pasta and tomato sauce, and includes healthy fats from olive oil and cheese.
Whether you’re feeding a crowd or looking for make-ahead meals, this casserole combines comfort, convenience, and crave-worthy flavor in one dish.
Must-Have Tools for Perfect Results
1. Cuisinart 9×13 Inch Baking Dish
Essential for layering and baking this casserole evenly.
This generously sized dish ensures that your pasta and chicken are distributed perfectly without crowding, allowing cheese to melt evenly and brown beautifully. Ideal for lasagnas, baked pastas, and holiday desserts too.
2. Calphalon Classic Nonstick Frying Pan
For achieving crispy, golden-brown chicken strips.
With even heat distribution and a durable nonstick surface, this pan makes shallow frying safer and cleanup a breeze. Great for sautéing veggies or searing proteins beyond this recipe.
3. OXO Good Grips Kitchen Tongs
To safely handle chicken during frying.
These stainless steel tongs offer excellent control when turning or lifting hot food, helping you keep your hands safely away from splattering oil. Also handy for grilling, serving, or tossing salads.
4. KitchenAid 3-Piece Mixing Bowl Set
Perfect for breading station setup.
Sturdy, non-slip bases keep your bowls steady as you flour, egg, and breadcrumb your chicken. Their nesting design saves space and they’re great for baking, mixing batters, or marinating meats.
5. Box Grater with Non-Slip Base
For shredding mozzarella and Parmesan fresh.
Grating cheese from a block melts better and tastes fresher than pre-shredded.
This multi-sided grater is also excellent for zesting citrus, grating garlic, or prepping veggies.
Chicken Parmesan Casserole
Equipment
- 1 Large Pot: For boiling rigatoni pasta
- 1 9×13 Inch Casserole Dish: For assembling and baking the casserole
- 3 Mixing Bowls: For breading station (flour, egg, breadcrumbs)
- 1 Frying Pan (nonstick or stainless): For shallow-frying chicken
- 1 Pair Kitchen Tongs: For safely flipping and removing chicken from oil
- 1 Cheese Grater: For shredding mozzarella and Parmesan
- 1 Cutting Board + Knife: For slicing chicken into strips and prepping garnish
- 1 Colander: For draining cooked pasta
- Paper Towels: For draining fried chicken pieces
Ingredients
For the Pasta and Sauce:
- ¾ pound rigatoni pasta
- 32 –48 ounces marinara sauce use more for extra sauciness
- 2 tablespoons grated Parmesan cheese
- 1 cup shredded mozzarella cheese freshly grated, if possible
For the Chicken:
- 2 small boneless skinless chicken breasts
- ¾ cup all-purpose flour
- 2 teaspoons seasoned salt
- ¼ teaspoon ground black pepper
- 2 large eggs
- 1½ cups Italian-style breadcrumbs
- ¾ cup vegetable oil for frying
- 2 tablespoons unsalted butter for color and crispness
For Assembly and Baking:
- 2 cups shredded mozzarella cheese freshly grated
- 2 tablespoons grated Parmesan cheese
- Fresh parsley chopped (for garnish)
Instructions
- Boil and Prepare the Pasta: Bring a large pot of salted water to a boil. Add the rigatoni and cook until just shy of al dente—about 1 minute less than the package suggests. Drain the pasta and return it to the pot. Stir in the marinara sauce (start with 32 oz.), 2 tablespoons Parmesan cheese, and 1 cup mozzarella cheese. Toss to combine and set aside.
- Prepare and Bread the Chicken: Pat the chicken breasts dry using paper towels, then slice them into thin strips, about ½ inch thick. Set up a breading station with three bowls. Dredge each chicken strip in the flour, then dip into the eggs, and finally coat generously with breadcrumbs. Lightly press the breadcrumbs into the chicken to help them adhere.
- Pan-Fry the Chicken Strips: In a large skillet, heat about ¼ inch of vegetable oil along with the butter over medium-high heat. Once hot, add the breaded chicken in batches, being careful not to overcrowd the pan. Fry for about 4 minutes on each side or until golden brown and fully cooked. Transfer to a plate lined with paper towels to drain. Once all chicken is done, cut the strips into bite-sized pieces.
- Layer and Assemble the Casserole: Preheat your oven to 375°F (190°C). Lightly grease a 9×13 inch baking dish. Spoon half of the pasta mixture into the dish. Scatter half of the fried chicken pieces on top, then sprinkle with 2 tablespoons Parmesan and 1 cup mozzarella cheese. Repeat the layers with the remaining pasta, chicken, and cheese.
- Bake Until Golden and Bubbling: Place the casserole uncovered in the oven and bake for 25 minutes. For a crispier, golden top, raise the temperature to 425°F and bake for an additional 5 minutes. Remove from oven, garnish with chopped parsley, and let rest for 5 minutes before serving.
Notes
- Use Freshly Grated Cheese: Block mozzarella (whole milk, low-moisture) melts better than pre-shredded and creates a gooier, stretchier texture.
- Sauce Preference: For a juicier casserole, use up to 48 ounces of marinara. If you like it thicker, stick to 32 ounces.
- Frying Tip: Adding a small amount of butter to the oil not only enhances flavor but gives the chicken a deeper golden crust.
- Make Ahead: Assemble the casserole up to 2 days in advance and refrigerate. When ready to bake, let it sit at room temperature for 30 minutes. Cover and bake for 15 minutes at 375°F, then uncover and bake another 25 minutes.
- Freezer Friendly: Cooled leftovers can be frozen. Thaw in the refrigerator overnight, then reheat in the microwave or oven. Add extra sauce before reheating to prevent dryness.
- Shortcut Options:
- Frozen Chicken Tenders: Let thaw slightly, cut into strips, and use in place of homemade.
- Rotisserie Chicken: Shred and layer. For a crispy topping, mix breadcrumbs with melted butter and sprinkle on top before the last 10 minutes of baking.
Chef’s Secrets for Crispy Perfection
The secret to irresistibly crispy chicken in this casserole lies in the prep and frying technique.
First, patting the chicken dry ensures the flour adheres properly, which is key for an even coating.
When breading, press the breadcrumbs gently into the chicken to help them stick and form that golden crust.
Adding a touch of butter to the oil may seem small, but it gives the chicken a rich, golden hue and adds flavor.
Don’t rush the frying—cooking in batches avoids overcrowding the pan, allowing the strips to crisp evenly.
For the cheese, skip pre-shredded bags and grate mozzarella fresh from a block.
Low-moisture, whole milk mozzarella melts beautifully and creates that gooey, bubbling finish we all crave in casseroles.
Serving Suggestions to Complete the Meal
This Chicken Parmesan Casserole is a satisfying main dish on its own, but it shines even brighter when served with the right sides.
A crisp Caesar salad or a simple mixed greens salad with balsamic vinaigrette adds freshness and balance to the cheesy richness.
For bread, garlic bread with melted cheese or a warm loaf of crusty Italian bread is ideal for soaking up the extra marinara sauce.
If you’re feeding a larger group, consider adding a vegetable side like roasted zucchini, sautéed spinach, or steamed broccoli.
A glass of red wine like Chianti or a sparkling Italian soda rounds out the meal beautifully for a comforting, well-rounded dinner.
Storage Tips for Longer Freshness
Leftovers of this casserole keep surprisingly well, making it great for meal prep or busy weeknights.
Store any cooled leftovers in an airtight container in the refrigerator for up to three days.
When reheating, consider adding a splash of marinara sauce to help keep the pasta moist and prevent drying.
To freeze, let the casserole cool completely, then portion it into freezer-safe containers.
It will keep well for up to two months. For best results, thaw overnight in the refrigerator before reheating.
Reheat in the oven at 350°F until warmed through, or use a microwave in 30-second intervals, stirring between each.
If you’re planning ahead, you can assemble the entire casserole (uncooked), cover it tightly, and refrigerate it for up to two days before baking.
Frequently Asked Questions About This Dish
1. Can I use a different pasta shape?
Absolutely! While rigatoni is perfect for holding sauce and layering, other sturdy shapes like penne, ziti, or fusilli work just as well. Just avoid delicate pastas that may break down during baking.
2. How do I make this recipe faster?
Using frozen breaded chicken tenders or rotisserie chicken can save a lot of time. If using rotisserie chicken, add a buttery breadcrumb topping during the final minutes of baking for a crispy touch.
3. Can this casserole be made vegetarian?
Yes! You can substitute the chicken with breaded eggplant slices or meatless chicken-style tenders for a vegetarian version. Keep the rest of the recipe the same, adjusting the bake time if needed.
4. What’s the best cheese to use?
Freshly grated, low-moisture whole milk mozzarella melts best and gives you that stretchy, cheesy texture. Pre-shredded cheese often contains anti-caking agents, which prevent smooth melting.
5. Why is my casserole dry after reheating?
This can happen if there’s not enough sauce or if it’s overheated. To fix it, stir in a few spoonfuls of marinara before reheating and cover with foil to retain moisture if using the oven.
This recipe is inspired by thecozycook and has been carefully refined to enhance clarity, streamline preparation steps, and ensure accurate results. We’ve also included health benefits, nutritional highlights, and Must-Have Tools to help you get the best results every time you cook.
