All products are selected by our editorial team for quality. If you buy through our links, we may earn a small commission at no extra cost to you.
This homemade chicken pot pie elevates a classic comfort dish with a creamy, vegetable-packed filling and a buttery, flaky crust.
What makes this recipe stand out is its perfect balance of hearty protein from tender chicken, fiber-rich vegetables like carrots, celery, and peas, and the satisfying richness of a creamy sauce without relying on heavy cream.
With moderate calories and low saturated fat, it’s a nourishing option for weeknight dinners or meal prep.
The recipe is surprisingly approachable, taking just over an hour from start to finish, and it allows for flexibility—choose store-bought pie crusts for convenience or make your own for extra indulgence.
High in protein, rich in vegetables, and delightfully satisfying, this pot pie is both a family-friendly meal and a versatile, everyday dinner option.
Must-Have Tools for Perfect Results
Large Skillet or Sauté Pan
Ideal for cooking the chicken and vegetables evenly, ensuring the filling develops deep flavor. Beyond this recipe, it’s perfect for stir-fries, searing meats, or sautéing vegetables.
9-Inch Pie Plate
Ensures even heat distribution for a crisp, golden crust. A versatile piece for tarts, quiches, and classic pies.
Pastry Brush
Used to apply egg wash, giving the crust a beautiful, golden shine. Also essential for glazing baked goods or basting meats.
Sharp Chef’s Knife
Perfect for chopping vegetables and cutting chicken into uniform pieces. A reliable all-purpose tool for any kitchen prep.
Wooden Spoon
Great for stirring the thickening sauce without scratching cookware. Handy for mixing, folding, or stirring any dish.
Weeknight-Friendly Chicken Pot Pie
Equipment
- 1 large skillet or sauté pan
- 1 9-inch pie plate
- 1 Pastry brush
- 1 Sharp chef’s knife
- 1 Wooden spoon
Ingredients
- 4 tablespoons butter plus extra for greasing
- 1 medium onion diced
- 4 medium carrots peeled and diced
- 2 celery stalks chopped
- Salt and black pepper to taste
- 1 tablespoon fresh thyme leaves
- 2 medium-large chicken breasts cut into 1-inch pieces
- 3 tablespoons all-purpose flour
- 1 cup chicken broth
- 1 ½ cups half-and-half or whole milk
- ¾ cup frozen peas
- 2 sheets refrigerated pie crust or 1 homemade pie crust
- 1 egg lightly beaten
Instructions
- Preheat the Oven for Perfect Baking: Set your oven to 425°F (220°C) to ensure it reaches the ideal temperature by the time your pie is ready. Preheating is key for achieving a crisp, golden crust that holds up to the creamy filling without becoming soggy. If using a metal pie plate, it will conduct heat evenly, giving your crust a perfect bottom texture.
- Sauté the Aromatics for Deep Flavor: In a large skillet or sauté pan, melt 4 tablespoons of butter over medium-high heat. Once melted, add the diced onion, chopped carrots, and celery along with a pinch of salt.Stir frequently and cook for about 5–7 minutes until the onions are soft and slightly golden. This step develops a rich, savory base that forms the backbone of your filling.
- Infuse with Fresh Herbs: Sprinkle in the fresh thyme leaves and stir to combine. The thyme adds a subtle, fragrant depth to the filling that complements both the chicken and vegetables beautifully. Cook for an additional 1 minute to allow the herbs to release their aroma.
- Brown the Chicken for Juicy Tenderness: Add the chicken pieces to the skillet, seasoning generously with salt and pepper. Sauté for 5–6 minutes, stirring occasionally, until the chicken starts to brown on the edges.Browning not only locks in flavor but also adds a pleasant texture to the finished pie.
- Create a Creamy Base with Flour and Dairy: Sprinkle the flour over the chicken and vegetables, stirring constantly for 1–2 minutes. This cooks out the raw flour taste and begins to thicken the sauce. Gradually pour in the chicken broth and half-and-half (or milk), stirring continuously.Cook the mixture until it thickens slightly—aim for a consistency just a little thinner than your desired final pie filling, as it will thicken further while baking.
- Incorporate the Peas for Color and Nutrition: Gently fold in the frozen peas and taste the filling, adding additional salt or pepper if needed. Remove the pan from heat and allow the mixture to cool slightly. Cooling ensures the filling won’t make your crust soggy when assembled.
- Prepare the Pie Plate for Easy Removal: Lightly butter a 9-inch pie plate or similar baking dish.This prevents the crust from sticking and makes slicing easier. Line the bottom of the dish with one of your pie crust sheets, gently pressing it into the corners and sides without stretching the dough.
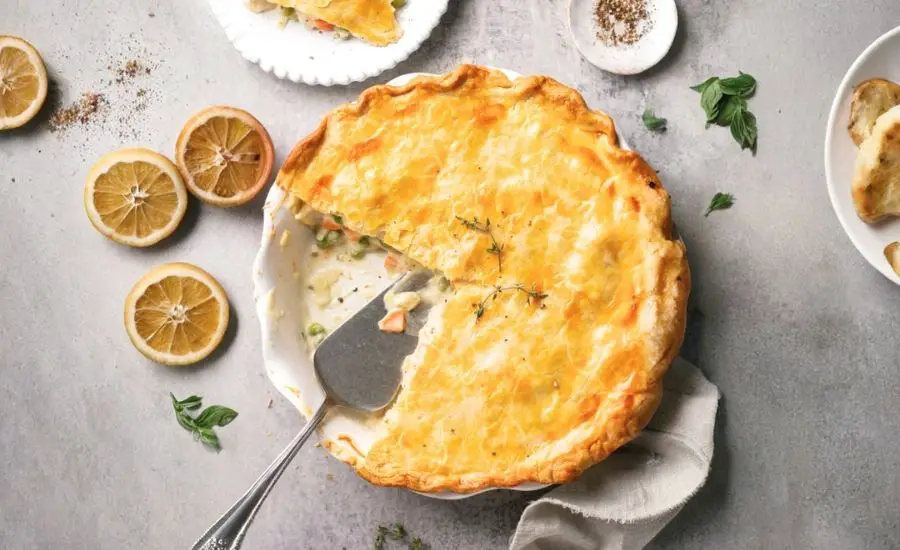
- Assemble the Pie with Care: Pour the slightly cooled filling evenly into the prepared crust, spreading it gently so it sits level. Brush the exposed edges of the bottom crust with the lightly beaten egg—this helps seal the top crust later.Lay the second pie crust over the filling, pressing the edges together and trimming any excess dough.Crimp the edges with your fingers or a fork for a decorative finish.
- Apply Egg Wash for a Golden Finish: Brush the entire top crust with the remaining beaten egg. This step ensures a glossy, golden-brown appearance once baked. Cut a small slit or “steam vent” in the center of the top crust to allow steam to escape during baking.
- Bake to Golden Perfection: Place the pie in the preheated oven and bake for 30–35 minutes, or until the top crust is golden and fully cooked. Depending on your oven’s temperature, you may need slightly more or less time, so check visually.If the edges brown too quickly, cover them with foil to prevent burning.
- Rest the Pie Before Serving: Remove the pie from the oven and allow it to rest for 10–15 minutes. Resting lets the filling set, making it easier to slice cleanly and ensuring each serving holds its shape.
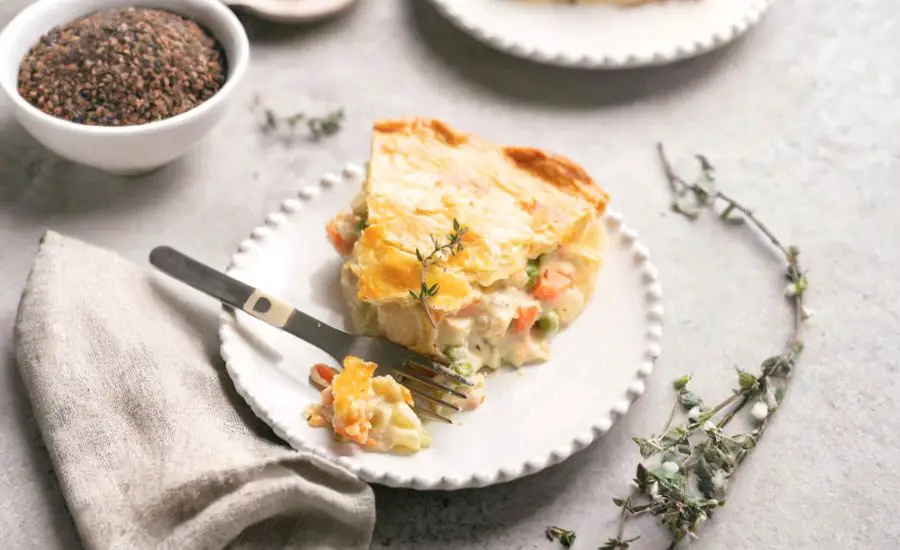
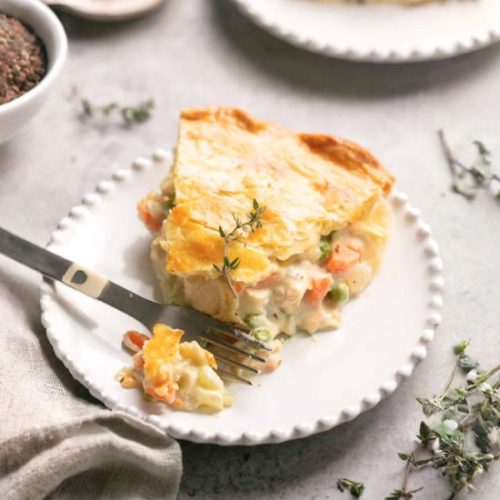
- Slice, Serve, and Enjoy: Use a sharp knife to cut the pie into six generous portions. Serve warm for a comforting, protein-packed meal. Pair with a light green salad for added fiber and a balanced plate.
Notes
- Use a metal pie plate for a crispier bottom crust; it conducts heat better than glass or ceramic.
- For convenience, store-bought pie crust works perfectly, but homemade crust adds extra flakiness and flavor.
- Make sure to cool the filling slightly before assembling to prevent a soggy crust.
- Egg wash isn’t mandatory but gives a beautiful golden finish.
- Customize the vegetables to your preference—corn, mushrooms, or green beans can be added for variety.
- To save time, cook chicken in advance or use rotisserie chicken for a quicker version.
- Optional white cooking wine can be added when sautéing the chicken and vegetables for extra depth.
Chef’s Secrets for Best Results
The key to an exceptional chicken pot pie lies in building layers of flavor. Start by browning the chicken for depth and juicy tenderness.
Sautéing the onions, carrots, and celery until soft releases their natural sweetness, which enhances the creamy sauce.
Be sure to cook the flour briefly before adding liquids to avoid a raw taste and achieve a silky, thick consistency.
Don’t rush the cooling process; adding hot filling directly to the pie crust can result in a soggy bottom.
Finally, brushing the crust with egg wash gives your pie a professional, golden finish.
Small touches like these elevate a simple pot pie to a restaurant-quality dish.
Serving Suggestions for Maximum Enjoyment
This chicken pot pie shines on its own but pairs beautifully with fresh, crisp sides.
Serve with a light green salad, roasted seasonal vegetables, or a tangy coleslaw for a balanced meal.
For extra comfort, pair with mashed potatoes or crusty bread to soak up the creamy filling.
Leftovers can be reheated individually and even make a fun lunch in a lunchbox or microwave-safe container.
A drizzle of fresh herbs, like parsley or thyme, just before serving adds a pop of color and flavor that enhances presentation.
Storage Tips for Longevity
Allow the pie to cool completely before storing to maintain its texture.
Cover tightly with foil or plastic wrap and refrigerate for up to 3–4 days.
For longer storage, the pie can be frozen unbaked for up to 2 months; wrap it securely and thaw overnight in the fridge before baking.
If already baked, freeze in individual slices for convenient single servings.
Reheat in the oven at 350°F (175°C) until warmed through, which helps retain the crust’s crispiness.
Avoid microwaving directly from frozen to prevent a soggy texture.
Frequently Asked Questions About Recipe
1. Can I use rotisserie chicken instead of raw chicken?
Yes! Rotisserie chicken is a great shortcut. Simply shred the cooked chicken and add it after the sauce has thickened, reducing overall cooking time.
2. Can I make this gluten-free?
Absolutely. Substitute all-purpose flour with a gluten-free flour blend and use a gluten-free pie crust. The cooking method remains the same, and the result is equally delicious.
3. Can I prepare the pie ahead of time?
Yes, you can assemble the pie in advance and refrigerate it unbaked for a few hours. Bring it to room temperature before baking to ensure even cooking.
4. Can I add more vegetables?
Certainly! Corn, mushrooms, green beans, or bell peppers are excellent additions. Adjust cooking time slightly if adding dense vegetables to ensure they become tender.
5. How do I avoid a soggy bottom crust?
Use a metal pie plate for better heat conduction, cool the filling slightly before adding, and consider pre-baking the bottom crust for 5–7 minutes before adding the filling.
This recipe is inspired by lecremedelacrumb and has been carefully refined to enhance clarity, streamline preparation steps, and ensure accurate results. We’ve also included health benefits, nutritional highlights, and Must-Have Tools to help you get the best results every time you cook.
