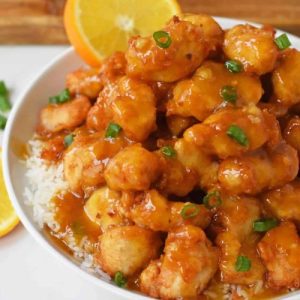
Crispy, tangy, and satisfying, this homemade Orange Chicken brings a healthier twist to a takeout favorite.
Packed with lean protein from tender chicken breast and a light coating, it’s a dish that fuels your body while pleasing your taste buds.
The fresh orange sauce delivers vitamin C and antioxidants, while the balance of sweet and savory flavors makes it a guilt-free comfort meal.
Quick, wholesome, and weeknight-friendly—perfect for both family dinners and meal prep.
Chinese Orange Chicken
Equipment
- 1 Medium saucepan (for sauce)
- 1 Mixing bowl (for coating)
- 1 Shallow dish or pie plate (for flour mixture)
- 1 Whisk
- 1 Heavy-bottomed pot (for frying, at least 3 qt)
- 1 Thermometer (for oil temperature)
- 1 Slotted spoon or tongs (for frying)
- Paper Towels (for draining)
- 1 Plate or tray (for holding chicken before frying)
Ingredients
For the Chicken
- 4 pieces boneless skinless chicken breasts — cut into bite-sized chunks
- 3 large eggs — whisked
- ⅓ cup cornstarch
- ⅓ cup all-purpose flour
- 1 teaspoon salt adjust to taste
- Oil — enough for deep frying about 2–3 cups, depending on pot size
For the Orange Sauce
- 1 cup orange juice fresh or store-bought
- ½ cup sugar
- 2 tablespoons rice vinegar or white vinegar
- 2 tablespoons soy sauce use tamari if gluten-free
- ¼ teaspoon ground ginger
- ¼ teaspoon garlic powder or 2 fresh garlic cloves finely minced
- ½ teaspoon red chili flakes
- Zest of 1 fresh orange
- 1 tablespoon cornstarch + 2 tablespoons water slurry for thickening
Garnish
- 2 stalks green onions — sliced
- Additional orange zest optional
Instructions
- Prepare the Chicken Base: Begin by cutting the boneless, skinless chicken breasts into small, bite-sized cubes. Aim for uniform pieces so they cook evenly during frying. Place the chicken chunks in a bowl and set them aside while you prepare the coatings. This step ensures that everything is ready before the cooking process starts, saving time and keeping the workflow smooth.
- Set Up the Breading Station: In one shallow dish (such as a pie plate or wide bowl), whisk together the all-purpose flour, cornstarch, and a pinch of salt. This dry mixture will help the chicken achieve a crisp, golden crust once fried. In a separate shallow dish, crack and whisk the eggs until smooth and slightly frothy. These two stations will be your dipping line: one for egg coating, one for flour coating.
- Coat the Chicken Properly: Working with a few pieces at a time, dip each chicken cube into the egg mixture, ensuring it’s fully coated. Lift it slightly to let excess egg drip back into the dish. Next, roll it in the flour-cornstarch mixture, pressing gently so the coating adheres well. Place the coated chicken on a clean plate. Repeat until all pieces are breaded. Don’t skip this step—double-coating is what guarantees that signature crunchy exterior.
- Heat the Oil for Frying: Pour about 2 to 3 inches of oil into a heavy-bottomed pot or Dutch oven. Place it over medium-high heat. Using a kitchen thermometer, monitor the temperature until the oil reaches 350°F (175°C). This is the sweet spot: hot enough to crisp the coating, but not so hot that the chicken burns before cooking through. If you don’t have a thermometer, drop a small bit of batter into the oil—if it bubbles and rises to the top, the oil is ready.
- Fry the Chicken to Golden Perfection: Carefully lower a batch of coated chicken pieces into the hot oil using a slotted spoon or tongs. Do not overcrowd the pot, as this will lower the oil temperature and lead to soggy chicken. Fry each batch for 2–3 minutes, turning occasionally to ensure even browning.When the chicken turns golden and crisp, transfer it onto a paper towel-lined plate to drain excess oil. Continue until all the chicken is fried and beautifully crunchy.
- Create the Orange Sauce Base: While the chicken rests, start making the sauce. In a medium saucepan, combine orange juice, sugar, rice vinegar, soy sauce, ground ginger, garlic (or garlic powder), and red chili flakes. Whisk to blend everything smoothly. Place the pan over medium heat and allow the mixture to warm up and slightly bubble for about 3 minutes. This gentle simmering helps the flavors meld together.
- Thicken the Sauce: In a small bowl, prepare a cornstarch slurry by whisking together 1 tablespoon cornstarch with 2 tablespoons water until lump-free. Slowly pour this slurry into the simmering orange sauce, whisking continuously to avoid clumps. Continue to cook for 4–5 minutes, or until the sauce thickens to a glossy consistency that can coat the back of a spoon. Remove the pan from the heat and stir in the fresh orange zest for a burst of citrus aroma.
- Combine the Crispy Chicken with the Sauce: Place the fried chicken pieces in a large mixing bowl. Pour the warm orange sauce over the chicken and gently toss until each piece is fully coated in the sticky, flavorful glaze. The sauce should cling beautifully to the crunchy coating, giving you that restaurant-style shine and taste. If you prefer, reserve a little extra sauce on the side to drizzle over rice or vegetables.
- Garnish and Serve: Transfer the saucy chicken to a serving platter or bowl. Sprinkle with freshly sliced green onions and a little extra orange zest for added freshness and color. Serve immediately while hot and crisp, ideally with steamed rice or stir-fried vegetables for a balanced meal.
- Storage & Meal Prep Tip: If you have leftovers, store the chicken and sauce separately for best results. The chicken can be kept in an airtight container in the refrigerator for up to 2 days, and the sauce for up to 4 days. To reheat, crisp the chicken in an oven or air fryer, then toss with reheated sauce just before serving. This keeps the texture closer to freshly made.
Notes
- Cut chicken pieces evenly for consistent cooking.
- Maintain oil at 350°F (175°C) to keep the chicken crisp and avoid sogginess.
- Freshly squeezed orange juice and zest make the sauce more vibrant than bottled juice.
- For gluten-free, swap soy sauce with tamari and use cornstarch instead of flour.
- Toss chicken with sauce only when ready to serve for maximum crunch.
- Adjust red chili flakes for a mild, medium, or spicy kick.
- Double the sauce if serving with rice or noodles.
- Use an air fryer for a lighter, lower-oil version.
- Garnish right before serving for the freshest flavor and color.
- This dish pairs beautifully with steamed rice, fried rice, or stir-fried veggies.
Chef’s Secrets to Perfect Orange Chicken
The secret to restaurant-style Orange Chicken lies in the balance of crispiness and sauce.
Always coat the chicken in a cornstarch-flour mixture for that signature crunch—it holds up better against sauce than flour alone.
When frying, keep batches small so the oil temperature stays consistent; this ensures evenly golden chicken.
For the sauce, don’t skip the slurry step—it creates the glossy, clingy texture that makes each bite irresistible.
Finally, stir in the orange zest at the very end; cooking it too long dulls its brightness.
Small details like these elevate the dish from homemade to takeout-worthy.
Serving Suggestions for Every Occasion
Orange Chicken shines as the star of the meal, but it pairs best with simple sides that balance its richness.
Serve it over steamed jasmine rice or brown rice to soak up the extra sauce, or alongside vegetable fried rice for a more filling spread.
For a lighter plate, pair it with stir-fried broccoli, bok choy, or snap peas to add crunch and fiber.
This recipe also makes an excellent party dish—serve it in small bowls with toothpicks for an easy finger-food version.
If you’re meal prepping, portion it with rice and roasted vegetables into containers for quick, ready-to-go lunches.
Storage Tips to Keep It Fresh
To preserve the crispiness of Orange Chicken, always store the chicken and sauce separately when possible.
Place leftover chicken in an airtight container lined with a paper towel to absorb excess moisture, and refrigerate for up to 2 days.
The sauce can be refrigerated in a small container for up to 4 days.
When reheating, warm the chicken in an air fryer or oven until crisp, and reheat the sauce gently on the stovetop or microwave.
Toss together only when ready to serve.
This way, you avoid soggy leftovers and keep that perfect crunch.
Frequently Asked Questions
1. Can I make this in an air fryer?
Yes! For a lighter version, spray the coated chicken pieces with cooking spray and air fry at 375°F (190°C) for about 12–15 minutes, flipping halfway through. It won’t be as indulgently crispy as deep frying, but it’s a great healthier option.
2. Can I use chicken thighs instead of chicken breast?
Absolutely. Boneless, skinless chicken thighs are juicier and more forgiving if slightly overcooked. Just trim off excess fat and cut into similar-sized chunks for even cooking.
3. How can I make the sauce less sweet?
If you prefer a tangier sauce, reduce the sugar by 2–3 tablespoons and increase the vinegar slightly. You can also add a splash of fresh lemon juice for extra brightness.
4. What oil is best for frying?
Neutral oils with a high smoke point—such as canola, peanut, or vegetable oil—work best. Avoid olive oil, as it can burn at high frying temperatures and affect the flavor.
5. Can I prepare this dish ahead of time?
You can prep ingredients in advance by cutting the chicken and mixing the dry coating.
The sauce can also be made ahead and stored in the fridge. Fry the chicken just before serving for the best crunch, then toss with warmed sauce.
