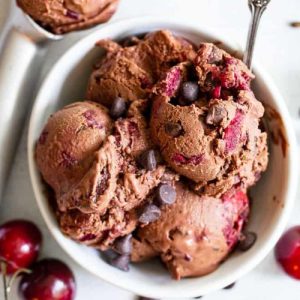
Indulge in this luscious Chocolate Chip Cherry Ice Cream that’s creamy, rich, and naturally sweetened.
Packed with plant-based protein from almond butter and fiber from fresh cherries, it’s a guilt-free dessert that’s also vegan, paleo-friendly, and low in refined sugar.
Quick to prepare and freezer-ready, it’s perfect for a satisfying treat anytime, whether for dessert or meal prep.
Chocolate Chip Cherry Ice Cream
Equipment
- 1 Medium saucepan
- Whisk
- Loaf pan or freezer-safe container
- Measuring cups and spoons
- Ice cream maker (optional)
Ingredients
- 2 cans 14 oz each full-fat coconut milk, separate cream from water
- ⅔ cup raw cacao powder sifted (or unsweetened cocoa powder)
- 1 tbsp tapioca starch
- ¾ cup pure maple syrup
- ¼ tsp sea salt
- 1 tbsp pure vanilla extract
- 6 tbsp creamy almond butter unsalted; for nut-free, use sunflower butter
- 1 cup fresh cherries pitted and chopped
- ¾ cup dark chocolate chips or chopped dark chocolate
Instructions
- Prepare the Coconut Base: Begin by opening your two cans of full-fat coconut milk. From one can, carefully scoop out only the thick cream, leaving the watery part behind — this cream will create the rich, creamy base for your ice cream. Pour both the separated cream and the other full can of coconut milk into a medium-sized saucepan.
- Mix the Cocoa and Thickener: Add 2/3 cup of sifted raw cacao powder to the coconut milk. If you don’t have raw cacao, unsweetened cocoa powder works perfectly as a substitute. Sprinkle in 1 tablespoon of tapioca starch, which will act as a natural thickener and give your ice cream that smooth, scoopable texture. Whisk all the ingredients together until fully combined, ensuring there are no lumps of powder.
- Sweeten the Mixture: Next, pour in 3/4 cup of pure maple syrup to naturally sweeten your ice cream. Maple syrup provides a deep, caramel-like sweetness without refined sugar. Add 1/4 teaspoon of sea salt to enhance the chocolate flavor and balance the sweetness. Whisk all the ingredients together until the mixture is smooth and glossy.
- Heat and Thicken the Base: Place the saucepan over medium heat. Stir continuously with a whisk to prevent the mixture from sticking or burning. As the mixture heats, you’ll notice it starts to thicken slightly and small bubbles will form along the edges — this usually takes about 10 minutes.The mixture should coat the back of a spoon without being overly stiff. This step is essential for creating a creamy, luscious ice cream.
- Add Flavor and Texture Enhancers: Once your chocolate base has thickened, remove the saucepan from the heat. Immediately whisk in 6 tablespoons of creamy almond butter (or sunflower butter for a nut-free version) until fully incorporated. Add 1 tablespoon of pure vanilla extract and stir in the 1/4 teaspoon of sea salt you set aside earlier. Continue whisking until the mixture is completely smooth and velvety. This step enhances both flavor and texture, giving the ice cream a rich mouthfeel.
- Cool the Mixture: Allow the chocolate mixture to cool at room temperature for about 20 minutes. During this time, you may notice a thin film forming on the surface — this is completely normal. Simply whisk the film back into the mixture to maintain a uniform texture. Once the mixture has cooled slightly, transfer it to the refrigerator to chill completely. Cooling ensures the ice cream will churn properly or set nicely if making a no-churn version.
- Prepare Cherries and Chocolate: While the mixture chills, pit and chop 1 cup of fresh cherries into bite-sized pieces. Measure out 3/4 cup of dark chocolate chips or chopped dark chocolate. These add bursts of sweetness and texture to every spoonful, making each bite exciting and indulgent. Set them aside until you’re ready to fold them in.
- No-Churn Method: If you’re making this ice cream without an ice cream maker, begin by folding the cooled chocolate mixture together with the chopped cherries and chocolate chips. Transfer everything into a loaf pan or another freezer-safe container. Smooth the top with a spatula, then cover tightly with plastic wrap. Freeze for at least 4–6 hours or overnight. For the creamiest texture, stir the mixture occasionally during freezing to prevent ice crystals from forming. When ready to serve, allow it to sit at room temperature for 5–10 minutes to soften slightly.
- Ice Cream Maker Method: If you have an ice cream maker, pour the fully chilled mixture into the machine’s bowl. Churn according to the manufacturer’s instructions for 20 minutes or until the ice cream reaches a thick, creamy consistency. Once churned, gently fold in the chopped cherries and chocolate. Transfer the ice cream to a loaf pan or freezer-safe container, cover, and freeze for at least 2 hours to set before serving.
- Serve and Enjoy: When ready to serve, scoop generous portions into bowls or cones. Each bite offers a creamy chocolate base, sweet bursts of cherries, and rich dark chocolate pieces. Store leftovers in an airtight container in the freezer for up to two weeks. This ice cream is perfect as a wholesome dessert, a post-dinner treat, or a make-ahead option for gatherings.
Notes
- For the creamiest texture, use full-fat coconut milk; light coconut milk may yield a thinner ice cream.
- Tapioca starch can be substituted with arrowroot powder or cornstarch if needed.
- Almond butter adds richness and creaminess—sunflower or cashew butter works for nut-free options.
- Use fresh, ripe cherries for the best flavor; frozen cherries can be used but may add extra moisture.
- For chocolate, use at least 60% cacao dark chocolate for a deep, rich flavor.
- If using an ice cream maker, chilling the mixture thoroughly is essential for proper churning.
- Stirring occasionally during no-churn freezing prevents ice crystals and keeps the ice cream smooth.
- Allow the ice cream to sit at room temperature 5–10 minutes before scooping for easier serving.
- Maple syrup or coconut sugar works for natural sweetness; adjust to taste depending on your cherries’ sweetness.
Chef’s Secrets For Perfect Creaminess
The secret to this ice cream’s silky texture starts with high-quality, full-fat coconut milk.
The fat content is key for creating a creamy, scoopable base without dairy.
Whisking the chocolate base constantly while heating prevents lumps and ensures even thickening.
Incorporating almond butter not only adds flavor but stabilizes the ice cream, making it rich and smooth.
For no-churn versions, gentle folding of chocolate chips and cherries avoids breaking the cream, preserving both texture and visual appeal.
Additionally, don’t rush the cooling step; chilling the base fully ensures better consistency, whether you churn or freeze.
Serving Suggestions For Maximum Enjoyment
Serve this ice cream in bowls, cones, or even layered in a sundae glass with fresh berries for an elegant touch.
Top with toasted nuts, cacao nibs, or a drizzle of dark chocolate or almond butter sauce for added texture.
It pairs wonderfully with vegan brownies or crisp cookies for a decadent dessert platter.
For a lighter option, serve alongside fresh fruit like strawberries or raspberries, which complement the tartness of the cherries and balance the rich chocolate.
This ice cream also works well as a topping for waffles, pancakes, or dairy-free cakes.
Storage Tips To Keep Freshness
Store your ice cream in an airtight container in the coldest part of your freezer to maintain its creamy texture.
Label the container with the date; it’s best enjoyed within two weeks for optimal flavor and freshness.
Avoid frequent thawing and refreezing, as this can create ice crystals and affect texture.
If ice crystals do form, allow the ice cream to sit at room temperature for 5–10 minutes and stir gently before serving.
For long-term storage, consider dividing the ice cream into smaller portions to minimize exposure to air every time you serve.
Frequently Asked Questions
1. Can I use frozen cherries instead?
Yes! Frozen cherries work perfectly, but be sure to thaw and drain them to prevent excess water from thinning the ice cream. Pat them dry with a paper towel before folding them into the base.
2. How can I make this ice cream nut-free?
Simply substitute the almond butter with sunflower seed butter or tahini. This keeps the creamy texture intact while making it safe for those with nut allergies.
3. Do I need an ice cream maker for this recipe?
No, this recipe works beautifully as a no-churn ice cream. Freezing in a container and occasionally stirring ensures a creamy, scoopable texture without special equipment.
4. Can I reduce the sugar or use another sweetener?
Yes, you can reduce the maple syrup slightly or use coconut sugar, agave, or a sugar substitute. Taste the base before chilling and adjust sweetness based on the natural sweetness of your cherries.
5. Why does a film form on the surface while cooling?
This is normal! It happens as the mixture cools. Simply whisk the film back into the base to maintain a smooth, uniform texture. It does not affect the taste or final consistency.
