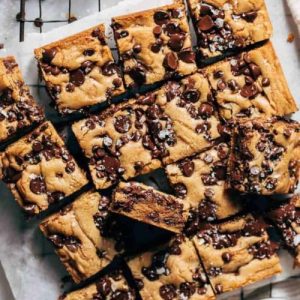
Indulge in these irresistible brown butter chocolate chip cookie bars—soft, chewy, and packed with rich, toffee-like flavor.
Made with wholesome ingredients like quality butter, real chocolate, and a touch of sea salt, they offer a satisfying treat with good fats and protein from butter and eggs.
Perfect for a quick snack, dessert, or make-ahead treat that everyone will love.
Chocolate Chip Cookie Bars
Equipment
- 8×8-inch baking pan
- Saucepan
- Measuring cups and spoons
- Mixing bowls (small & large)
- Whisk
- Rubber Spatula
- Parchment paper
Ingredients
- ½ cup 110 g unsalted butter, plus 1 tbsp
- ½ cup 100 g dark brown sugar, packed
- ¼ cup 50 g granulated sugar
- 1 large egg
- 1 ½ tsp vanilla extract
- 1 ¼ cups 165 g all-purpose flour
- ½ tsp baking powder
- ¾ tsp kosher salt
- 1 cup 185 g semisweet chocolate chips, plus extra for topping
- Flaky sea salt for sprinkling
Instructions
- Prepare the Brown Butter: Place 1/2 cup of unsalted butter in a medium saucepan over medium heat. Allow it to melt slowly, stirring occasionally. As it melts, the butter will foam and bubble—this is normal. Keep a close eye on it, as it will change color quickly. Continue stirring until it turns a deep golden amber and emits a rich, nutty aroma. Remove from heat immediately to prevent burning. Pour into a heat-safe measuring cup and add the remaining 1 tablespoon of butter. Stir to combine, ensuring the total butter measures exactly 1/2 cup. Transfer to the refrigerator to cool slightly while preparing the other ingredients.
- Preheat and Prepare Baking Pan: Preheat your oven to 350°F (175°C). Grease an 8×8-inch baking pan lightly with butter or non-stick spray. Line the pan with parchment paper, allowing some overhang on two sides. This makes lifting the bars out easy after baking. Set the prepared pan aside for later.
- Mix Dry Ingredients: In a small bowl, combine the flour, baking powder, and kosher salt. Whisk thoroughly to ensure even distribution. This prevents clumps and helps the bars rise evenly while baking. Set the dry ingredients aside for easy access during mixing.
- Combine Sugars and Brown Butter: In a large mixing bowl, add the dark brown sugar, granulated sugar, and the cooled brown butter. The butter should be warm but not hot to the touch—too hot and it could cook the egg in the next step.Using a whisk or a spoon, mix until the sugars and butter form a smooth, glossy mixture. This step ensures the cookie bars will have a tender, chewy texture.
- Add Egg and Vanilla: Whisk in 1 large egg and 1 1/2 teaspoons of pure vanilla extract until fully incorporated. The mixture will appear creamy and slightly fluffy. Take your time here—this step builds the structure of the cookie bars while keeping them soft and chewy.
- Incorporate Dry Ingredients: Switch to a rubber spatula. Gradually fold in the flour mixture into the wet mixture. Use gentle motions, folding from the bottom to the top, until just combined. It’s okay if a few streaks of flour remain. Overmixing can make the bars dense, so fold carefully.
- Add Chocolate Chips: Fold in 1 cup of semisweet chocolate chips until evenly distributed. These chocolate chips will melt slightly during baking, creating pockets of gooey chocolate throughout the bars. Reserve a few extra chips to sprinkle on top for an attractive and indulgent finish.
- Transfer to Baking Pan: Scrape the dough into the prepared 8×8-inch pan. Use a spatula to spread it evenly, pressing lightly to ensure uniform thickness. Sprinkle the reserved chocolate chips evenly over the top and gently press them into the dough. This adds a visually appealing chocolate layer and extra melty goodness.
- Bake the Cookie Bars: Place the pan in the preheated oven and bake for 25–30 minutes. The edges should turn a very light golden brown, and the center should appear set but slightly puffed. Avoid overbaking, as the bars will continue to firm up as they cool.
- Add Sea Salt and Cool: Immediately after removing the bars from the oven, sprinkle a few pinches of flaky sea salt evenly over the surface. This enhances the chocolate flavor and adds a subtle, delicious contrast. Allow the bars to cool in the pan for about 45 minutes at room temperature. For faster cooling, place the pan in the refrigerator, but ensure it doesn’t freeze.
- Slice and Serve: Once the bars are cool but still slightly warm, use the parchment overhang to lift them out of the pan. Place on a cutting board and slice into 16 even squares with a sharp knife. The bars should be soft, chewy, and packed with melty chocolate in every bite.Serve immediately or store in an airtight container at room temperature for up to 3 days.
Notes
- Use high-quality butter, such as European or cultured, for a richer, nutty flavor.
- Brown butter must be watched closely—it browns quickly and can burn if unattended.
- Gently fold in flour to keep the bars soft and chewy; avoid overmixing.
- Sprinkle flaky sea salt on top after baking to enhance the chocolate flavor.
- Extra chocolate chips on top make the bars more visually appealing and gooey.
- Cooling the bars fully improves slicing and maintains their chewy texture.
- Pan size is important: an 8×8-inch pan ensures perfect thickness; adjusting may change baking time
Chef’s Secrets For Perfect Bars
The key to these cookie bars’ signature flavor is the brown butter.
Cooking butter until it reaches a golden amber color releases natural nutty aromas that infuse the dough.
Always remove it from heat immediately to prevent burning, and let it cool slightly before adding the egg.
Another secret is folding the chocolate chips in gently.
This preserves pockets of melty chocolate and prevents the dough from becoming too stiff.
Lastly, a pinch of flaky sea salt on top is transformative—it balances sweetness and enhances the chocolate flavor, giving a bakery-quality finish at home.
Serving Suggestions With Chocolate Bars
These chocolate chip bars are versatile and perfect for many occasions.
Serve them warm with a scoop of vanilla ice cream for a decadent dessert, or pair with a cup of coffee or milk for an indulgent snack.
They also make excellent make-ahead treats for lunchboxes or parties.
For a festive twist, drizzle melted chocolate or caramel over the cooled bars, or sprinkle with chopped nuts for extra texture.
Their rich flavor and chewy texture make them a crowd-pleaser in any setting.
Storage Tips To Keep Fresh
Store the cookie bars in an airtight container at room temperature for up to 3 days.
If you want to extend their freshness, refrigerate them for up to a week.
To maintain the soft, chewy texture, avoid stacking them too tightly, and separate layers with parchment paper.
These bars also freeze exceptionally well—wrap individual squares in plastic wrap and place in a freezer-safe bag for up to 2 months.
When ready to enjoy, thaw at room temperature or warm slightly in the microwave for that fresh-baked experience.
Frequently Asked Questions
1. Can I use salted butter instead of unsalted?
Yes, you can substitute salted butter, but reduce or omit the added kosher salt in the recipe.
Using unsalted butter gives you full control over the saltiness and flavor balance, which is especially important when finishing with flaky sea salt.
2. How can I make the bars more chocolatey?
For extra chocolate goodness, increase the chocolate chips in the batter or sprinkle additional chips on top before baking. You can also experiment with a mix of semisweet, milk, or dark chocolate for varied flavor.
3. Can I make these bars gluten-free?
Absolutely! Swap the all-purpose flour with a 1:1 gluten-free baking flour blend. Make sure it contains xanthan gum or another binding agent to maintain the chewy texture. Baking times may vary slightly.
4. Why are my bars dense or dry?
Overmixing the dough or overbaking can cause dry, dense bars. Fold the flour gently until just combined, and remove the bars from the oven as soon as the edges turn lightly golden and the center is set but still soft.
5. Can I prepare the dough ahead of time?
Yes! You can make the dough and refrigerate it for up to 24 hours before baking. This can even enhance the flavor, as the brown butter and sugar continue to meld.
Just bring the dough to room temperature slightly before spreading in the pan and baking.
