All products are selected by our editorial team for quality. If you buy through our links, we may earn a small commission at no extra cost to you.
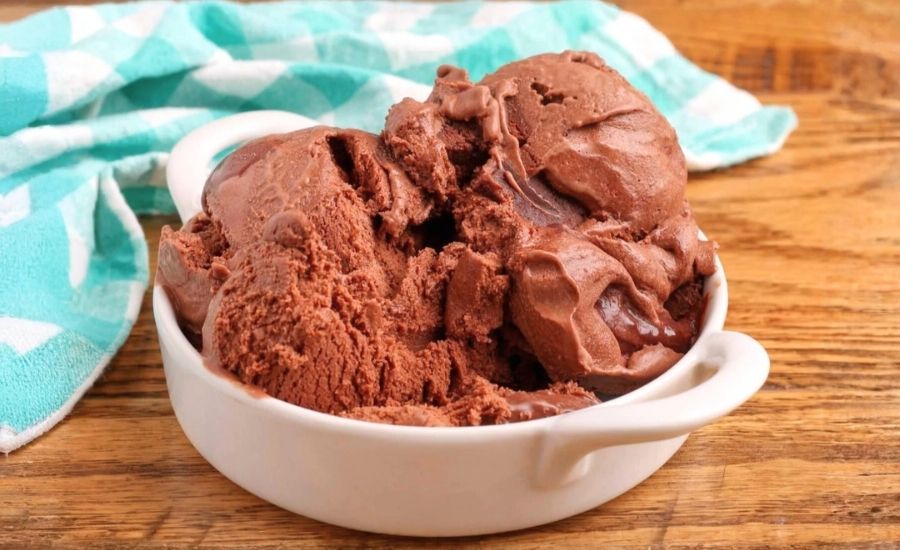
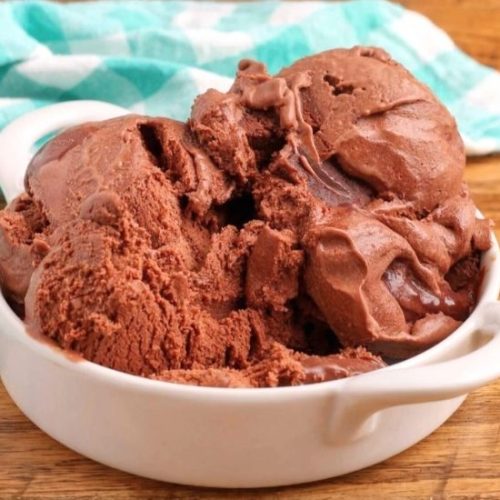
This Chocolate Brownie Ice Cream recipe delivers pure indulgence with every bite, combining the richness of homemade chocolate ice cream with the irresistible chew of fudgy brownie chunks.
What makes it especially appealing is the balance of creamy, chocolaty decadence and texture-packed mix-ins—all layered with optional hot fudge for even more depth.
While this treat is undoubtedly a dessert, it still offers some nutritional positives.
With 5g of protein per serving, this dessert benefits from dairy-based protein and antioxidant-rich cocoa.
The heavy cream and chocolate chips contribute satisfying fats that keep you full longer than typical empty-calorie desserts.
Best of all, it’s a homemade freezer-friendly treat that stores well, making it perfect for make-ahead desserts, celebrations, or satisfying a weeknight chocolate craving without a store run.
Whether you serve it over a brownie or enjoy it solo, it’s a sweet finale that’s well worth the effort.
Must-Have Tools for Perfect Results
Cuisinart Ice Cream Maker
This automatic machine ensures smooth, creamy ice cream with minimal effort.
Just pour in the base and let it churn—no hand cranking or guesswork.
A must for consistent texture and easy homemade ice cream success.
All-Clad Stainless Steel Saucepan (2-3 qt)
Ideal for melting chocolate and simmering the cream-cocoa mixture evenly without scorching.
Its durable construction and responsive heat control make it a daily kitchen hero for sauces, soups, and candies alike.
OXO Good Grips Silicone Whisk
Perfect for whisking cocoa, sugar, and chocolate smoothly into the cream.
The silicone won’t scratch pans, and it’s heat-safe and dishwasher-friendly—great for daily batters and sauces too.
Rubbermaid Brilliance Freezer-Safe Containers
These airtight, clear containers are perfect for layering the ice cream, brownies, and fudge.
They seal tight to prevent freezer burn and double as prep or leftover containers for everyday use.
Chef’s Knife (8-inch, High-Carbon Steel)
Essential for cleanly slicing cold brownies into even chunks without crumbling.
A sharp, versatile knife like this is a kitchen essential from desserts to dinner prep.
Chocolate Fudge Brownie Ice Cream
Equipment
- 1 × Ice Cream Maker
- 1 × Medium Saucepan (2–3 qt)
- 1 × Silicone Whisk
- 1 × Mixing Bowl
- 1 × Freezer-Safe Container with Lid
- 1 × Chef’s Knife
Ingredients
- 1½ cups heavy cream
- ⅓ cup Dutch-process cocoa powder
- ⅔ cup granulated sugar
- ⅛ teaspoon kosher salt
- ½ cup semi-sweet chocolate chips
- 1½ cups whole milk
- 1 teaspoon pure vanilla extract
- 4 brownies chilled and chopped into ½-inch cubes (about 1½ cups total)
- ½ cup hot fudge sauce at room temperature (optional)
Instructions
Make the Chocolate Base
- In a medium saucepan, pour in the heavy cream and whisk in the cocoa powder, sugar, and salt. Set the pan over medium heat and cook while whisking constantly. The mixture should begin to steam and small bubbles will form at the edges—this means it's hot enough.
Melt in the Chocolate
- Remove the saucepan from the heat and immediately stir in the semi-sweet chocolate chips. Whisk until the chocolate is completely melted and smooth.
Add Milk and Vanilla
- Once the chocolate is fully blended, pour in the milk and add the vanilla extract. Stir to combine, then transfer the mixture to a large bowl. Cover and refrigerate for a minimum of 4 hours or until it’s thoroughly chilled—overnight is even better.
Churn the Ice Cream
- Once the base is cold, pour it into your ice cream maker and churn according to your machine’s instructions. This usually takes 20–25 minutes, depending on the model.
Layer with Brownies and Fudge
- Scoop about a third of the churned ice cream into a freezer-safe container. Drizzle with some hot fudge (if using) and scatter brownie chunks across the surface. Repeat this layering process with the remaining ice cream, more fudge, and brownie pieces until everything is used.
Freeze Until Firm
- Cover the container with a lid and freeze the layered ice cream for several hours until firm. Once fully set, scoop and serve on its own, over extra brownies, or with additional toppings if desired.
Notes
- Brownie Texture Tip: Use dense, fudgy brownies (not cakey) for the best texture when frozen. Cold brownies are easier to cut into clean chunks.
- Customize It: Want more crunch? Add chocolate chunks, chopped nuts, or even a caramel swirl along with the fudge.
- Dairy Options: Whole milk and heavy cream provide the best creamy consistency. Substituting with low-fat milk will reduce creaminess.
- Storage Advice: This ice cream keeps well in an airtight container in the freezer for up to 2 weeks for best texture and flavor.
- Make-Ahead Tip: You can prep the base up to two days in advance before churning.
Chef’s Secrets for Creamy Perfection
The secret to ultra-creamy homemade ice cream lies in properly heating and blending the ingredients.
Start by whisking the cocoa, sugar, and salt into the cream while gently heating to avoid scorching.
The moment you add the chocolate chips, make sure the cream mixture is hot enough to melt them fully—this ensures a smooth, luxurious texture without gritty bits.
Another insider tip is chilling the base completely before churning. Rushing this step can result in icy or inconsistent texture.
Also, don’t skip the vanilla extract—it rounds out the chocolate flavor and enhances depth.
Finally, using dense, chewy brownies (preferably chilled or day-old) helps them hold their texture in the frozen mixture without turning soggy.
These details might seem small, but together they guarantee a truly scoop-shop quality dessert.
Serving Ideas That Elevate Dessert
This rich, brownie-studded ice cream is delicious enough to stand on its own, but it also shines as part of a larger dessert.
Serve it over a warm brownie or molten lava cake for a double-chocolate treat that melts together beautifully.
Add a dollop of whipped cream and a sprinkle of mini chocolate chips or crushed nuts for texture contrast.
For a fun twist, use it as a filling for homemade ice cream sandwiches, pairing it between two chocolate cookies.
If you’re entertaining, try scooping it into chilled dessert glasses and drizzling with extra hot fudge or caramel sauce for a restaurant-style presentation.
You can even serve smaller scoops alongside espresso for an indulgent mocha-inspired affogato.
Storage Tips for Fresh Flavor
Homemade ice cream is best enjoyed within 1 to 2 weeks of churning.
To store it, transfer the ice cream to an airtight, freezer-safe container as soon as it’s layered and ready.
Smooth the top, press a sheet of parchment or plastic wrap directly onto the surface, and seal with a lid.
This helps prevent ice crystals from forming and keeps the texture creamy.
Avoid storing it near the freezer door, where temperature fluctuations are common.
For the best experience, let the ice cream sit at room temperature for about 5 minutes before scooping—it softens just enough to serve without losing its structure.
If adding hot fudge later, be sure it’s fully cooled before layering or serving to avoid melting the frozen base.
Frequently Asked Questions and Helpful Answers
1. Can I make this without an ice cream maker
Yes, you can! After preparing and chilling the base, pour it into a freezer-safe container.
Stir every 30–60 minutes during freezing to mimic churning. While the texture may be less smooth than machine-churned, it will still be delicious.
2. What kind of brownies work best
Fudgy brownies with a dense, chewy texture are ideal. Avoid cakey or frosted varieties, which may crumble or create icy bits when frozen.
Brownies made a day ahead and refrigerated cut more cleanly and stay intact in the ice cream.
3. Is there a non-dairy version I can try
Yes! Substitute the heavy cream with full-fat coconut milk and the milk with almond or oat milk.
Use dairy-free chocolate chips and ensure your brownies are vegan-friendly.
The flavor will have a slight coconut note but still be rich and satisfying.
4. Can I reduce the sugar in this recipe
While a small reduction is fine, sugar helps with both sweetness and scoopability.
Reducing too much may cause the ice cream to become icy or hard.
For a lower-sugar option, try using a natural sweetener like maple syrup or a sugar substitute like erythritol—but test in small batches first.
5. How do I prevent freezer burn
Freezer burn occurs when air reaches the surface of the ice cream.
To avoid this, press parchment paper or plastic wrap directly onto the surface before sealing the container with a lid.
Store deeper in the freezer away from fluctuating temperatures near the door.
This recipe is inspired by barefeetinthekitchen and has been carefully refined to enhance clarity, streamline preparation steps, and ensure accurate results. We’ve also included health benefits, nutritional highlights, and Must-Have Tools to help you get the best results every time you cook.
