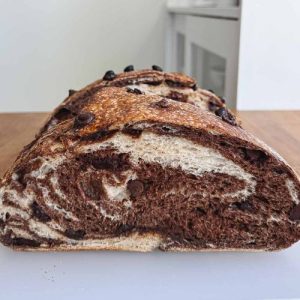
This chocolate marbled sourdough bread is the perfect fusion of indulgence and nourishment.
With a beautifully swirled chocolate crumb, soft interior, and bursts of melty chocolate chips, it feels like a treat but is surprisingly wholesome.
Made with natural fermentation, it’s easier to digest, rich in plant-based protein, and a good source of fiber. Lower in saturated fat than most desserts, it’s a satisfying everyday option—great for breakfast, snacks, or meal prep.
Chocolate Marbled Sourdough Bread
Equipment
- 2 Large mixing bowls
- Measuring Cups & Spoons
- Digital Kitchen Scale
- Dough scraper (1)
- Clean work surface or pastry mat
- Proofing basket (1) or lined bowl
- Plastic wrap or damp towel (1)
- Dutch oven with lid (1)
- Parchment Paper (1 sheet)
- Scoring knife or sharp blade (1)
Ingredients
Plain Dough
- 250 g bread flour about 2 cups + 1 tbsp
- 50 g sourdough starter ¼ cup
- 190 g water ¾ cup + 2 tsp
- 5 g salt 1 tsp
Chocolate Dough
- 250 g bread flour about 2 cups + 1 tbsp
- 50 g sourdough starter ¼ cup
- 176 g water ¾ cup
- 25 g cocoa powder ¼ cup
- 25 g sugar 2 tbsp, cane, coconut, or brown
- 5 g salt 1 tsp
Additional
- 175 g chocolate chips 1 cup
Instructions
- Prepare the plain dough: In a large mixing bowl, whisk together the sourdough starter and water until the starter dissolves and the liquid looks slightly bubbly.Add the flour and salt, then stir with a spoon or your hands until all dry flour is absorbed and the dough looks shaggy. It will feel sticky at first, which is completely normal for sourdough. Cover the bowl with a damp towel or plastic wrap and let it rest for about 30 minutes so the flour can hydrate and the gluten begins to develop naturally.
- Mix the chocolate dough: In a separate bowl, combine sourdough starter, water, and sugar, whisking until the sugar dissolves fully. Add the flour, cocoa powder, and salt, then mix until you have a thick, sticky dough. The cocoa will make this dough slightly denser than the plain one, but it will loosen during fermentation. Cover the bowl and rest for 30 minutes, just like the plain dough.
- First stretch and fold: Once both doughs have rested, it’s time to build strength without kneading. Lightly wet your hands to prevent sticking, then grab one edge of the dough, stretch it upward, and fold it over the center. Rotate the bowl a quarter turn and repeat on the next side. Continue until you’ve folded all four sides over themselves. Cover and let the dough rest for another 30 minutes. Repeat the same process with the second dough. This helps create structure and elasticity for both doughs.
- Combine the doughs through lamination: To create the marble effect, lightly mist a large, clean work surface with water. Stretch the plain dough into a large, thin rectangle about ¼ inch thick. Repeat with the chocolate dough, aiming for roughly the same size and thickness. Place the chocolate dough on top of the plain dough so they overlap evenly. Sprinkle chocolate chips across the surface, pressing them gently into place. Fold the left side toward the center, then fold the right side over it to form a long rectangle. Finally, roll the dough tightly from the bottom upward, forming a layered package. Place it seam-side down in a clean bowl, cover, and rest for 1 hour.
- Second and third stretch and folds: Over the next two hours, perform two more sets of stretch-and-folds, spacing them 60 minutes apart. These folds further strengthen the dough, help distribute the chocolate chips evenly, and enhance the marble pattern. After the final fold, cover the bowl and let the dough ferment at room temperature until it has risen by about 50% in volume, with visible bubbles on the sides and bottom. This bulk fermentation usually takes 4 to 6 hours, depending on your starter strength and room temperature.
- Shape the dough: When the dough is airy and slightly jiggly, it’s ready to shape. Lightly flour your work surface and gently turn out the dough seam-side down. With floured hands, stretch it into a rectangle. Fold the bottom third upward, then the top third down, overlapping slightly. Fold the left side inward, then the right side over it. Flip the dough seam-side down and gently round it into a ball by tucking the edges underneath and dragging it toward you on the counter to tighten the surface. Place the shaped dough into a floured proofing basket or a towel-lined bowl with the seam facing up.
- Cold proof the dough: Cover the proofing basket and refrigerate the dough overnight or up to 48 hours. This slow, cold fermentation deepens the flavor, makes the bread more digestible, and improves its texture. Aim for at least 12 hours for the best results. The chilled dough will also be easier to handle during baking.
- Preheat the oven and Dutch oven: About 30 to 60 minutes before baking, place your Dutch oven with its lid inside your oven and preheat to 500°F (260°C). Preheating the Dutch oven ensures it is piping hot, creating steam that helps the bread expand quickly in the oven, giving you a lofty loaf with a crisp crust.
- Score the dough: Once your Dutch oven is hot, remove the dough from the refrigerator. Lay a sheet of parchment paper on top of the proofing basket, then invert the dough onto it so the seam faces down. Using a sharp bread lame or knife, score the surface with one deep slash at a 45° angle or create your own design. Scoring controls how the bread expands and prevents it from bursting randomly in the oven.
- Bake the bread: Carefully lift the dough by the parchment paper and place it inside the hot Dutch oven. Cover with the lid and bake at 500°F (260°C) for 30 minutes. Then, reduce the oven temperature to 450°F (232°C), remove the lid, and continue baking for another 10–15 minutes.The bread is ready when the crust is a deep golden brown and the internal temperature reaches 208–210°F (98–99°C).
- Cool and enjoy: Transfer the baked bread to a wire rack and let it cool completely for at least 1 to 2 hours. Cooling allows the crumb to set and prevents a gummy texture when sliced. Once cooled, cut into the loaf to reveal the stunning chocolate marbling inside. Enjoy it plain, toasted with butter, spread with jam, or paired with mascarpone for a luxurious treat.
Notes
- Always use an active, bubbly sourdough starter for best fermentation and rise.
- For extra nutrition, replace a small portion of the bread flour with whole wheat flour.
- Use good quality cocoa powder for a rich chocolate flavor and deeper color.
- Chilling the dough overnight not only enhances flavor but also makes it easier to score.
- A digital kitchen scale is highly recommended for precise ingredient measurements.
- If your kitchen is cold, bulk fermentation may take longer—be patient and watch the dough, not just the clock.
- Avoid slicing the bread too soon after baking; cooling time is essential for the crumb structure.
- For an indulgent twist, sprinkle in nuts or dried fruit along with the chocolate chips.
- Leftover slices make excellent French toast or a base for bread pudding.
- The recipe can be halved to make a smaller loaf, though baking time may be slightly reduced.
Chef’s Secrets for Perfect Sourdough
The secret to a beautifully marbled loaf lies in lamination—stretching the dough thin and layering it before rolling.
This not only creates striking chocolate swirls but also distributes the chocolate chips evenly throughout the loaf.
Another key element is temperature: sourdough is highly sensitive to your kitchen climate.
A warmer environment speeds up fermentation, while cooler conditions slow it down.
Always look for visual cues such as bubbles, volume increase, and a slightly jiggly texture rather than relying solely on timing. Lastly, resist the temptation to overproof.
Cold-proofing in the refrigerator balances flavor development with better handling, ensuring a crisp crust and soft, airy interior.
Delicious Serving Suggestions to Try
This bread is versatile enough to shine in both sweet and savory settings.
For a simple breakfast, toast a slice and spread with butter, nut butter, or cream cheese.
If you prefer something indulgent, pair it with mascarpone, ricotta, or a drizzle of honey.
It also makes a fantastic base for French toast or bread pudding, where the marbled chocolate adds depth to every bite.
For an afternoon snack, serve with a hot cup of coffee or tea.
Feeling creative? Use it as a base for a sweet grilled cheese with mascarpone and fresh strawberries, or enjoy it plain to fully savor the chocolate swirls.
Storage Tips for Long Freshness
Sourdough naturally stays fresher longer than commercial breads, but proper storage makes a big difference.
Once fully cooled, store the loaf in a breathable cotton or linen bread bag at room temperature for up to 3 days.
Avoid sealing it in plastic unless freezing, as that traps moisture and softens the crust.
For longer storage, slice the bread and freeze individual pieces in a freezer-safe bag.
When ready to enjoy, reheat slices in a toaster or warm them in the oven for a few minutes to restore freshness.
Avoid refrigerating sourdough, as this accelerates staling.
Frequently Asked Questions
1. Can I use all-purpose flour instead of bread flour?
Yes, you can, but bread flour produces better structure and chew due to its higher protein content. If using all-purpose flour, expect a slightly softer crumb and less rise.
2. How do I know if my starter is ready?
A healthy starter should be bubbly, doubled in size within 4–6 hours of feeding, and pass the “float test” (a spoonful of starter floats in water). If it doesn’t, feed it regularly for a few days before baking.
3. Can I add more mix-ins besides chocolate chips?
Absolutely! Chopped nuts, dried fruit, or even a swirl of peanut butter can be added during lamination. Just avoid overloading the dough, as too many inclusions can weigh it down.
4. What if my dough feels too sticky?
Sourdough tends to be sticky, especially with cocoa powder added. Lightly dampen your hands instead of using too much flour, which can alter hydration. Over time, stretch-and-folds will strengthen the dough and make it easier to handle.
5. How do I prevent burnt chocolate chips on top?
If some chips poke through the surface, they may burn slightly during baking. To prevent this, tuck chips inside the dough during lamination or lightly brush the surface with butter before baking to shield exposed pieces.
