Indulge in a decadent chocolate treat without the fuss!
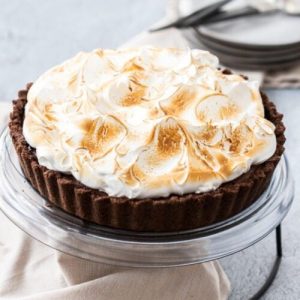
This no-bake Chocolate Meringue Pie combines a crunchy cookie crust, velvety chocolate custard, and airy marshmallow topping for a show-stopping dessert.
Packed with protein from eggs and rich in fiber from chocolate cookies, it’s satisfying, easy to prepare, and perfect for everyday dessert cravings or make-ahead occasions.
Chocolate Meringue Pie
Equipment
- 1 Food Processor or Blender
- 1 deep 8-inch pie tin or springform tin
- 1 Balloon Whisk
- 1 Electric hand mixer (or stand mixer)
- 1 heatproof bowl (for marshmallow topping)
- 1 Spatula
- 1 kitchen torch (optional, for finishing)
Ingredients
For the Cookie Base:
- 400 g chocolate-coated cream-filled cookies e.g., Tim Tams or Oreos
- 75 g salted butter melted
For the Chocolate Custard:
- 150 g dark chocolate 50%, finely chopped
- 2 ½ cups milk 625 ml
- 45 g unsalted butter 3 tbsp
- ⅔ cup caster sugar
- 2 tbsp dutched or unsweetened cocoa powder
- 1 tsp vanilla extract
- ⅓ cup cornflour cornstarch
- 2 tbsp water
- 3 large eggs separated
For the Marshmallow Topping:
- ¾ cup caster sugar
- ½ tsp cream of tartar
Instructions
- Prepare the Pie Base: Start by lining the base of an 8-inch pie dish or a springform tin with baking paper to prevent sticking. Place your chocolate-coated cream-filled cookies (such as Tim Tams or Oreos) into a food processor or blender. Blitz them until they become fine crumbs. Pour in the melted salted butter and pulse again until the crumbs are evenly coated and hold together slightly when pressed between your fingers.Transfer the crumb mixture into the prepared pie tin. Using lightly damp hands or the back of a spoon, press the crumbs firmly across the base and up the sides to create an even layer about 1.5 inches high. Chill this base in the refrigerator while you prepare the chocolate custard, allowing it to firm up and hold its shape.
- Melt the Chocolate for the Custard: Place the chopped dark chocolate into a heatproof bowl. Melt it in the microwave in 30-second bursts, stirring thoroughly after each interval until smooth and glossy. The chocolate should be fully melted but not overheated, which can cause it to seize. Set the melted chocolate aside for later incorporation into the custard.
- Heat the Milk Mixture: In a medium saucepan with a heavy base, pour in the milk. Add the unsalted butter, caster sugar, cocoa powder, and vanilla extract. Using a whisk, combine these ingredients and gradually heat over low-to-medium heat. Stir frequently to dissolve the sugar completely and to ensure the cocoa blends evenly into the milk. Continue heating until the mixture reaches a gentle simmer, releasing a rich chocolate aroma. Be careful not to let it boil, as this can cause the milk to scald.
- Prepare the Egg Yolk Mixture: While the milk mixture is heating, take a medium mixing bowl and combine the egg yolks with the cornflour (cornstarch) and water. Using an electric hand mixer or whisk, beat the mixture for about one minute until it becomes pale and slightly fluffy. This step helps to aerate the egg yolks and ensures a smooth custard texture without lumps.
- Combine Milk and Egg Yolks: Slowly drizzle the hot milk mixture into the egg yolk mixture while constantly whisking. This process, called tempering, prevents the yolks from cooking too quickly and forming scrambled bits. Once fully combined, pour the mixture back into the saucepan. Continue to cook over medium heat, stirring constantly with a balloon whisk. Within 5-6 minutes, the mixture should thicken noticeably. You’ll know it’s ready when the whisk leaves clear lines in the custard that hold briefly before blending back together.
- Incorporate the Melted Chocolate: Remove the saucepan from the heat and immediately add the melted dark chocolate. Whisk thoroughly until the chocolate is fully incorporated and the custard is smooth, silky, and thick enough to coat the back of a spoon. The custard should be slightly pourable but viscous, falling off the whisk in thick ribbons rather than running freely.
- Assemble the Chocolate Layer: Pour the chocolate custard into the chilled cookie base. Using a spatula, spread it evenly across the surface and gently press down to remove any air pockets. Smooth the top for a clean finish. To prevent a skin from forming on the custard while chilling, press a sheet of plastic wrap directly onto its surface. Refrigerate for at least one hour to allow the custard to set and firm up, ensuring a stable base for the marshmallow topping. For best results, chill for a minimum of three hours before serving.
- Prepare the Marshmallow Topping: Fill a medium saucepan with a few centimeters of water and bring it to a gentle simmer. Place a heatproof bowl (or the bowl of a stand mixer) over the saucepan, ensuring the base of the bowl does not touch the water. Add the reserved egg whites, caster sugar, and cream of tartar to the bowl. Begin whisking continuously with a hand whisk until the sugar dissolves completely. Using a thermometer, check that the mixture reaches approximately 70°C (160°F), which ensures the egg whites are pasteurized and safe to eat.
- Whip the Marshmallow: Remove the bowl from the heat. Using an electric hand mixer or stand mixer with a whisk attachment, beat the mixture on medium-high speed for 6-8 minutes. Whip until it forms thick, glossy soft peaks and the bowl has cooled down to room temperature. The marshmallow should be airy, light, and hold shape, creating a fluffy cloud-like texture ready to crown your pie.
- Top the Pie with Marshmallow: Spoon or dollop the marshmallow mixture onto the set chocolate custard. Use a spatula or the back of a spoon to create gentle swirls and peaks, giving it a cloud-like appearance. For a professional finish, lightly scorch the top using a kitchen torch until the peaks turn golden brown. This step enhances the meringue flavor and adds visual appeal, but it is optional.
- Chill and Serve: Return the finished pie to the refrigerator and allow it to chill for at least 3 hours so the marshmallow topping can firm up slightly. When ready to serve, use a hot, clean knife to slice through the pie smoothly. Wipe the knife between cuts to maintain clean edges. Serve chilled for a creamy, decadent dessert experience that balances crunchy, smooth, and fluffy textures in every bite.
Notes
- Always weigh ingredients where a weight is provided for accuracy and best results.
- Allow the pie to chill for at least 3 hours to ensure the custard and marshmallow topping set properly.
- Use a hot, clean knife to cut slices and wipe it between each cut for neat edges.
- Substitute Tim Tams with any chocolate-coated, cream-filled cookies or use Oreos with additional finely chopped chocolate for texture.
- Milk chocolate can be used instead of dark chocolate for a sweeter, softer custard, while dark chocolate gives a firmer, richer flavor.
- Caster or superfine sugar can be swapped for granulated sugar if fully dissolved before use.
- Cream of tartar may be replaced with the same amount of vinegar or lemon juice.
Chef’s Secrets For Perfect Pie
For a flawlessly smooth custard, always temper the egg yolks by gradually adding the hot milk mixture.
This prevents the eggs from curdling and ensures a creamy, lump-free chocolate layer.
When melting chocolate, avoid overheating; work in short bursts and stir constantly.
Pressing the cookie base firmly into the tin helps it hold its shape when slicing.
For a cloud-like marshmallow topping, whipping the egg whites until glossy peaks form is key.
Finally, gently torch the meringue to enhance flavor and give it a professional golden finish without burning.
Serving Suggestions For Chocolate Pie
This pie is best served chilled, either on its own or paired with complementary flavors.
For a luxurious touch, serve each slice with a dollop of freshly whipped cream or a drizzle of warm caramel or raspberry sauce.
Fresh berries, like raspberries or strawberries, add a bright contrast to the rich chocolate.
For gatherings, consider plating with a mint sprig or chocolate shavings on top.
Individual mini pies or tartlets can also be made using the same method for elegant dessert presentations.
Storage Tips To Keep Fresh
Store the pie in an airtight container in the refrigerator to maintain the custard’s creamy texture and the marshmallow’s fluffiness. It will keep well for up to 3 days.
For longer storage, the custard can be prepared in advance and chilled separately from the marshmallow topping, which should be whipped fresh before serving.
Avoid freezing the marshmallow topping, as it can lose its texture.
Use a sharp, hot knife when slicing to prevent cracking the custard layer and ensure clean presentation.
Frequently Asked Questions
1. Can I use different cookies for the base?
Absolutely! Any chocolate-coated, cream-filled cookie works well, like Oreos, ChoccyWoccies, or even homemade sandwich cookies.
Adjust the butter slightly if the cookies are very dry or crumbly to ensure the base holds together.
2. How can I make the custard extra smooth?
Tempering the egg yolks is key: slowly whisk the hot milk into the yolks before cooking together.
Additionally, stirring constantly over medium heat prevents lumps. A fine mesh sieve can also be used to strain the custard for an ultra-silky finish.
3. Is it safe to eat raw egg whites in the marshmallow?
Yes, if you follow the method of heating the egg whites and sugar over simmering water until 70°C (160°F). This pasteurizes the egg whites, making them safe to consume while keeping the topping fluffy.
4. Can I make the pie ahead of time?
Definitely! The pie can be assembled and chilled up to a day in advance. Keep the marshmallow topping covered in the refrigerator until just before serving to maintain its texture.
For extra convenience, the base and custard can be prepared even earlier, and the marshmallow can be added last-minute.
5. What variations can I try with this pie?
xperiment with different chocolate types or cocoa percentages for varied sweetness and richness. Add espresso powder to the custard for a mocha flavor, or sprinkle crushed nuts over the marshmallow for texture.
Fruit purees, caramel swirls, or a sprinkle of sea salt also create exciting flavor twists.
