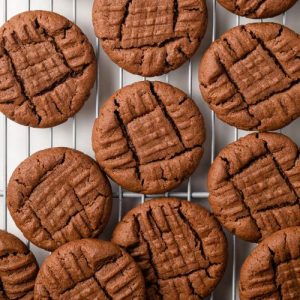
These chocolate peanut butter cookies are soft, thick, and irresistibly rich, combining the classic flavors of cocoa and creamy peanut butter.
Packed with plant-based protein and heart-healthy fats, they’re a guilt-free treat that satisfies your sweet tooth while offering nutritional benefits.
Quick to prepare and bake in under 30 minutes, they’re perfect for everyday snacking or easy meal prep.
Chocolate Peanut Butter Cookies
Equipment
- 1 large mixing bowl
- 1 small mixing bowl
- electric mixer
- 1.5 tablespoon cookie scoop
- Baking sheets (2)
- Parchment paper
- Wire cooling rack
Ingredients
- ½ cup 113 g unsalted butter, softened
- ¾ cup 210 g creamy peanut butter
- 1 ¼ cups 250 g light brown sugar, packed
- 2 tablespoons milk
- 1 teaspoon vanilla extract
- 1 large egg room temperature
- 1 ¼ cups 163 g all-purpose flour
- ½ cup 42 g unsweetened cocoa powder
- ½ teaspoon salt
- ¾ teaspoon baking soda
Instructions
- Preheat and Prepare Your Oven: Begin by preheating your oven to 375°F (190°C). Proper preheating ensures your cookies bake evenly and develop the perfect soft, thick texture. While the oven is warming, line two baking sheets with parchment paper. This prevents sticking and makes cleanup effortless. Set the prepared baking sheets aside for when your dough is ready.
- Cream the Butter and Peanut Butter: In a large mixing bowl, combine the softened unsalted butter and creamy peanut butter. Using an electric mixer at medium speed, beat them together until the mixture becomes smooth, creamy, and fully blended. This step is crucial because a well-creamed base helps your cookies achieve a tender, melt-in-your-mouth texture.
- Add the Sugar and Liquids: Next, add the packed light brown sugar, milk, and vanilla extract to the butter and peanut butter mixture. Continue beating at medium speed until everything is fully incorporated and fluffy. The brown sugar adds moisture and a hint of caramel flavor, while the milk ensures a soft, chewy cookie.
- Incorporate the Egg: Add the room-temperature egg to the mixture. Beat just until the egg is fully combined with the other ingredients. Avoid overmixing at this stage, as it can make the cookies dense. The egg provides structure and richness, helping the cookies hold their shape during baking.
- Combine Dry Ingredients: In a separate small bowl, whisk together the all-purpose flour, unsweetened cocoa powder, salt, and baking soda. Ensure these ingredients are evenly mixed to avoid pockets of cocoa or flour. This dry mixture provides the framework for your cookies and balances the sweetness of the sugar and richness of the peanut butter.
- Incorporate Dry Ingredients into Wet: Gradually add the dry mixture to the wet ingredients. Use the mixer on low speed or a spatula to gently fold the flour mixture into the peanut butter batter. Mix just until no streaks of flour remain. Overmixing can lead to tough cookies, so stop as soon as everything is combined. The dough should be soft, slightly sticky, and easy to scoop.
- Portion the Cookie Dough: Using a 1.5-tablespoon cookie scoop, portion the dough into evenly sized balls.Place them about 2 inches apart on the prepared baking sheets to allow room for spreading. Even spacing ensures uniform baking and prevents cookies from merging together.
- Shape the Cookies: Lightly flatten each cookie ball with the back of a fork in a crisscross pattern. This not only creates the classic peanut butter cookie appearance but also ensures the cookies bake evenly. Press gently—too much force will make them flat, while too little will prevent even baking.
- Bake to Perfection: Transfer the baking sheets to the preheated oven and bake for 7–8 minutes. Keep a close eye on them; the cookies should look set but still soft in the center Avoid overbaking, as they will continue to cook slightly on the hot baking sheet and you want to maintain a tender, chewy texture.
- Cool and Transfer: Remove the cookies from the oven and let them cool on the baking sheet for 5 minutes. This brief cooling period allows them to firm up slightly, making them easier to transfer. After 5 minutes, use a spatula to move the cookies to a wire cooling rack to cool completely.
- Store or Serve: Once cooled, serve immediately or store in an airtight container at room temperature. These cookies stay soft for up to a week. For longer storage, freeze baked cookies for up to 3 months or freeze unbaked dough balls for future baking—simply add 1–2 extra minutes to the baking time when baking from frozen.
Notes
- Peanut Butter Choice: Use commercial creamy peanut butter (like Jif or Skippy) for the best texture. Natural peanut butter may be too oily and cause cookies to spread too much.
- Measuring Flour: For consistent results, spoon flour into the measuring cup and level it with a knife rather than scooping directly.
- Cocoa Powder: Use natural unsweetened cocoa powder for a rich chocolate flavor and balanced sweetness.
- Baking Time: Cookies should be removed from the oven when just set; they continue to bake slightly on the hot tray. Overbaking leads to harder cookies.
- Room-Temperature Ingredients: Ensure butter and eggs are at room temperature for smoother mixing and optimal texture.
- Cookie Scoop: Using a consistent scoop size ensures uniform baking and presentation.
- Fork Pattern: Lightly pressing a crisscross pattern on each cookie helps even baking and gives a classic appearance.
Chef’s Secrets To Perfect Cookies
The key to creating soft, thick, and chewy chocolate peanut butter cookies lies in both ingredient choice and technique.
Start by using room-temperature butter and eggs—this ensures your dough blends evenly, producing a tender texture.
Always cream butter and peanut butter thoroughly to incorporate air, which helps cookies rise and stay fluffy.
Don’t overmix once you add the flour; gentle folding preserves a soft crumb.
Finally, watch your baking time closely—cookies continue to firm on the hot sheet, so pulling them out slightly underdone guarantees the perfect bite.
Serving Suggestions For Maximum Enjoyment
These cookies are incredibly versatile. Serve them warm with a glass of cold milk or a cup of coffee for a comforting treat.
They also pair beautifully with vanilla ice cream or a drizzle of chocolate ganache for a simple dessert upgrade.
For parties or gatherings, consider stacking them with layers of fruit or spreading peanut butter between two cookies for a decadent sandwich.
Their soft, chewy texture makes them ideal for on-the-go snacking or as a sweet addition to lunchboxes.
Storage Tips For Freshness
To keep your cookies soft and flavorful, store them in an airtight container at room temperature for up to a week.
Layering parchment paper between cookies prevents sticking.
For longer storage, freeze baked cookies in a sealed freezer-safe container for up to three months.
Unbaked cookie dough can also be frozen—simply portion into balls, freeze on a tray, and transfer to a freezer bag.
When baking from frozen, add 1–2 extra minutes to the baking time to achieve the perfect texture.
Frequently Asked Questions
1. Can I use natural peanut butter?
Natural peanut butter can be used, but it contains more oil and may cause cookies to spread excessively. For best results, stick to commercial creamy brands. If using natural peanut butter, chill the dough before baking to help maintain shape.
2. How can I make cookies extra soft?
For ultra-soft cookies, slightly underbake them and allow them to cool on the baking sheet for a few minutes before transferring to a wire rack. Using brown sugar adds moisture, which also helps maintain a chewy texture.
3. Can I make these cookies gluten-free?
Yes! Substitute all-purpose flour with a 1:1 gluten-free baking flour blend. Make sure the blend contains xanthan gum or another binding agent to help cookies hold their shape.
4. How do I prevent cookies from sticking?
Always line baking sheets with parchment paper or a silicone mat. Avoid greasing the pan directly, as it can cause cookies to spread too much. Cool completely before removing from the sheet for best results.
5. Can I add mix-ins like chocolate chips or nuts?
Absolutely! Fold in ½ to 1 cup of chocolate chips, chopped nuts, or even dried fruit to customize the flavor. Just remember that adding too many mix-ins can slightly affect baking time, so check cookies a minute or two earlier.
