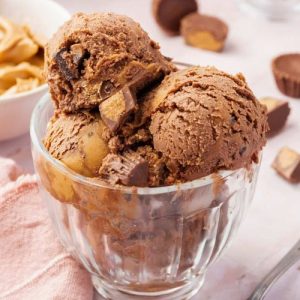
Indulge in this rich and creamy chocolate peanut butter ice cream, a no-egg, Philadelphia-style treat that’s surprisingly easy to make at home.
Packed with good fats from peanut butter and chocolate, plus a touch of protein, it’s both satisfying and delicious.
Quick to prepare and freezer-friendly, this recipe is perfect for a decadent dessert without the fuss.
Chocolate Peanut Butter Ice Cream
Equipment
- 1 Ice cream maker (chilled at least 24 hours)
- 1 Large saucepan
- 1 Large glass bowl
- 1 Whisk
- 1 Knife for swirling and chopping
- 1 Loaf pan
- Plastic Wrap
Ingredients
- 2 cups heavy cream
- 1 cup whole milk
- ¼ cup unsweetened cocoa powder 20 g
- ¾ cup granulated sugar 150 g
- ½ teaspoon salt
- 1 cup creamy peanut butter divided (250 g)
- 4 oz semi-sweet chocolate roughly chopped, divided (120 g)
- 1 teaspoon vanilla extract
- 1 cup chopped peanut butter cups for mixing in 150 g, about 17 mini cups
Instructions
- Prepare Your Ice Cream Maker: Before starting, ensure your ice cream maker’s bowl is completely frozen. Ideally, chill it for at least 24 hours. To check, pick it up and gently shake—if you hear water moving, it’s not ready.A fully frozen bowl is crucial for achieving the smooth, creamy texture that makes homemade ice cream irresistible.
- Mix the Dairy Base: In a large saucepan, combine 2 cups of heavy cream and 1 cup of whole milk. Whisk them together over medium heat until fully blended. Add ¼ cup unsweetened cocoa powder (20 g), ¾ cup granulated sugar (150 g), and ½ teaspoon salt. Whisk constantly to prevent the cocoa from clumping and the sugar from settling at the bottom. This step ensures a smooth, velvety ice cream base.
- Heat to Simmer: Slowly bring the cream mixture to a gentle simmer over medium heat. Watch closely—small bubbles should form along the edges of the pan, but avoid boiling. The ideal temperature is around 170°F (77°C). Simmering, rather than boiling, prevents the cream from curdling and maintains a creamy consistency.
- Incorporate Chocolate and Peanut Butter: Once simmering, remove the pan from heat and add ½ cup of creamy peanut butter and 2 oz of roughly chopped semi-sweet chocolate. Stir continuously until fully melted and incorporated. This creates the rich chocolate-peanut butter flavor base for the ice cream. Take your time here; the smoother the mixture, the creamier the final ice cream will be.
- Add Vanilla and Chill: Pour the warm mixture into a large glass bowl. Stir in 1 teaspoon of vanilla extract for a fragrant, layered flavor. Cover the surface of the mixture with plastic wrap, pressing it directly onto the ice cream base to prevent a skin from forming. Refrigerate for at least 4 hours or until thoroughly chilled. Chilling is essential to help the ice cream churn properly and achieve the ideal texture.
- Prepare for Churning: Once chilled, remove the ice cream base from the refrigerator. Make sure your ice cream maker’s bowl is still solidly frozen. Pour the base into the bowl of the ice cream maker, following your machine’s instructions. Churning transforms the cold liquid into creamy ice cream by incorporating air and breaking up ice crystals.
- Add Mix-Ins: During the last 2 minutes of churning, add 1 cup of chopped peanut butter cups and the remaining 2 oz of chopped semi-sweet chocolate. Reserve ¼ cup of peanut butter cups for topping. Gently fold these mix-ins in as the ice cream churns, ensuring each bite has sweet, nutty chunks.
- Layer Peanut Butter Swirl: Spoon half of the ice cream into a loaf pan. Dollop half of the remaining ½ cup peanut butter over the ice cream in random spots. Using a knife, swirl the peanut butter gently into the ice cream, creating a marbled effect. Repeat with the remaining ice cream and peanut butter. This technique gives the ice cream a beautiful, indulgent swirl in every scoop.
- Top and Freeze: Sprinkle the reserved chopped peanut butter cups evenly across the surface, gently pressing them into the ice cream. Cover the pan with plastic wrap or a lid and freeze for at least 4 hours or until the ice cream is firm enough to scoop. This final freeze allows the flavors to meld and the texture to set perfectly.
- Serve and Enjoy: Remove the ice cream from the freezer and let it sit at room temperature for 5 minutes before scooping. This makes it easier to serve while keeping the texture creamy. Scoop into bowls or cones and enjoy a rich, chocolatey, peanut-buttery treat that’s both indulgent and satisfying.
Notes
- This is a Philadelphia-style ice cream, meaning it contains no eggs, making it faster and simpler to prepare than custard-based ice creams.
- Heating the milk and cream is only to melt the chocolate and peanut butter; avoid boiling to prevent curdling.
- Use high-quality peanut butter and chocolate for the richest flavor and smoothest texture.
- The ice cream maker bowl must be fully frozen to achieve the perfect creamy consistency.
- Chilling the ice cream base thoroughly before churning ensures smoother results and prevents icy textures.
- Swirling peanut butter at the layering stage creates beautiful marbling and concentrated flavor pockets.
- Allow the ice cream to sit at room temperature for a few minutes before scooping for easier serving.
Chef’s Secrets For Perfect Texture
Achieving a creamy, rich ice cream starts with high-quality ingredients and proper technique.
Always whisk the cocoa powder and sugar thoroughly into the milk and cream to prevent clumps.
When adding peanut butter and chocolate, ensure the mixture is removed from heat and stirred slowly for a velvety consistency.
For even distribution of chunks, fold peanut butter cups in during the final churning minutes instead of earlier.
Finally, let the ice cream freeze fully in a loaf pan; partial freezing can cause uneven texture and ice crystals.
These subtle steps elevate homemade ice cream to a professional-level dessert.
Serving Suggestions To Impress Guests
Serve this chocolate peanut butter ice cream in classic bowls or waffle cones for a nostalgic treat.
Drizzle with warm chocolate or caramel sauce for added indulgence, or sprinkle with extra chopped peanuts for texture contrast.
For a playful twist, pair scoops with fresh berries or banana slices—the fruit balances the richness while adding natural sweetness.
Mini sandwiches using soft cookies and ice cream make a fun dessert for parties, while single servings with whipped cream and a cherry create an elegant presentation perfect for date nights or family dinners.
Storage Tips For Longevity
Store leftover ice cream in an airtight container in the freezer to maintain texture and prevent ice crystals.
Placing a layer of plastic wrap directly on the surface before sealing adds extra protection.
For the best taste, consume within 2–3 weeks; flavor and creaminess peak during this period.
If the ice cream becomes slightly hard, let it rest at room temperature for 5–10 minutes before scooping.
Avoid frequent thawing and refreezing, which can damage the texture.
For portion-controlled storage, consider freezing in small containers or muffin tins, then transferring to larger containers once frozen.
Frequently Asked Questions
1. Can I make this ice cream without an ice cream maker?
Yes! You can use a no-churn method by whipping the heavy cream separately, folding in the chocolate-peanut butter base, and freezing in a loaf pan.
Stir every 30–60 minutes during the first few hours to break up ice crystals for a smoother texture.
2. Can I use natural peanut butter instead of creamy peanut butter?
Natural peanut butter works, but it may slightly change the texture due to its higher oil content.
Stir well to ensure even incorporation and consider chilling the ice cream base longer before churning.
3. Can I substitute the chocolate with dark or milk chocolate?
Absolutely. Use high-quality dark or milk chocolate based on your preference.
Dark chocolate will make the ice cream slightly less sweet and more intense, while milk chocolate creates a creamier, sweeter flavor.
4. How do I prevent ice crystals from forming?
Chill the ice cream base thoroughly before churning, avoid overfilling the ice cream maker, and freeze the ice cream in an airtight container.
Swirling peanut butter and mixing chunks at the final churning stage also helps reduce icy textures.
5. Can I add other mix-ins or flavors?
Yes! Consider adding caramel swirls, chocolate chips, roasted nuts, or even a hint of espresso powder for variation.
Always fold in mix-ins during the last few minutes of churning to ensure even distribution without disrupting the ice cream’s creamy texture.
