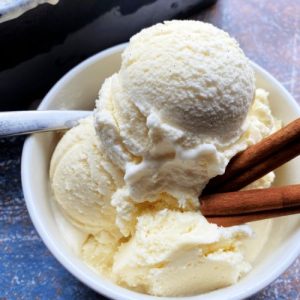
Indulge in the comforting flavors of homemade cinnamon vanilla ice cream, where warm spices meet creamy richness.
This recipe delivers a satisfying treat while providing protein from eggs and healthy fats from cream and milk.
With naturally sweetened goodness and customizable cinnamon intensity, it’s an easy, make-ahead dessert perfect for everyday enjoyment or special occasions, offering both flavor and wholesome ingredients in every scoop.
Cinnamon Vanilla Ice Cream
Equipment
- 1.7 oz Taylor & Colledge Organic Vanilla Bean Paste with Seeds
- Kitchenaid Stand Mixer
- KitchenAid Hand Mixer
- Hamilton Beach 68330N Automatic Ice Cream Maker, 4 Quart, White
- Cuisinart ICE-30BC Pure Indulgence 2-Quart Automatic Ice Cream Maker
- Ice Cream Scoop with Comfortable Handle
Ingredients
- 4 large eggs
- 2 ½ cups granulated sugar
- 4 cups heavy cream
- 2 tablespoons vanilla bean paste
- ½ teaspoon salt
- 6 cups whole milk
- 3 teaspoons ground cinnamon
Instructions
- Prepare Your Eggs: Start by cracking four large eggs into a clean, medium-sized mixing bowl. Using a stand mixer or hand mixer, beat the eggs on medium-high speed until they become light, airy, and pale yellow. This step is crucial as it incorporates air, giving the ice cream a fluffy and creamy texture. Make sure no yolk or white remains separate; the mixture should look smooth and frothy.
- Incorporate the Sugar: Gradually add 2 ½ cups of granulated sugar to the beaten eggs, one tablespoon at a time. Beat continuously as you add the sugar to ensure it fully dissolves and blends evenly into the egg mixture. This process prevents graininess in your ice cream and helps create a smooth, velvety base. Continue mixing until the mixture thickens slightly and becomes glossy.
- Add the Cream: Next, slowly pour in 4 cups of heavy cream into your egg-sugar mixture. Mix on low speed initially to prevent splashing, then increase to medium speed to combine fully. The cream adds richness and smoothness to the ice cream, ensuring every bite is indulgent. Scrape down the sides of the bowl occasionally to incorporate all ingredients evenly.
- Add Vanilla Flavor: Measure 2 tablespoons of vanilla bean paste and stir it into the mixture. The vanilla bean paste provides deep, aromatic flavor and tiny vanilla flecks, creating a luxurious and authentic ice cream taste. Mix gently to distribute the vanilla evenly throughout the base.
- Season with Salt: Add ½ teaspoon of salt to the mixture. Salt enhances all the flavors, balancing the sweetness while intensifying the cinnamon and vanilla. Mix thoroughly to make sure it’s fully integrated.
- Mix in Milk: Pour 6 cups of whole milk into the creamy base slowly, stirring continuously to ensure the liquid blends smoothly. The milk lightens the mixture slightly, making the ice cream perfectly creamy rather than overly dense. For best results, stir until no streaks of cream or milk are visible.
- Add Cinnamon: Measure 3 teaspoons of ground cinnamon and add it to the mixture. Stir gently but thoroughly until the cinnamon is evenly distributed, giving the ice cream a warm, spiced flavor. Taste the mixture at this stage: if you prefer a spicier kick, add ½ teaspoon at a time until it reaches your desired warmth.
- Chill the Mixture: Before freezing, cover the bowl with plastic wrap and refrigerate the ice cream base for at least 1–2 hours. Chilling ensures the mixture is cold, which is essential for proper churning and smooth texture in the ice cream maker. Cold ingredients prevent ice crystals from forming during freezing.
- Churn the Ice Cream: Pour the chilled ice cream base into your ice cream maker, following the manufacturer’s instructions. Churn for 20–30 minutes or until the ice cream thickens and reaches a soft-serve consistency. The churning process incorporates air and freezes the mixture simultaneously, giving it a creamy, smooth texture.
- Transfer to Freezer: Once churned, transfer the ice cream into a loaf pan or airtight container. Smooth the top with a spatula and cover it with aluminum foil or a tight-fitting lid to prevent freezer burn.
- Harden in the Freezer: Place the ice cream in the freezer for at least 2–4 hours or until fully firm. For best results, allow it to freeze overnight. This step ensures the ice cream is scoopable yet retains its creamy, rich texture.
- Serve and Enjoy: Use a comfortable ice cream scoop to serve generous portions.The creamy vanilla base paired with warm cinnamon makes each bite comforting and indulgent. Garnish with a sprinkle of cinnamon or a drizzle of chocolate syrup if desired. Store leftovers in the freezer, tightly covered, for up to two weeks.
Notes
- Adjust cinnamon intensity gradually to achieve your preferred level of spice; start with 1 teaspoon and add more if desired.
- For smoother texture, ensure eggs are fully beaten and sugar is completely dissolved before adding cream.
- Use high-quality vanilla bean paste for the most authentic flavor and visible vanilla flecks.
- Chill the ice cream base thoroughly before churning to prevent icy textures.
- If using a loaf pan for freezing, cover tightly with foil to avoid freezer burn.
- Leftover ice cream can be softened slightly at room temperature for easier scooping.
Chef’s Secrets To Perfect Ice Cream
Achieving creamy, smooth ice cream starts with proper technique and attention to detail.
Beating the eggs until light and fluffy incorporates air, which prevents the ice cream from being dense.
Gradually adding sugar ensures it dissolves evenly, avoiding a grainy texture.
Chilling the base before churning is essential—it allows the ice cream to freeze evenly and form a luxurious, velvety consistency.
Using high-quality cream, milk, and vanilla paste elevates the flavor profile, making each scoop rich and aromatic.
For an extra touch, try infusing a cinnamon stick in warm milk before mixing to deepen the spice notes.
Serving Suggestions For Best Enjoyment
Cinnamon Vanilla Ice Cream pairs beautifully with warm desserts like apple pie, bread pudding, or freshly baked cinnamon rolls.
It also works as a simple treat on its own—served in elegant bowls with a sprinkle of cinnamon or nutmeg for extra flair.
For a fun twist, drizzle caramel or chocolate sauce over a scoop, or add toasted nuts for texture.
This ice cream is also an excellent accompaniment to fruit crumbles or poached pears, creating a dessert that’s both comforting and visually appealing.
Storage Tips For Long-Lasting Ice Cream
Proper storage is key to maintaining the texture and flavor of homemade ice cream.
Always store it in an airtight container to prevent ice crystals and freezer burn.
If possible, place a layer of plastic wrap directly on the surface before sealing the lid.
Keep the ice cream in the coldest part of the freezer, avoiding the door, which experiences temperature fluctuations.
When ready to serve, let it sit at room temperature for a few minutes to soften slightly, making scooping easier while preserving its creamy texture.
Homemade ice cream is best enjoyed within two weeks for peak flavor.
Frequently Asked Questions
1. Can I make this ice cream without eggs?
Yes! You can substitute eggs with a custard-free method using cornstarch or a cream-and-milk base. The texture will still be creamy but slightly less rich. Make sure to chill the mixture thoroughly before churning.
2. How can I make this ice cream spicier?
Increase the cinnamon gradually, ½ teaspoon at a time, and taste as you go. For added warmth, consider adding a pinch of nutmeg or ground cloves for a subtle complexity.
3. Can I use low-fat milk or cream?
Yes, but the ice cream will be less rich and slightly less creamy. For best results, use at least 2% milk and light cream, or consider adding a small amount of mascarpone to maintain creaminess.
4. How do I prevent ice crystals from forming?
Chill the ice cream base completely before churning, and store it in an airtight container. Covering the surface directly with plastic wrap or foil also minimizes ice crystal formation.
5. Can I make this ice cream ahead of time for a party?
Absolutely! Prepare the base and churn it a day in advance, then freeze until needed. For the best texture, remove from the freezer 10–15 minutes before serving to allow for easy scooping.
