This Classic Beef Stew with Root Vegetables stands out for its rich, comforting flavors developed through slow braising, which tenderizes the beef and melds it beautifully with hearty root vegetables.
It’s a satisfying meal that balances robust protein from quality beef (29g per serving) with fiber-rich vegetables like rutabaga and carrots, contributing to digestive health and sustained energy.
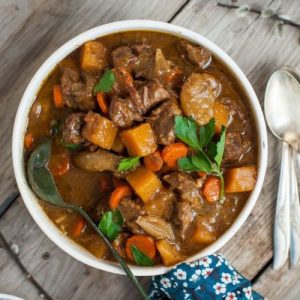
Easy Classic Beef Stew with Root Vegetables
Equipment
- 1 Large Dutch Oven (3.5 qt)
- 1 Pair of Tongs
- 1 rubber spatula
- Measuring cups and spoons
- 1 Chef’s knife
Ingredients
- 2 pounds beef stew meat cut into bite-sized pieces
- ⅓ cup all-purpose flour
- 1 teaspoon fine sea salt plus more to taste
- 1 teaspoon freshly ground black pepper plus more to taste
- 3 tablespoons olive oil divided
- 3 teaspoons salted butter divided
- 3 cups beef broth separated
- ⅓ cup red wine or beer optional, for added depth
- 6 French shallots peeled and halved
- 2 small onions peeled and quartered
- 1 teaspoon fresh thyme leaves or 1/2 teaspoon dried thyme
- ½ teaspoon dried rosemary crushed
- 2 garlic cloves minced
- 1 pound rutabaga peeled and cut into 1-inch cubes
- 3 medium carrots peeled and sliced into rounds
- 1 teaspoon Dijon mustard
- 1 tablespoon Worcestershire sauce
Instructions
- Prepare and Coat the Beef: Begin by patting the beef cubes dry with a paper towel to remove excess moisture—this helps achieve a perfect sear. In a bowl, mix the flour with 1 teaspoon of salt and 1 teaspoon of pepper. Toss the beef pieces in the seasoned flour until they are evenly coated.
- Brown the Beef (First Batch): Heat 1 tablespoon olive oil and 1 teaspoon butter in a heavy-bottomed Dutch oven over medium heat until the butter is melted and foamy. Add half of the beef in a single layer, ensuring not to crowd the pan. Sear the meat on all sides until a rich golden crust forms, about 5-7 minutes. Remove browned beef to a clean bowl.
- Deglaze the Pan (First Time): Pour about 1/2 cup of beef broth into the hot pot and use a spatula to scrape up all browned bits stuck to the bottom. These flavorful bits are essential for the stew’s depth. Pour this deglazing liquid over the browned beef.
- Brown the Beef (Second Batch): Repeat the browning process with the remaining beef using the last teaspoon of butter and 1 tablespoon olive oil. After browning, deglaze again with the red wine or beer, scraping up all the caramelized bits. Transfer this to the bowl with the first batch of beef.
- Sauté Aromatics and Vegetables: In the same Dutch oven, heat 1 tablespoon olive oil over medium heat.Add shallots and onions and cook for 2 minutes until softened. Stir in thyme, rosemary, and garlic, cooking until fragrant.Add rutabaga and carrots, sautéing for 3 to 4 minutes until edges begin to soften.
- Thicken and Add Liquid: Sprinkle the remaining 2 tablespoons of seasoned flour over the vegetables and stir well to coat. Cook for 1 minute to eliminate the raw flour taste. Gradually pour in the remaining beef broth while stirring to avoid lumps, scraping the bottom to incorporate any stuck bits.
- Combine and Season: Return the browned beef and accumulated juices to the pot. Stir in Dijon mustard and Worcestershire sauce to enrich the flavor. The liquid should just cover the ingredients; if necessary, add a bit more broth or water.
- Slow Cook the Stew: Cover the Dutch oven with a tight-fitting lid and place it in a preheated oven at 275°F (135°C). Let the stew braise gently for 3 hours, allowing flavors to meld and beef to become tender.
- Final Cooking and Resting: Remove the lid and continue cooking uncovered for an additional hour to thicken the stew. Afterward, take the pot out and let the stew rest for about 15 minutes—the thickness will improve as it cools.
- Taste and Adjust Seasoning: Before serving, taste the stew and season with additional salt and freshly ground black pepper as needed.
Notes
- Browning is Key: Taking your time to brown the beef thoroughly in batches builds essential flavor—avoid overcrowding the pan to ensure even caramelization.
- Deglazing Choices: While red wine adds depth, you can skip it and use beef broth, beer, or even a robust apple cider for different flavor profiles.
- Butter Finish: For an extra touch of richness, stir in 2 tablespoons of butter once the stew is out of the oven. This adds silkiness and depth to the sauce.
- Vegetable Variations: Root veggies like parsnips or turnips can be swapped in for rutabaga or carrots to customize texture and taste.
- Make Ahead: This stew tastes even better the next day, making it perfect for meal prep or cozy leftovers.
The moderate fat content (13g, with only 4g saturated fat) provides good flavor without heaviness, while the low sodium (340mg) keeps it heart-friendly.
Using olive oil and butter in moderation introduces healthy fats that enhance mouthfeel and nutrient absorption.
This stew’s long, slow cooking process might seem time-consuming, but it’s mostly hands-off, making it perfect for meal prep or cozy family dinners.
Its versatility—paired with mashed potatoes or crusty bread—makes it an everyday classic that never disappoints.
Plus, optional wine deglazing adds depth without complexity.
Overall, it’s a nourishing, well-balanced dish combining tradition and nutrition.
Must-Have Tools for Perfect Results
Le Creuset Enameled Cast Iron Dutch Oven
This 3.5-quart braiser is essential for even heat distribution and excellent heat retention during slow cooking, ensuring your beef stew develops deep flavors without burning.
Its durable enamel finish resists staining and makes cleanup a breeze—perfect for any home cook aiming for consistent, restaurant-quality results.
Tongs
A sturdy pair of tongs is crucial for browning beef cubes evenly without tearing the meat.
They offer precise control and help you handle hot ingredients safely, making your cooking process more efficient and enjoyable.
Rubber Spatula
Perfect for deglazing the pan and scraping up flavorful browned bits, a flexible rubber spatula helps incorporate every bit of flavor into your stew.
Its heat resistance and easy maneuverability make it a versatile kitchen tool beyond this recipe.
Measuring Cups and Spoons
Accurate measurement of flour, oils, and liquids ensures your stew has the right texture and seasoning balance.
Investing in quality measuring tools promotes consistency in cooking and baking alike.
Sharp Chef’s Knife
Precision cutting of root vegetables and onions affects cooking times and texture.
A sharp chef’s knife makes prep faster and safer while improving your overall kitchen experience.
Chef’s Secrets for Deep Flavor
Creating a deeply flavorful beef stew hinges on a few crucial techniques.
First, don’t rush the browning process — searing the beef in batches allows the meat to caramelize perfectly, building a rich, savory base. Avoid overcrowding your pan to ensure even browning.
Deglazing the pan after browning, especially with red wine or beer, lifts those flavorful browned bits into the stew, enhancing its complexity.
Using a heavy Dutch oven with excellent heat retention promotes even cooking and prevents hot spots that could burn the ingredients.
Slow, low-temperature braising in the oven gently breaks down the beef’s connective tissues, producing tender, melt-in-your-mouth results.
Lastly, allowing the stew to rest before serving lets the sauce thicken naturally and the flavors to meld harmoniously.
Serving Suggestions for Perfect Pairings
This hearty beef stew pairs beautifully with simple, comforting sides that soak up its savory sauce.
Classic mashed potatoes are a traditional favorite, offering creamy texture to contrast the tender beef and vegetables.
Crusty rustic bread is another excellent option, ideal for dipping and mopping up every last drop of stew.
For a lighter accompaniment, steamed green beans or sautéed kale add freshness and color to your plate.
A crisp, slightly acidic salad with vinaigrette can balance the richness of the stew.
When serving family-style, consider warming your serving dishes to keep the stew hot and inviting throughout the meal.
Storage Tips to Preserve Freshness
Beef stew is a fantastic make-ahead dish, and storing it properly ensures you enjoy its full flavor and texture later.
Allow the stew to cool completely at room temperature but no longer than two hours before transferring it to airtight containers.
Refrigerate for up to 4 days, reheating gently on the stovetop over low heat to prevent the meat from toughening.
For longer storage, freeze portions in freezer-safe containers or heavy-duty zip bags for up to 3 months.
When reheating from frozen, thaw overnight in the fridge, then warm slowly to maintain moisture and flavor.
Stir occasionally during reheating to distribute heat evenly. Avoid repeated reheating to preserve the stew’s quality.
Frequently Asked Questions About Stew
Q1: Can I use other cuts of beef for this stew?
Absolutely! Chuck roast or brisket are excellent alternatives as they become tender with slow cooking, though cooking times may vary slightly.
Q2: Is it necessary to use wine or beer for deglazing?
No, these are optional but highly recommended as they add depth and complexity. You can substitute with extra beef broth or apple cider for different flavor profiles.
Q3: Can I prepare this stew in a slow cooker instead of the oven?
Yes, after browning the beef and sautéing vegetables on the stove, transfer everything to a slow cooker and cook on low for 6-8 hours for tender results.
Q4: How can I thicken the stew if it’s too watery?
Remove the lid in the final hour of cooking to reduce liquid. Alternatively, stir in a slurry of cornstarch and water or simmer uncovered until desired thickness.
Q5: What vegetables work best in beef stew?
Root vegetables like rutabaga, carrots, parsnips, and potatoes hold up well during long cooking and absorb flavors beautifully. Avoid softer vegetables like zucchini which can become mushy.
