This honey butter cornbread recipe strikes the perfect balance between rustic comfort and modern nutrition.
Fluffy on the inside with irresistibly crisp edges, it gets its rich flavor from real butter and natural sweetness from honey or maple syrup—no refined sugar needed.
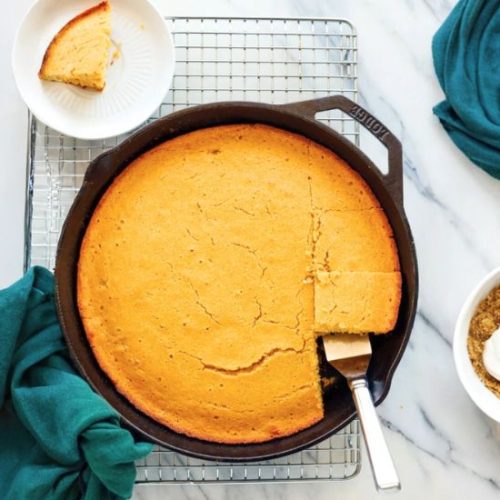
Honey Cornbread with Honey Butter
Equipment
- (1) 12-Inch Cast Iron Skillet – for baking and butter melting
- (2) Mixing Bowls – 1 large for dry ingredients, 1 medium for wet
- (1) Whisk – to blend eggs, honey, and milk smoothly
- (1) Silicone Spatula – to fold in butter and transfer batter
- (1) Oven Thermometer (optional) – to ensure accurate baking temperature
- (1) Cooling Rack – to rest the skillet after baking
Ingredients
- ½ cup 1 stick unsalted butter
- 1½ cups medium or fine cornmeal
- 1½ cups white whole wheat flour or use all-purpose or regular whole wheat
- 1½ teaspoons fine sea salt
- 2 teaspoons baking powder
- ½ teaspoon baking soda
- 3 large eggs at room temperature
- ⅔ cup honey or pure maple syrup
- 1½ cups milk of your choice dairy, almond, oat, etc., at room temperature
- Optional toppings: extra butter honey, or fruit jam
Instructions
- Preheat Oven and Prepare Skillet: Preheat your oven to 375°F (190°C). Place the butter into a large 12-inch cast iron skillet and set the skillet in the oven to melt the butter. This should take 5 to 13 minutes, depending on your oven—watch closely toward the end. The butter should bubble and begin to brown slightly but not burn.
- Mix Dry Ingredients: While the butter melts, combine the cornmeal, flour, salt, baking powder, and baking soda in a large mixing bowl. Stir until everything is evenly distributed, then set aside.
- Whisk the Wet Ingredients: In a separate medium bowl, whisk the eggs with the honey or maple syrup until smooth and fully incorporated. Add the milk and whisk again until the mixture is well blended.
- Combine Wet and Dry Mixtures: Pour the wet mixture into the dry ingredients and gently stir just until combined. It’s okay if the batter still has a few lumps—we’ll stir again after adding the butter.
- Add Melted Butter to Batter: Using oven mitts, remove the skillet from the oven once the butter has melted and browned slightly. Carefully swirl the butter around to coat the bottom and sides of the pan. Then pour all the butter into the batter and stir until just incorporated.
- Transfer Batter to Hot Skillet: Pour the batter into the hot, butter-coated skillet. Use a spatula to scrape down the sides of the bowl so you don’t waste any of the mixture. Smooth out the top gently.
- Bake Until Golden and Set: Return the skillet to the oven and bake for 25 to 30 minutes, or until the edges are golden brown, the center is firm and springy, and a toothpick inserted comes out with just a few moist crumbs.
- Cool Briefly and Serve: Remove the skillet from the oven using mitts and let it rest on a cooling rack for at least 5 minutes before slicing. Serve warm with a pat of butter, a drizzle of honey, or your favorite jam.
Notes
- Butter Watch Tip: Don’t walk away while melting the butter—check it early and often to avoid burning. The goal is nutty, golden butter, not dark brown.
- Room Temp Shortcut: Forgot to bring ingredients to room temperature? Place cold eggs in a bowl of warm water while the butter melts, and microwave the milk for 15–20 seconds.
- Flour Options: White whole wheat flour adds nutrition without sacrificing texture. You can use all-purpose for a more classic version or regular whole wheat for a heartier bite.
- Cornmeal Suggestions: Choose medium or fine-ground cornmeal for best texture. Stone-ground varieties offer a more rustic feel and better nutrition due to less processing.
- Baking Dish Alternatives: No cast iron? Use a 9×13-inch dish, 8×8-inch or 10×10-inch square pan, or even a 12-cup muffin tin. Adjust bake time accordingly—muffins will cook faster.
- Add-Ins to Customize: Stir in shredded cheddar or Jack cheese, fresh corn kernels, diced bell peppers, jalapeños, or even fruits like blueberries or cranberries for a twist.
- Make It Gluten-Free: A 1-to-1 gluten-free flour blend should work well—just make sure it’s a reputable brand meant for baking.
Using white whole wheat flour adds a fiber boost while maintaining a tender crumb, and the inclusion of eggs and milk provides a solid source of protein.
The recipe is vegetarian and can easily be adapted to be dairy-free or gluten-free, making it flexible for a variety of diets.
From a nutritional standpoint, it offers plant-based complex carbohydrates, good fats from butter, and a moderate protein punch from eggs and milk.
Its naturally sweetened and whole-grain composition makes it a smarter choice than boxed mixes.
Plus, it’s ideal for everyday cooking—quick to prepare, one-bowl simple, and meal-prep friendly.
You can even bake it ahead and freeze for later. Perfect as a side for soups, chili, or enjoyed with jam at breakfast.
Must-Have Tools for Perfect Results
Lodge 12-Inch Cast Iron Skillet
This heavy-duty skillet is essential for achieving the crispy, golden edges that make this cornbread exceptional. Preheating the skillet with butter ensures even cooking and a flavorful crust. It’s also perfect for everything from frittatas to skillet pizzas.
OXO Good Grips Balloon Whisk
A sturdy whisk is key for blending the eggs, honey, and milk into a smooth, uniform mixture. This OXO whisk’s ergonomic handle and strong wires make it ideal for both batters and sauces in everyday cooking.
Pyrex 4-Quart Glass Mixing Bowl
Large and microwave-safe, this mixing bowl is perfect for combining dry and wet ingredients. Its transparent design helps monitor blending, and it’s a go-to for baking, meal prep, and storing leftovers.
Rubbermaid High-Heat Silicone Spatula
Use this heat-resistant spatula to fold in the butter and scrape every bit of batter into the skillet. Its flexibility ensures you waste nothing, and it’s also great for cooking eggs, stirring sauces, and baking.
Taylor Precision Oven Thermometer
To make sure your oven is truly at 375°F, this affordable tool helps prevent underbaking or overbaking. Accurate baking temps are crucial for achieving that perfect cornbread texture.
Chef’s Secrets for Cornbread Success
The key to mastering this honey butter cornbread lies in two techniques: using a hot cast iron skillet and properly layering your mixing steps.
Preheating the skillet with butter in the oven not only melts the butter but also allows the batter to begin cooking the moment it hits the pan, giving the cornbread its signature crisp, golden edges.
Make sure the butter is just lightly browned—not burnt—for a deep, nutty aroma that enriches the overall flavor.
Another pro tip is to avoid overmixing the batter. Stir until just combined to preserve the tender, fluffy interior.
Lastly, using room temperature eggs and milk helps create a more uniform batter, which bakes evenly and rises properly.
If you’re short on time, warm the eggs in water and microwave the milk briefly—easy and effective.
Serving Ideas to Make It Shine
This cornbread is incredibly versatile, making it suitable for everything from weeknight dinners to weekend brunch spreads.
Serve it warm with a pat of butter and drizzle of honey for a simple yet indulgent side.
Pair it with hearty dishes like chili, soups, or stews, where the sweet-savory balance helps cut through the richness.
For a Southern twist, serve it with collard greens and barbecue ribs or pulled pork.
It’s also fantastic as a breakfast item—try it with scrambled eggs and jam or sliced in half and toasted the next day.
Hosting a brunch? Add seasonal fruit and a dollop of whipped cream for a delightful twist on shortcake.
How to Store and Reheat Well
To keep your cornbread fresh, store leftovers in an airtight container at room temperature for up to 3 days, or refrigerate for up to 1 week.
If refrigerating, allow the cornbread to cool completely before sealing it to prevent condensation from making it soggy.
For longer storage, freeze individual slices wrapped tightly in plastic wrap and then placed in a zip-top freezer bag.
They’ll keep well for up to 3 months. When ready to eat, reheat in a low oven (around 300°F) until warmed through, or microwave individual pieces for 20–30 seconds.
For best texture, avoid reheating in high heat as it may dry out the crumb.
Frequently Asked Questions (FAQs)
1. Can I make this recipe without a cast iron skillet?
Yes! While a cast iron skillet gives the best texture, you can use a 9×13-inch baking dish, an 8×8-inch square pan, or even a muffin tin. Adjust baking times accordingly—muffins will cook faster, while larger pans may vary slightly.
2. What type of cornmeal works best?
Medium or finely ground cornmeal is ideal. Stone-ground varieties give a more rustic texture and slightly higher nutritional value. Avoid coarse grinds, which may make the bread overly gritty.
3. Can I use maple syrup instead of honey?
Absolutely. Maple syrup gives a slightly different but equally delicious sweetness. It also makes the recipe suitable for those avoiding honey due to allergies or dietary restrictions.
4. Is it possible to make this gluten-free?
Yes, a high-quality 1-to-1 gluten-free flour blend should substitute well for the wheat flour. The texture may be slightly different, but the flavor and structure hold up nicely.
5. How do I make it more savory or spicy?
You can stir in shredded cheddar, chopped jalapeños, or even cooked corn kernels into the batter. These additions work beautifully with the honey flavor and give the cornbread a more complex taste.
