This homemade fried onion rings recipe captures the irresistible crunch and golden crispiness you expect from a classic diner favorite, but with the comfort of making it yourself.
What makes this recipe stand out is its use of panko bread crumbs, which provide a lighter, airier texture than traditional breadcrumbs, giving each ring an unbeatable crunch.
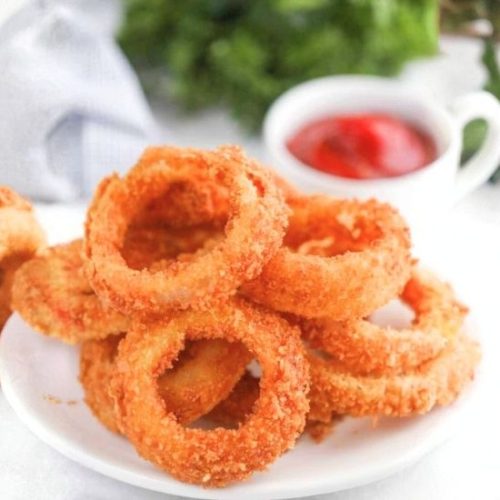
15-Minute Crispy Onion Rings
Equipment
- 3 Small Mixing Bowls
- Small Saucepan (to hold 2 inches of oil)
- Deep Fry Thermometer
- Slotted Spoon or Spider Strainer
- Paper Towels (for draining)
Ingredients
- 1 large onion peeled and sliced into half-inch thick rings
- ½ cup all-purpose flour
- 2 large eggs
- ½ cup milk
- 1 cup panko bread crumbs
- Vegetable oil enough for deep frying (about 2 inches in depth)
- Salt for seasoning (optional)
Instructions
- Prepare Your Breading Stations: Set up three separate shallow bowls. Place the flour in the first bowl. In the second bowl, beat together the eggs and milk until well combined. Pour the panko bread crumbs into the third bowl.
- Coat the Onion Rings: Take each onion ring and first dredge it thoroughly in the flour, making sure it is evenly coated. Next, dip the floured onion ring into the egg and milk mixture, allowing any excess to drip off. Finally, press the onion ring into the panko bread crumbs until fully covered. Set the breaded rings aside on a clean plate.
- Heat the Oil: Pour vegetable oil into a small saucepan, filling it about two inches deep. Heat the oil over medium heat until it reaches 375°F (190°C). Use a deep fry thermometer to check the temperature for consistent frying.
- Fry the Onion Rings: Carefully place the coated onion rings into the hot oil in small batches, being careful not to overcrowd the pan. Fry each side for approximately 2 to 3 minutes, or until they turn a rich golden brown. Use a slotted spoon or spider strainer to flip and remove the rings.
- Drain and Season: Transfer the fried onion rings to a plate lined with paper towels to absorb excess oil. While still hot, sprinkle with salt if desired to enhance flavor and maintain crispiness.
- Serve and Enjoy: Serve your crispy homemade onion rings immediately with your preferred dipping sauce, such as ranch or ketchup, for a delicious treat.
Notes
- For extra crunch, you can double-dip the onion rings by repeating the egg and panko coating step before frying.
- Make sure the oil temperature stays consistent around 375°F to prevent soggy or burnt onion rings. Adjust heat as necessary.
- Use a neutral oil with a high smoke point like vegetable or canola oil for the best frying results.
- Leftover onion rings are best enjoyed fresh but can be reheated in a hot oven or air fryer to regain crispiness.
- If you prefer a gluten-free version, substitute the flour and panko with gluten-free alternatives.
Despite being a fried treat, the recipe balances indulgence with simplicity and quality ingredients.
Onions themselves are a good source of fiber and vitamin C, and coating them lightly ensures a satisfying bite without excessive oil absorption.
Quick to prep and cook within 15 minutes, these onion rings are an ideal snack or side dish that fits perfectly into busy weeknight meals or weekend gatherings.
The process is straightforward enough for beginners yet produces a deliciously satisfying result that’s perfect for sharing or meal prep, especially when paired with a favorite dipping sauce.
Must-Have Tools for Perfect Results
Deep Fry Thermometer
Essential for monitoring the oil temperature precisely at 375°F, ensuring crispy, evenly cooked onion rings without greasy sogginess. A must-have for safe and effective frying in any home kitchen.
Three Small Mixing Bowls
Ideal for organizing the flour, egg wash, and panko breadcrumbs separately. These bowls streamline the breading process and keep your workspace tidy, perfect for prepping a variety of fried or breaded dishes.
Small Saucepan
Perfect for holding the oil during frying. Its size helps maintain oil temperature without requiring too much oil, making it a more economical and manageable option for home cooks.
Slotted Spoon or Spider Strainer
Allows you to safely lift fried onion rings out of hot oil while letting excess oil drip away, ensuring crispiness and less greasy results. A versatile tool for any frying task.
Paper Towels
Crucial for draining fried foods post-cooking to absorb extra oil and maintain crisp texture. An inexpensive kitchen staple that significantly improves the quality of fried dishes.
Chef’s Secrets for Crispy Onion Rings
Achieving the perfect crispy texture in homemade onion rings hinges on a few key techniques.
First, using panko bread crumbs instead of regular breadcrumbs adds an airy crunch that mimics restaurant-quality frying.
Also, maintaining the oil temperature at a steady 375°F is crucial—too low and the rings absorb excess oil, too high and they burn quickly.
Be sure to slice your onions evenly, about half an inch thick, so they cook uniformly.
For extra crunch, you can double-dip the rings by repeating the egg and panko coating step.
Don’t rush the draining process; let the rings rest on paper towels to soak up any residual oil to keep them crisp.
Finally, seasoning immediately after frying while the rings are still hot helps the salt adhere better, enhancing every bite.
Delicious Serving Suggestions for Onion Rings
These golden onion rings are incredibly versatile and pair wonderfully with a variety of dishes.
Serve them alongside classic burgers or sandwiches for a nostalgic diner experience.
They also make a fantastic appetizer or party snack when accompanied by an array of dipping sauces like tangy ranch, smoky barbecue, or spicy sriracha mayo.
For a lighter twist, pair onion rings with fresh salads or grilled vegetables to balance their richness.
Adding a squeeze of fresh lemon or a sprinkle of smoked paprika over the rings just before serving can elevate their flavor even further, making every bite exciting and crave-worthy.
Smart Storage Tips to Maintain Freshness
While onion rings are best enjoyed immediately for maximum crispiness, leftovers can be stored properly to extend their enjoyment.
After frying and cooling completely, place the onion rings in an airtight container lined with paper towels to absorb moisture.
Store them in the refrigerator and consume within 1 to 2 days for best quality.
To reheat, avoid microwaving as it tends to make them soggy. Instead, warm them in a preheated oven at 375°F or in an air fryer for a few minutes to restore their crunch.
Avoid freezing fried onion rings, as this can negatively affect texture and cause excess moisture upon thawing.
Frequently Asked Questions About Onion Rings
Q1: Can I use other types of onions?
Absolutely! While yellow onions are classic for frying, sweet onions like Vidalia or white onions also work beautifully and offer a milder flavor.
Q2: What can I use instead of panko breadcrumbs?
If you don’t have panko, regular breadcrumbs will work, though the texture will be less crispy. Crushed cornflakes or crushed crackers can also make excellent crunchy coatings.
Q3: How do I know when the oil is at the right temperature?
A deep fry thermometer is the best way to ensure the oil reaches and maintains 375°F. Alternatively, drop a small breadcrumb into the oil; if it sizzles and browns quickly, the oil is ready.
Q4: Can I bake the onion rings instead of frying?
Yes, for a healthier alternative, coat and bake the onion rings on a wire rack at 425°F for 20-25 minutes, flipping halfway. They won’t be as crispy but still tasty.
Q5: How do I prevent onion rings from becoming soggy?
Maintaining proper oil temperature and draining them well on paper towels immediately after frying are key. Avoid overcrowding the pan, which lowers oil temperature and leads to sogginess.
