Elevate your breakfast game with this fluffy, golden Dutch Baby Pancake, featuring a luxuriously custardy center thanks to extra eggs.
Packed with protein and wholesome nutrients, it’s a satisfying way to start your day without excess sugar.
Quick, easy, and versatile, this skillet pancake is perfect for weekday mornings, weekend brunches, or meal prep, making it a healthy, crowd-pleasing choice.
Dutch Baby Pancake
Equipment
- 10-inch cast iron skillet (or oven-safe skillet/pie dish)
- Blender or food processor
- Oven mitts or potholders
Ingredients
- 3 tablespoons unsalted butter
- 4 large eggs at room temperature
- 1 cup milk at room temperature (any type: whole, 2%, 1%, or skim)
- 1 cup all-purpose flour
- ½ teaspoon kosher salt
- 1 –2 tablespoons granulated sugar optional, or omit for savory version
Instructions
- Preheat Your Oven and Skillet: Start by setting your oven to 425°F (220°C) to ensure it reaches the perfect temperature. Place a 10-inch cast iron skillet, oven-safe skillet, or pie dish inside while the oven heats. Preheating the skillet is essential—it helps the butter sizzle immediately when added and gives your Dutch Baby a golden, crisp edge.
- Prepare the Batter Ingredients: While the oven is warming, gather your main ingredients: eggs, milk, flour, salt, and optional sugar. Make sure the eggs and milk are at room temperature, as this helps the batter blend smoothly and produces a tender, custardy texture. Measure everything accurately for consistent results.
- Blend the Batter: Add the eggs, milk, flour, salt, and sugar (if using) to a blender or food processor. Blend on medium speed for about 1 minute, stopping to scrape down the sides and bottom. This ensures there are no lumps and that the flour is fully incorporated. A smooth, slightly runny batter is key for a perfectly puffed Dutch Baby.
- Let the Batter Rest (Optional): Once blended, allow the batter to rest for 10 minutes. This step is optional but highly recommended: it gives the flour time to hydrate, resulting in a more tender texture. While the batter rests, your preheated skillet will be ready for the next step.
- Melt the Butter in the Skillet: Carefully remove the hot skillet from the oven using oven mitts or potholders. Add the butter to the skillet and gently swirl it around until it’s completely melted, coating the bottom and sides evenly. This not only prevents sticking but also helps create the signature crisp edges of the Dutch Baby.
- Pour the Batter into the Skillet: Immediately pour the rested batter into the skillet over the melted butter. Tilt the pan slightly to make sure the batter spreads evenly across the bottom and up the sides. This ensures a uniform puff and even cooking.
- Bake the Dutch Baby: Place the skillet back in the preheated oven and bake for approximately 15 minutes.Keep an eye on it—your Dutch Baby should puff dramatically and turn a beautiful golden brown. For a custard-like center, pull it out at 15 minutes; for a firmer center, bake an extra 2–3 minutes. Avoid opening the oven door too early, as this can cause it to deflate.
- Prepare for Serving: Once baked, carefully remove the skillet from the oven. The Dutch Baby will start to deflate slightly, which is normal. Let it sit for 1–2 minutes before adding toppings. This pause allows the custardy center to set slightly, making it easier to slice and serve.
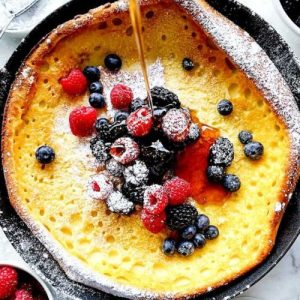
- Add Your Favorite Toppings: Now the fun part—customize your Dutch Baby with sweet or savory toppings. Popular sweet options include fresh berries, powdered sugar, maple syrup, or a dollop of yogurt. For savory versions, try sautéed vegetables, cheese, or smoked salmon. Be creative—this pancake works beautifully with both styles.
- Slice, Serve, and Enjoy: Use a sharp knife or spatula to cut your Dutch Baby into wedges. Serve immediately while warm, and watch as everyone enjoys the fluffy edges and tender custardy center. This dish is perfect for breakfast, brunch, or even a light dinner.
Notes
- For best results, use room-temperature eggs and milk to ensure a smooth, lump-free batter.
- Letting the batter rest for 10 minutes helps create a tender, custardy center.
- Preheating the skillet is essential—this gives the pancake its signature puff and crispy edges.
- Customize the flavor by adjusting sugar for sweetness or omitting it entirely for a savory version.
- Dutch Baby pancakes deflate slightly after baking; this is normal and doesn’t affect texture or flavor.
- Use a spatula to carefully lift slices, especially from the edges, to preserve the puff.
Chef’s Secrets For Perfect Pancakes
Creating a picture-perfect Dutch Baby pancake is all about technique.
Start by preheating your skillet thoroughly—this step ensures the butter sizzles immediately and produces those beautifully crisp edges.
Blending the batter until completely smooth is crucial; any lumps can prevent the center from setting properly.
Resting the batter for a few minutes allows the flour to absorb liquids fully, giving the pancake its tender, custardy texture.
For extra flavor, try infusing your milk with a touch of vanilla or cinnamon before blending.
Timing is also key: pulling the pancake from the oven at just the right moment ensures a golden, puffed exterior and a soft, custardy interior.
Serving Suggestions For Every Meal
Dutch Baby pancakes are incredibly versatile and can be adapted for sweet or savory meals.
For breakfast or brunch, top with fresh berries, a drizzle of maple syrup, and a sprinkle of powdered sugar.
Savory toppings like sautéed mushrooms, spinach, melted cheese, or smoked salmon create a more substantial dish suitable for lunch or a light dinner.
You can also experiment with nut butters, caramelized fruit, or yogurt to vary textures and flavors.
Because the pancake is so visually impressive, it’s a great dish to serve for special occasions or weekend gatherings.
Storage Tips To Maintain Freshness
Dutch Baby pancakes are best enjoyed fresh, but leftovers can be stored with care.
Allow the pancake to cool completely, then wrap tightly in plastic wrap or place in an airtight container.
Store in the refrigerator for up to 2 days. To reheat, place slices on a baking sheet in a preheated 350°F oven for 5–7 minutes to restore crisp edges, or use a toaster oven for a quicker option.
Avoid microwaving, as this can make the pancake soggy.
For longer storage, the batter itself can be prepared ahead of time and kept refrigerated for up to 24 hours before baking.
Frequently Asked Questions
1. Can I make this pancake gluten-free?
Yes! Substitute the all-purpose flour with a 1:1 gluten-free baking blend. Be aware that texture may be slightly different, but the pancake will still puff and taste delicious.
2. Can I use non-dairy milk?
Absolutely. Almond, oat, or soy milk works well, though the custard may be slightly less rich than with dairy milk. Use room-temperature milk for best results.
3. Why did my Dutch Baby deflate?
Deflation is normal and expected. Dutch Babies puff up dramatically in the oven and naturally collapse slightly as they cool. It doesn’t affect flavor or texture.
4. Can I make this ahead of time?
While it’s best served fresh, the batter can be prepared in advance and stored in the refrigerator for up to 24 hours. Bake just before serving for optimal puff and texture.
5. What toppings work best?
The options are endless! Sweet toppings like berries, syrup, or powdered sugar are classic. For savory versions, consider cheese, herbs, sautéed vegetables, or smoked meats. Experimenting allows you to enjoy a new flavor each time.
