Experience the joy of homemade artisan bread with minimal effort!
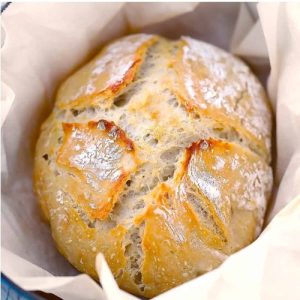
This Dutch Oven No-Knead Bread delivers a perfectly golden, crusty loaf in under three hours, packed with fiber and plant-based protein from all-purpose flour.
Low in saturated fat and naturally wholesome, it’s ideal for everyday meals, quick snacks, or meal prep—satisfying, easy, and irresistibly aromatic.
Dutch Oven No Knead Bread
Equipment
- 1 Dutch Oven (5–6 qt)
- 1 Silicone Spatula
- Parchment paper
- Whisk
- Meat Thermometer (for water temperature)
Ingredients
- 1 ½ cups warm water ≈100°F / 38°C
- 1 packet active dry yeast 2 ¼ tsp
- 1 ½ tsp fine grain salt sea salt or kosher
- 3 ¼ cups all-purpose or bread flour plus extra for dusting
Instructions
- Activate the Yeast: Begin by pouring 1 ½ cups of warm water into a large mixing bowl or container. The water should feel warm to the touch, around 100°F (38°C) — comfortably warm, not hot, to avoid killing the yeast. Sprinkle 1 packet (2 ¼ teaspoons) of active dry yeast over the water. Add 1 ½ teaspoons of fine grain salt to the mix. Using a whisk, gently stir until most of the yeast and salt are dissolved. Let this mixture sit for a few minutes while you prepare your flour — you should notice the yeast starting to bloom with tiny bubbles. This ensures a lively dough and a good rise later.
- Combine the Flour: Measure 3 ¼ cups of all-purpose or bread flour and add it to the yeast mixture all at once. Using a silicone spatula or a wooden spoon, gently stir the mixture until a sticky, cohesive dough forms. Don’t worry about overmixing — the dough should be messy, sticky, and slightly wet. If it seems too loose and difficult to handle, sprinkle in 1–2 tablespoons of flour at a time until it holds together. If it feels too dry, add a little extra water, a tablespoon at a time, until the texture matches a sticky but uniform dough.
- First Rise: Cover the bowl loosely with a clean kitchen towel or place the lid slightly ajar on your container. Let the dough rise in a warm, draft-free environment for 2–3 hours, until it has approximately doubled in size. If your kitchen is cold, preheat your oven for 3–5 minutes, turn it off, and place the covered bowl inside to trap gentle warmth. During this period, resist the temptation to stir or poke the dough — the slow fermentation develops flavor and structure naturally.
- Prepare Dutch Oven and Parchment Paper: About 30–60 minutes before baking, preheat your oven to 450°F (232°C). Place your Dutch oven inside the oven with the lid on to allow it to heat thoroughly. The Dutch oven must be hot to create that signature crusty exterior. Meanwhile, prepare a sheet of parchment paper slightly larger than your loaf. Dust it lightly with flour to prevent sticking and help shape the dough later.
- Shape the Dough: Once the dough has doubled, carefully scrape it out of the bowl onto the floured parchment paper. Gently fold the edges up over the center to form a rough loaf shape. Avoid overworking the dough to retain its airy texture. You can use the edges of the parchment to flip the loaf so the floured side faces up. If desired, lightly score the top with a sharp knife or razor blade about ½ inch deep. This allows controlled expansion and creates a beautiful artisan look.
- Transfer Dough to Dutch Oven: Carefully remove the hot Dutch oven from the oven. Lift the parchment paper with the shaped dough and lower it into the Dutch oven. Ensure it’s centered and not touching the sides. Replace the lid immediately. The heat and steam trapped inside the Dutch oven will create a golden, crisp crust while keeping the interior soft.
- Bake Covered: Place the Dutch oven in the center of your preheated oven. Bake covered for 35 minutes. If the dough was cold from the refrigerator, extend this time to 40–45 minutes. The lid traps steam, giving the bread a crispy exterior while ensuring the inside stays tender and airy.Avoid opening the lid during this time to maintain the right environment for the crust.
- Bake Uncovered: After the initial baking, carefully remove the lid. Continue baking for another 5–10 minutes, or until the crust reaches a deep golden-brown color. You can check the doneness by gently tapping the bottom of the loaf — it should sound hollow. This step allows the crust to fully crisp and develop that irresistible, crunchy texture.
- Cool the Bread: Using the sides of the parchment paper, carefully lift the loaf out of the Dutch oven and place it on a wire rack or cutting board. Allow it to cool for at least 10 minutes before slicing, ideally 30–60 minutes. Cooling is crucial — cutting too soon can result in a gummy interior due to trapped steam. Patience here ensures a perfectly airy and structured crumb.
Notes
- Adjust Dough Consistency: Depending on your flour type and humidity, the dough may feel slightly wet or dry. Add 1–2 tablespoons of flour if too sticky or a splash of water if too dry.
- Rising Environment: A warm, draft-free spot is ideal. If your kitchen is cold, use your oven briefly to create gentle warmth.
- Scoring the Loaf: Lightly score the top with a sharp knife or razor to allow controlled expansion and create a beautiful crust.
- Salt Options: Fine sea salt, Himalayan salt, or kosher salt works best. Avoid iodized salt if possible, as it can affect yeast activity and flavor.
- Dutch Oven Size: A 5–6 qt Dutch oven works best, but slight variations in size are fine if you use parchment to prevent sticking.
- Cold Dough Handling: Dough stored in the fridge is easier to shape and develops deeper flavor. Add 5–10 minutes extra baking if cold.
- Optional Add-ins: Herbs, roasted garlic, grated cheese, or seeds can be mixed into the dough for variety without altering the basic baking process.
Chef’s Secrets For Perfect Loaf
The secret to a perfect Dutch Oven No-Knead Bread lies in patience and temperature control.
Allowing the dough to rise slowly in a warm, draft-free environment enhances flavor and develops the crumb.
Preheating the Dutch oven is essential for that golden, crackly crust, while covering the dough during initial baking traps steam, mimicking a professional bakery oven.
Minimal handling ensures airy pockets inside, so resist the urge to knead or shape aggressively.
Serving Suggestions For Every Meal
This bread is versatile and pairs well with nearly any meal. Serve warm slices with butter, olive oil, or avocado for breakfast.
It’s excellent alongside soups, stews, or salads for lunch or dinner, providing a hearty, fiber-rich complement.
You can also toast slices for sandwiches or panini.
For gatherings, cut into thick slices and serve with dips, cheeses, or cured meats — its rustic crusty exterior and soft interior make it irresistible.
Storage Tips To Keep Fresh
Once baked, allow your loaf to cool completely before storing to prevent a gummy interior.
Store at room temperature in a paper bag or loosely covered bread box for 2–3 days.
For longer storage, slice and freeze the loaf in an airtight bag, removing as much air as possible. Reheat slices in a toaster or oven directly from frozen.
Avoid refrigerating bread, as it can dry out and lose its crisp texture.
Frequently Asked Questions
1. Can I use whole wheat flour?
Yes! You can replace part or all of the all-purpose flour with whole wheat flour. Expect a slightly denser texture and nuttier flavor. You may need to adjust water slightly as whole wheat absorbs more liquid.
2. Why isn’t my dough rising properly?
Yeast is sensitive to water temperature and age. Ensure water is warm, not hot, and check that your yeast is fresh. If in doubt, proof yeast first by adding a pinch of sugar and waiting 5–10 minutes — it should foam.
3. Can I bake without a Dutch oven?
Absolutely. Use a heavy skillet or baking sheet and place a pan of hot water on the oven’s lower rack to create steam. This mimics the Dutch oven environment for a crispy crust.
4. How do I avoid a gummy interior?
Allow the bread to cool completely before slicing — at least 30 minutes. The internal structure needs time to set; cutting too soon releases steam and leaves a sticky crumb.
5. Can I add flavors or seeds?
Yes! Add herbs, roasted garlic, olives, cheese, or seeds directly into the dough before the first rise. Just mix gently to avoid deflating the dough. This creates artisan-style loaves with customized flavors.
