Indulge in this rich and velvety flourless chocolate cake that’s as decadent as it is simple to make.
Naturally gluten-free and high in fiber, it offers a guilt-free way to enjoy chocolate.
With good fats from butter and a satisfying chocolate punch, this cake is perfect for everyday baking, special occasions, or a quick dessert that impresses every time.
Flourless Chocolate Cake
Equipment
- 8-inch round cake pan (1)
- Parchment Paper (1 sheet)
- Wire cooling rack (1)
- Microwave-safe mixing bowls (2)
Ingredients
For the Cake:
- 1 cup semisweet chocolate chips or chopped chocolate
- ½ cup unsalted butter
- ¾ cup granulated sugar
- ¼ teaspoon salt
- 1 teaspoon vanilla extract
- 3 large eggs lightly beaten
- ½ cup Dutch-process cocoa powder
For the Ganache:
- 1 cup semisweet chocolate chips or chopped chocolate
- ½ cup heavy cream
Instructions
- Prepare Your Pan: Grease an 8-inch round cake pan thoroughly with nonstick cooking spray to prevent sticking. Then, cut a piece of parchment paper to fit the bottom of the pan and place it carefully inside. Spray the parchment lightly with nonstick spray as well. This extra step ensures the cake will release smoothly once baked, maintaining its delicate crust and fudgy interior. Set the pan aside while you prepare the batter.
- Melt Chocolate and Butter: In a large microwave-safe bowl, combine 1 cup of semisweet chocolate chips (or chopped chocolate) with ½ cup unsalted butter. Microwave the mixture in 30-second intervals, stirring well after each burst until both the chocolate and butter are fully melted and smooth.Take care not to overheat, as chocolate can seize and become grainy. A glossy, silky mixture is the goal. If preferred, you can melt the mixture gently over a double boiler for even more control.
- Incorporate Sugar and Flavorings: Once the chocolate and butter are smooth, add ¾ cup granulated sugar, ¼ teaspoon salt, and 1 teaspoon of vanilla extract. Stir until everything is fully combined and the sugar begins to dissolve slightly into the warm chocolate mixture. This step balances sweetness with depth and ensures a rich, flavorful cake.
- Fold in Eggs: Lightly beat 3 large eggs in a separate bowl. Gradually add the eggs to the chocolate mixture, stirring gently until completely incorporated. Take care to stir just until smooth; overmixing can cause the cake to lose its fudgy texture. The eggs provide structure while keeping the center rich and moist.
- Add Cocoa Powder: Sift ½ cup Dutch-process cocoa powder into the mixture to avoid lumps. Gently fold it in until just combined. At this stage, it’s important not to overmix, as too much stirring can lead to a denser cake rather than the ideal fudgy texture. The cocoa powder deepens the chocolate flavor and gives the cake a luscious, rich color.
- Pour and Smooth Batter: Transfer the batter into the prepared cake pan, spreading it evenly with a spatula to ensure uniform thickness. Smooth the top gently, being careful not to disturb the parchment or create air bubbles. This helps the cake bake evenly and develop a thin, delicate crust on top.
- Bake to Perfection: Preheat your oven to 375°F (190°C). Place the cake on the center rack and bake for approximately 25 minutes. The cake is done when a thin crust forms on the top, and an instant-read thermometer inserted into the center registers 200°F. The edges should be set while the center remains slightly soft and fudgy.
- Cool the Cake: Allow the cake to cool in the pan on a wire rack for about 10 minutes. Then, carefully run a butter knife around the edges to loosen it. Place a serving plate upside down over the pan and gently invert the cake onto the plate, so the bottom of the cake becomes the top. Let the cake cool completely to room temperature before glazing; this ensures a smooth, even ganache layer.
- Prepare the Chocolate Ganache: In a medium microwave-safe bowl, combine 1 cup semisweet chocolate chips (or chopped chocolate) with ½ cup heavy cream. Heat in 30-second intervals, stirring between each burst, until the cream is very hot and the chocolate melts into a smooth, glossy mixture. Take care not to overheat, as this can cause the ganache to seize. Stir thoroughly to achieve a silky, uniform texture.
- Glaze the Cake: Pour the ganache evenly over the cooled cake, starting in the center and gently spreading it toward the edges with a spatula. Let the ganache drip slightly down the sides for a beautiful, professional look. For best results, allow the glaze to set for a few hours at room temperature, or refrigerate to speed up the process.
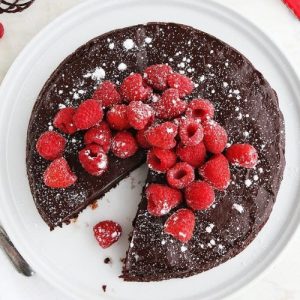
- Slice and Serve: Once the ganache has set, slice the cake carefully with a sharp knife. Serve with a dusting of powdered sugar, fresh raspberries, or a scoop of ice cream or whipped cream for an indulgent touch. Each slice should reveal a rich, fudgy interior and a glossy chocolate top, creating a dessert that’s as visually stunning as it is delicious.
Notes
- Use high-quality chocolate for the best flavor.
- Avoid overmixing the batter to maintain a fudgy texture.
- Dutch-process cocoa powder gives a deeper chocolate flavor.
- Let the cake cool completely before adding ganache for smooth glazing.
- Refrigerate the cake to set the ganache faster.
- Cake can be made a day ahead; store covered in the fridge.
- Serve with fresh berries, whipped cream, or ice cream for extra indulgence.
Chef’s Secrets For Perfect Cake
Achieving the ideal flourless chocolate cake comes down to technique and attention to detail.
Always melt chocolate and butter gently to prevent burning, either in short microwave bursts or over a double boiler.
When folding in the eggs and cocoa, stir just until combined to preserve the cake’s delicate, fudgy texture.
Using parchment paper ensures a smooth release from the pan, keeping the cake’s crust intact.
Finally, allowing the cake to cool completely before glazing guarantees a glossy, even ganache finish.
Serving Suggestions For Every Occasion
This cake is versatile and pairs beautifully with a variety of accompaniments.
Fresh raspberries or strawberries add a tangy contrast to the rich chocolate, while a dollop of whipped cream or a scoop of vanilla ice cream brings a creamy balance.
Dusting powdered sugar over the top adds a touch of elegance, making it perfect for dinner parties, birthdays, or casual family desserts.
For a more sophisticated presentation, drizzle caramel or sprinkle crushed nuts on top.
Storage Tips To Maintain Freshness
Store your flourless chocolate cake in an airtight container in the refrigerator for up to five days.
If you want to extend its shelf life, wrap the cooled cake tightly in plastic wrap and freeze for up to two months.
Thaw overnight in the fridge before serving.
To maintain the ganache’s silky texture, avoid leaving the cake at room temperature for extended periods, as it can soften and lose its glossy finish.
Frequently Asked Questions
1. Can I use dark chocolate instead of semisweet?
Yes! Dark chocolate works beautifully and will make the cake slightly less sweet but richer in flavor. Just ensure it’s good quality for the best results.
2. Is this cake gluten-free?
Absolutely. This recipe contains no flour, making it naturally gluten-free and suitable for those with gluten sensitivities or dietary restrictions.
3. Can I make this cake ahead of time?
Yes, the cake can be baked a day in advance. Store it in the fridge and add ganache just before serving, or glaze it in advance and refrigerate until ready to serve.
4. How do I know when the cake is done?
The cake is ready when it develops a thin crust on top and an instant-read thermometer inserted in the center reads 200°F. It should be firm around the edges but slightly soft in the middle.
5. Can I use almond or coconut milk in ganache?
Yes, you can replace heavy cream with full-fat coconut milk or a plant-based cream for a dairy-free option. The texture will remain smooth, though the flavor will be slightly different.
