This garlic and herb focaccia is a vegan-friendly twist on the classic Italian bread, combining pillowy softness with a golden, crisp crust.
Made with olive oil, fresh herbs, and a touch of garlic, it’s packed with healthy fats, plant-based protein, and fiber.
Low in saturated fat yet rich in flavor, this focaccia is simple, satisfying, and versatile — perfect for everyday cooking, meal prepping, or serving as a crowd-pleasing side.
Soft & Fluffy Garlic Herb Focaccia
Equipment
- 1 set measuring cups
- 1 set – Measuring Spoons
- 1 standard bowl
- 1 large mixing bowl
- 1 — 9×13 inch baking pan
Ingredients
- 1 cup olive oil
- 2 tablespoons fresh herbs minced
- 5 cloves garlic minced
- 2 cups lukewarm water
- 2 ¼ teaspoons rapid rise yeast 1 packet
- 1 ½ teaspoons sugar
- 5 cups all-purpose flour divided
- ¾ teaspoon salt plus extra for garnish
- ¼ cup vegan parmesan grated
Instructions
- Infuse the Olive Oil with Garlic and Herbs: Begin by pouring the olive oil into a small sauté pan and setting it over medium heat. Add the freshly minced garlic and chopped herbs directly into the oil. Allow them to gently sizzle for about a minute until the garlic turns fragrant and the herbs release their aroma. Be careful not to let the garlic brown too quickly, as it can turn bitter. The goal is a warm, flavorful infusion that will coat the bread beautifully later. Once fragrant, remove the pan from the heat and set it aside to cool slightly.
- Activate the Yeast: In a medium mixing bowl, combine the lukewarm water, rapid rise yeast, and sugar. Stir gently to dissolve, then let the mixture sit undisturbed for 5–10 minutes. You’ll notice bubbles and a frothy layer forming on top — this is the yeast waking up and activating.If no bubbles appear, your yeast may be expired or the water temperature may have been too hot or too cold. This step is essential for achieving the focaccia’s light, airy texture.
- Create the Initial Dough Base: In a large mixing bowl, add 2 cups of flour. Pour in the yeast mixture and about ⅓ cup of the infused oil mixture. Whisk everything together until it forms a sticky, wet batter-like consistency. Allow this mixture to rest for about 3 minutes — this short pause gives the flour time to hydrate and the gluten strands a head start in developing.
- Form and Knead the Dough: Add the remaining flour and the salt to the bowl. Using clean hands, begin mixing everything together until no dry flour pockets remain. Once the dough begins to come together, transfer it onto a lightly floured surface or continue kneading directly in the bowl. Knead for about 5 minutes, stretching and folding the dough until it becomes smooth, elastic, and slightly tacky but no longer overly sticky. This step helps develop gluten, which is key to a fluffy interior and chewy bite.
- First Rise (Bulk Fermentation): Shape the dough into a ball and place it back in the large mixing bowl. Lightly cover the surface of the dough with a drizzle of oil to prevent sticking. Cover the bowl with a warm, damp towel or plastic wrap, and set it aside to rise for about 45 minutes, or until the dough has doubled in size. If you prefer a deeper flavor and softer texture, you can refrigerate the dough for a slow rise of up to 24 hours.
- Prepare the Baking Pan: While the dough is rising, take your 9×13-inch baking pan and pour in about ⅓ of the remaining herb-infused oil. Use a basting brush or a clean paper towel to evenly coat the entire surface of the pan, including the corners and sides. This not only prevents sticking but also gives the focaccia its signature crisp, golden crust.
- Shape the Dough: Once the dough has completed its first rise, gently transfer it into the prepared pan. Using your fingertips, press and stretch the dough until it fills the entire pan, reaching into each corner. Don’t worry if it shrinks back slightly — just allow it to rest for a couple of minutes and continue pressing until it stays in place. This technique helps create an even thickness throughout the bread.
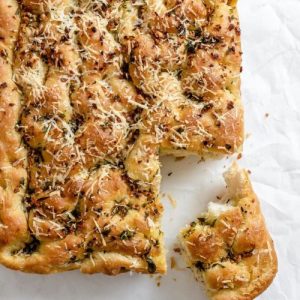
- Dimple and Top the Dough: Now for the fun part — using your fingertips, press firmly into the dough to create deep dimples across the entire surface. These indentations will hold pools of the flavored oil and melted vegan cheese, giving the focaccia its rustic look and rich taste. Drizzle the remaining garlic-herb oil mixture evenly over the top, making sure the dimples catch the oil. Sprinkle the grated vegan parmesan and a light pinch of salt across the surface for extra flavor.
- Bake to Golden Perfection: Preheat your oven to 410°F (210°C). Place the pan in the center of the oven and bake for 25–30 minutes, or until the focaccia is lightly golden on top.If you prefer a crunchier crust, bake for an additional 5–10 minutes, keeping an eye to prevent over-browning. The edges should be crisp while the inside remains fluffy and tender.
- Cool, Slice, and Serve: Once baked, remove the focaccia from the oven and allow it to cool in the pan for about 10 minutes. This resting time helps the bread finish setting while keeping the crust crisp. Carefully lift or slice the bread directly in the pan into 9 equal squares (or more, depending on your serving preference). Serve warm or at room temperature — perfect on its own, paired with soups, or as part of a sandwich.
Notes
- Use warm water (100–110°F / 38–44°C) to activate the yeast properly. Too hot kills the yeast, too cold prevents activation.
- Check that your yeast is fresh and not expired to ensure the dough rises correctly.
- For a richer flavor, try a slow rise in the refrigerator (18–24 hours) instead of the quicker 45-minute rise.
- Always coat the dough lightly with olive oil before covering to prevent it from drying out.
- If the dough feels too sticky, dust your hands lightly with flour while kneading.
- Pressing deep dimples into the dough is important — they help trap oil and flavor.
- For an extra-crispy crust, bake slightly longer (5–10 minutes) while monitoring closely.
- Vegan parmesan can be swapped with nutritional yeast for a lighter, cheesier flavor.
- A mix of fresh rosemary, thyme, and oregano makes a classic herb blend, but you can customize with your favorites.
- Allow the focaccia to rest after baking before slicing to keep the interior fluffy and moist.
Chef’s Secrets for Perfect Focaccia
The secret to bakery-quality focaccia lies in the details.
Always start with high-quality extra virgin olive oil — it’s the backbone of the flavor and texture.
When activating yeast, patience is key: wait until you see clear bubbles forming before moving forward.
Kneading is important, but don’t overdo it; the dough should feel elastic, soft, and slightly tacky, not dry.
Another tip is to generously oil the baking pan — this ensures the golden, crispy bottom crust that focaccia is loved for.
Finally, don’t rush the dimpling step.
Press firmly and deeply with your fingertips, as those pockets hold the oil and create the bread’s signature rustic appearance.
Serving Suggestions and Pairing Ideas
This garlic herb focaccia is incredibly versatile and can be enjoyed in countless ways.
Serve it warm as a starter alongside soups like minestrone or tomato basil for a comforting Italian-inspired meal.
It also pairs beautifully with fresh salads, especially those with lemony or balsamic dressings.
For a more indulgent option, use focaccia slices as sandwich bread — it works wonderfully with grilled vegetables, hummus, or plant-based deli slices.
Hosting guests? Cut it into small squares and serve as finger food with olive tapenade or a vegan cheese platter.
Its crisp crust and soft center make it a perfect companion for almost any dish.
Storage Tips for Lasting Freshness
Focaccia tastes best fresh from the oven but can easily be stored for later enjoyment.
Once completely cooled, wrap the bread tightly in foil or keep it in an airtight container at room temperature for up to 2 days.
For longer storage, refrigerate it for up to 5 days, though the texture may firm slightly. To restore its fluffiness, reheat slices in the oven at 350°F (175°C) for 5–7 minutes before serving.
You can also freeze focaccia for up to 3 months — simply slice it, wrap tightly in plastic wrap, and place in a freezer bag.
Defrost at room temperature, then warm in the oven to revive its crispy crust
Frequently Asked Questions
1. Can I use dried herbs instead of fresh?
Yes, dried herbs work well when fresh herbs aren’t available. Since dried herbs are more concentrated, use about one-third of the amount called for fresh.
For example, if the recipe calls for 2 tablespoons of fresh herbs, substitute with 2 teaspoons of dried herbs.
2. Why didn’t my focaccia rise properly?
The most common reasons are expired yeast, water that was too hot or too cold, or not giving the dough enough time to rise.
Always check yeast freshness and maintain the correct water temperature (100–110°F / 38–44°C) for best results.
3. How do I make the crust extra crispy?
For a crunchier crust, bake the focaccia for an additional 5–10 minutes and use a generous coating of oil on the pan.
You can also brush a little extra oil on top halfway through baking.
4. Can I make the dough ahead of time?
Absolutely! For more flavor and convenience, prepare the dough the night before and let it rise slowly in the refrigerator for up to 24 hours.
This slow fermentation develops a deeper, more complex taste.
5. What can I use instead of vegan parmesan?
If vegan parmesan isn’t available, nutritional yeast is a great alternative that adds a cheesy, nutty flavor.
You can also sprinkle sesame seeds or sunflower seeds on top for extra crunch and nutrition.
