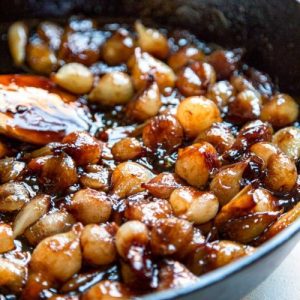
These Glazed Pearl Onions with Bacon are a perfect balance of sweet, savory, and smoky flavors.
Packed with fiber from onions and protein from crispy bacon, this dish makes a nutritious, satisfying side.
Quick to prep and simple to cook, it’s ideal for everyday meals, meal prep, or holiday dinners, offering a flavorful, guilt-free option for any table.
Glazed Pearl Onions with Bacon
Equipment
- Skillet (1, medium)
- Saucepan (1, medium)
- Cutting board (1)
- Knife (1)
- Paper towels (for draining bacon)
- Bowl (1, for ice water)
- Spoon or spatula (1)
Ingredients
- 4 slices bacon cut into thin strips
- 1 tbsp butter
- 2 lbs fresh white pearl onions or 29 oz frozen, thawed and drained
- 2 tbsp sugar
- ⅓ cup balsamic vinegar
- ¼ cup water
- ½ tsp black pepper
- 2 tbsp fresh parsley chopped
Instructions
- Prepare the Bacon: Start by slicing 4 strips of bacon into thin, uniform pieces.Place them in a cold skillet over medium heat and slowly render the fat. Cook the bacon until it turns golden brown and crispy, releasing its rich smoky flavor. Use a slotted spoon to transfer the cooked bacon onto a plate lined with paper towels, allowing excess grease to drain. Keep the bacon fat in the skillet, as it will form the flavorful base for cooking the onions.
- Prep the Pearl Onions: If using fresh white pearl onions, trim off the root ends carefully without cutting through the bulb. Bring a medium saucepan of water to a rolling boil. Add the onions and blanch them for 1 to 2 minutes. This loosens the skins, making them easy to peel. Immediately transfer the blanched onions into a bowl of ice water to stop the cooking process. Once cooled, pinch the stem end of each onion; the outer skin should pop off effortlessly. If using frozen pearl onions, simply thaw them completely and drain any excess water before cooking.
- Heat the Cooking Base: In the skillet with the reserved bacon fat, add 1 tablespoon of butter. Heat over medium-low heat until the butter melts and combines with the bacon fat, creating a rich, aromatic cooking base. The combination of bacon fat and butter adds both depth of flavor and a silky texture to the onions.
- Cook the Onions: Add the prepared pearl onions to the skillet. Stir gently to coat them evenly in the bacon fat and butter mixture. Reduce the heat to medium-low and cook the onions slowly for about 20 minutes. Stir occasionally or gently shake the skillet back and forth to ensure the onions brown evenly without breaking apart. This slow cooking process caramelizes the onions naturally, enhancing their sweetness and tenderness.
- Add Sweetness with Sugar: Sprinkle 2 tablespoons of sugar evenly over the onions. Continue cooking for another 2 minutes, stirring gently. The sugar will dissolve and start to create a lightly caramelized glaze around each onion, adding a balanced sweetness that complements the savory bacon.
- Incorporate Balsamic Vinegar and Water: Pour 1/3 cup of balsamic vinegar and 1/4 cup of water into the skillet. Stir the onions carefully to coat them in the liquid, ensuring each one is covered in the tangy-sweet glaze. Reduce the heat to low, cover the skillet with a lid, and let the onions simmer gently for 25 minutes. This slow simmer allows the flavors to meld together beautifully, softening the onions while thickening the glaze into a rich, glossy sauce.
- Add Crispy Bacon and Seasoning: Once the onions are tender and the glaze has thickened, stir in the reserved crispy bacon pieces. Sprinkle 1/2 teaspoon of black pepper over the onions and mix gently. The bacon adds a smoky crunch and umami flavor that perfectly contrasts the sweet glaze, creating a harmonious balance of taste and texture.
- Garnish and Serve: Transfer the glazed onions to a serving dish. Sprinkle 2 tablespoons of freshly chopped parsley over the top for a burst of color and a hint of fresh, herbal flavor. Serve immediately while warm as a delightful side dish that pairs beautifully with roasted meats, poultry, or even a vegetarian main.
- Storage Tips (Optional): If you have leftovers, allow them to cool completely and store in an airtight container in the refrigerator for up to 3 days. To reheat, gently warm in a skillet over low heat to preserve the glaze and maintain the tender texture of the onions.
Notes
- Fresh pearl onions give the best flavor, but frozen ones work well when time is short.
- Always blanch fresh onions before peeling—this makes skin removal effortless.
- Cooking the onions slowly is key to achieving tender, sweet results without burning.
- Balsamic vinegar adds depth and tang; for a milder flavor, reduce it slightly with extra water.
- Crispy bacon adds texture—reserve some pieces to sprinkle just before serving.
- For a vegetarian option, omit the bacon and use olive oil instead of bacon fat.
- Garnishing with fresh parsley brightens the dish both visually and in flavor.
- The dish can be made ahead and gently reheated, making it perfect for holidays.
Chef’s Secrets for Best Results
The secret to this recipe lies in patience and balance.
Allowing the onions to cook low and slow is essential—this ensures they soften gradually while developing a naturally sweet flavor.
Don’t rush this stage, as it creates the foundation for the glaze.
When adding the balsamic vinegar, make sure it’s a good-quality variety with a slight natural sweetness.
This helps create a glossy, rich sauce without becoming too sharp.
Lastly, keep a portion of the bacon aside until the very end for maximum crispness, giving every bite a contrast of tender onions and crunchy bacon.
Serving Suggestions for Every Occasion
These glazed pearl onions are a versatile side that pairs well with a variety of dishes.
They shine on a holiday table alongside roasted turkey, glazed ham, or prime rib, but they’re just as enjoyable next to grilled chicken, steak, or pan-seared salmon on a weeknight.
For a vegetarian-friendly pairing, serve them with creamy mashed potatoes, roasted root vegetables, or a simple grain pilaf.
The sweet-and-savory glaze also makes them a wonderful topping for sandwiches, burgers, or grain bowls, elevating even the simplest meals into something special.
Storage Tips for Lasting Freshness
If you’re planning ahead, this dish stores beautifully.
Once cooled, transfer the glazed onions to an airtight container and refrigerate for up to 3 days.
To reheat, warm them gently in a skillet over low heat, adding a splash of water if needed to loosen the glaze.
Avoid using the microwave, as it may make the onions mushy and reduce the crispness of the bacon.
For longer storage, freeze the cooked onions and glaze (without the bacon) for up to 2 months.
When ready to serve, reheat on the stovetop and stir in freshly cooked bacon for the best texture.
Frequently Asked Questions
1. Can I use red or yellow pearl onions instead of white?
Yes! Red and yellow pearl onions will both work, though the flavor will vary slightly.
Red onions have a mild sweetness and will give the dish a deeper color, while yellow onions add a bit more sharpness. White onions remain the classic choice for their delicate flavor.
2. How can I make this recipe vegetarian or vegan?
To make it vegetarian, skip the bacon and use 2 tablespoons of olive oil or plant-based butter instead of bacon fat.
For a fully vegan option, ensure the butter substitute is dairy-free. The onions will still glaze beautifully, and the balsamic adds plenty of flavor.
3. What can I substitute for balsamic vinegar?
If balsamic vinegar isn’t available, you can use red wine vinegar or apple cider vinegar mixed with a teaspoon of honey or brown sugar.
This gives a similar sweet-tangy balance, though the flavor won’t be quite as rich as balsamic.
4. Can I make this dish ahead of time for entertaining?
Absolutely! This is an excellent make-ahead dish. Prepare it a day in advance, refrigerate, and then reheat gently in a skillet before serving.
For best texture, add the bacon just before serving so it stays crispy.
5. How do I prevent the onions from breaking apart while cooking?
The key is gentle handling and slow cooking. Avoid stirring too vigorously—use a wooden spoon to move the onions carefully or simply shake the skillet occasionally.
Keeping the heat at medium-low prevents them from burning or splitting open too quickly.
