This Homemade Cherry Garcia Ice Cream offers a delightful blend of tart cherries and rich chocolate, creating a refreshing dessert that feels indulgent yet homemade.
Made with real cherries and creamy custard, this recipe balances natural fruit sweetness with luscious dairy fats, providing a satisfying treat that’s also rich in protein and calcium from the whole milk and egg yolks.
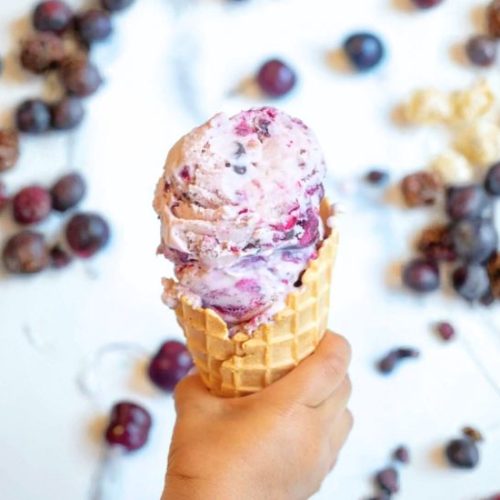
Homemade Cherry Garcia Ice Cream
Equipment
- 1 Ice Cream Maker (or alternative churn method)
- 1 Medium Saucepan (3-quart)
- 1 Fine Mesh Sieve
- 1 Stand or Hand Mixer
- 1 Loaf Pan (9 x 5 x 3 inches, for no-churn option)
Ingredients
- 1 ½ lbs cherries pitted
- 1 ½ cups whole milk
- 2 cups heavy whipping cream
- 6 large egg yolks
- 1 ¼ cups granulated sugar
- 1 teaspoon lemon juice
- 1 teaspoon vanilla extract
- ¾ cup chocolate chips or chunks
- Pinch of salt
Instructions
- Prepare Your Ice Cream Maker: Begin by placing the ice cream maker’s churn bowl into the freezer. This step is crucial as it chills the bowl thoroughly, which helps the ice cream mixture freeze evenly and develop that smooth, creamy texture. Make sure to freeze the bowl for at least 12 hours or according to your machine’s instructions before starting the recipe.
- Pit and Portion Cherries: Start by pitting your cherries carefully, removing all stems and pits. Once pitted, divide the cherries into two portions: 1 pound for cooking and 1/2 pound for chopping fresh later. This division allows some cherries to be cooked down into a luscious sauce while the others add fresh bursts of flavor and texture in the finished ice cream.
- Macerate Cherries with Sugar: Place the 1 pound of pitted cherries into a small saucepan. Sprinkle 1/4 cup of granulated sugar over them, gently stirring to coat. Let this mixture sit at room temperature for about 30 minutes. This process, called maceration, draws out the cherries’ natural juices and softens the fruit, helping to create a flavorful cherry syrup during cooking.
- Heat Milk for Custard Base: Pour the whole milk into a 3-quart saucepan and set it over medium-low heat. Stir the milk regularly to prevent it from sticking to the bottom or scorching. Slowly heat the milk until it reaches approximately 195°F (just below boiling). This gentle heating prepares the milk for combining with the egg yolks to form a creamy custard base.
- Whisk Egg Yolks and Sugar: While the milk heats, crack the egg yolks into a medium mixing bowl. Add 1 cup of granulated sugar to the yolks and whisk vigorously until the mixture is pale and slightly thickened. This step ensures the sugar begins to dissolve and the yolks will incorporate smoothly with the hot milk without scrambling.
- Temper the Egg Mixture: Once the milk reaches the correct temperature, slowly pour about half of it into the egg yolk mixture, whisking constantly. This gradual addition, known as tempering, warms the eggs gently, preventing them from cooking too quickly and curdling. After fully combining, pour the entire egg and milk mixture back into the saucepan.
- Cook Custard Until Thickened: Return the saucepan to medium heat and cook the custard, whisking constantly. This continuous stirring is vital to prevent lumps or scrambling. Continue cooking until the custard thickens enough to coat the back of a spoon — usually when it reaches about 170–175°F. If lumps form, keep whisking; they will smooth out with constant motion.
- Strain and Cool Custard: Immediately strain the custard through a fine mesh sieve into a medium bowl set over an ice bath (a larger bowl filled with ice and water). Straining removes any lumps or cooked bits, ensuring a silky smooth texture. Cover the bowl tightly with plastic wrap, pressing it directly onto the custard surface to prevent a skin from forming. Chill in the refrigerator for at least 2 hours to cool completely.
- Cook Cherry Sauce: After the cherries have macerated for 30 minutes, add 1 teaspoon of fresh lemon juice to the saucepan. Place it over medium heat and cook, stirring occasionally, until the cherry juices thicken into a syrupy consistency. This usually takes about 30 minutes. The lemon juice brightens the flavor and balances the sweetness.
- Separate Cherries and Syrup: Once the sauce has thickened, pour the cherry mixture through a sieve over a bowl to separate the cooked cherries from the syrup. Set both aside — the syrup will be folded into the ice cream base, while the cooked cherries will be mixed in later to add texture.
- Combine Custard, Cream, and Flavorings: Take the chilled custard base from the refrigerator and whisk in the heavy whipping cream, reserved cherry syrup, 1 teaspoon of vanilla extract, and a pinch of salt. Whisk until all ingredients are fully incorporated and the mixture is smooth. This step enriches the ice cream base with creaminess and balanced flavor.
- Start Churning Ice Cream Base: Remove the churn bowl from the freezer and pour the prepared ice cream base into it. Set your ice cream maker to churn according to the manufacturer’s instructions, usually about 20 minutes, until the mixture thickens to a soft-serve consistency. This slow churning process incorporates air and freezes the mixture evenly.
- Add Cherries and Chocolate Chips: When the ice cream reaches the soft-serve stage, gently fold in the chopped fresh cherries, cooked cherries from the sauce, and chocolate chips or chunks. Return the mixture to the ice cream maker and churn for an additional 15 minutes. This ensures the mix-ins are evenly distributed throughout the ice cream.
- Freeze for Firm Texture: Transfer the churned ice cream into a freezer-safe container or bowl. Cover tightly with plastic wrap or an airtight lid to protect against freezer burn. Place it in the freezer for 3 to 4 hours to firm up to a scoopable consistency.This final freeze allows the flavors to meld and the texture to solidify.
- Serve and Enjoy: Once fully frozen, scoop your homemade Cherry Garcia ice cream into bowls or cones. Enjoy the perfect balance of tart cherry bursts, rich chocolate, and creamy custard that only homemade ice cream can offer. Store any leftovers in the freezer, covered tightly, for up to one week for optimal freshness.
Notes
- Use ripe, fresh cherries for the best flavor; frozen cherries can work but may add extra moisture.
- Tempering the egg yolks slowly is crucial to avoid curdling and ensure a smooth custard.
- For an extra smooth custard, strain twice if needed.
- Customize this recipe by swapping cherries for other berries or fruits you prefer.
- If you don’t have an ice cream maker, try the no-churn method included in the original recipe for equally delicious results.
- Make sure to chill your ice cream base thoroughly before churning to achieve the best texture.
- Adding a pinch of salt helps enhance all the flavors and balance the sweetness.
While indulgent, it avoids artificial additives and is vegetarian-friendly, making it a wholesome choice for dessert lovers.
The preparation is straightforward and flexible, allowing you to choose between traditional churning or a no-churn method, making it perfect for busy cooks or those without specialized equipment.
Plus, the homemade touch means you can customize it with your favorite mix-ins or adjust sweetness, making this recipe a versatile and satisfying option for family gatherings or everyday enjoyment.
Must-Have Tools for Perfect Results
Ice Cream Maker
Essential for creating a smooth, creamy texture by slowly churning the custard base, preventing ice crystals and delivering that classic ice cream consistency. A versatile kitchen appliance perfect for homemade frozen desserts year-round.
Medium Saucepan
Used to gently heat the milk and cook the custard base without scorching, ensuring a silky smooth mixture. A kitchen staple for sauces, custards, and more.
Fine Mesh Sieve
Crucial for straining the custard to remove lumps and ensure a velvety finish. This tool is invaluable for smooth sauces, purees, and custards in any kitchen.
Stand or Hand Mixer
Helps whip cream to soft peaks and incorporate ingredients evenly, especially handy for the no-churn version. An all-purpose tool for mixing, whipping, and baking preparations.
Loaf Pan
Ideal for freezing no-churn ice cream, providing easy portioning and storage. A versatile vessel also great for breads, cakes, and layered desserts.
Chef’s Secrets for Creamy Perfection
Creating a creamy, smooth ice cream relies heavily on the custard base’s quality and careful cooking.
Whisk the egg yolks and sugar thoroughly before tempering to ensure a silky texture, and never rush the cooking process—constant stirring over medium heat prevents lumps or scrambled eggs.
Straining the custard is a must for removing any cooked bits and achieving that velvety consistency.
When churning, patience is key: churning too quickly or before the base is well chilled can lead to icy textures.
Incorporating the cherries and chocolate chips during the last few minutes of churning ensures they are evenly distributed without breaking down.
For flavor depth, macerate cherries ahead of time and cook them into a syrup — this intensifies their natural sweetness and balances tartness beautifully.
Serving Suggestions to Impress Everyone
Serve your homemade Cherry Garcia ice cream in classic waffle cones or chilled bowls topped with extra fresh cherries or chocolate shavings for a gourmet touch.
This ice cream pairs wonderfully with warm desserts like chocolate lava cake or a slice of rich brownie, creating a delightful contrast between warm and cold.
For a lighter dessert option, serve scoops alongside fresh fruit salad or a crisp cookie.
Adding a drizzle of cherry syrup or dark chocolate sauce can elevate presentation and flavor.
For parties, consider making ice cream sandwiches using chocolate chip cookies or brownie bites for a crowd-pleasing treat.
Storage Tips for Maximum Freshness
Store the ice cream in an airtight container to prevent freezer burn and protect the delicate flavors.
Press a piece of plastic wrap directly on the ice cream’s surface before sealing the container to minimize ice crystal formation.
Keep the container in the coldest part of your freezer, away from the door where temperature fluctuates.
Homemade ice cream is best enjoyed within one week for optimal taste and texture, though it can last up to two weeks if stored properly.
If the ice cream hardens too much, let it sit at room temperature for 5–10 minutes before scooping to soften slightly.
Frequently Asked Questions (FAQs)
1. Can I use frozen cherries instead of fresh?
Yes, frozen cherries work well, but be sure to thaw and drain excess liquid before using to avoid watery ice cream. The texture might be slightly softer, but the flavor remains delicious.
2. Is it necessary to use an ice cream maker?
While an ice cream maker provides the best texture, you can use the no-churn method described in the notes, which uses whipped cream and condensed milk for a creamy alternative without special equipment.
3. Can I make this recipe dairy-free or vegan?
This recipe relies on dairy and eggs for its custard base, but you could experiment with coconut milk or almond milk and egg replacers. However, texture and flavor may differ from the classic.
4. How do I prevent ice crystals in homemade ice cream?
Chilling the custard base thoroughly before churning, churning properly to incorporate air, and storing the ice cream airtight with a plastic wrap layer helps minimize ice crystals.
5. Can I substitute other fruits or add-ins?
Absolutely! This recipe is versatile; try blueberries, raspberries, or even mix in nuts or different chocolate types. Just adjust sweetness and cooking times as needed.
