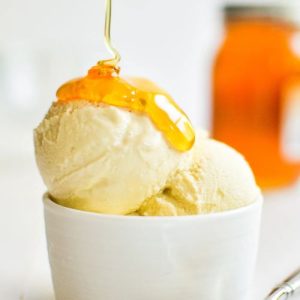
Indulge in this creamy homemade honey ice cream, naturally sweetened with pure honey for a rich, golden flavor.
High in protein from egg yolks and packed with healthy fats from cream and milk, it’s a satisfying dessert without refined sugars.
Quick to prepare and perfect for make-ahead treats, this ice cream is both wholesome and irresistibly smooth.
Honey Ice Cream
Equipment
- Medium saucepan (1)
- Small mixing bowl (1)
- Whisk (1)
- Fine mesh strainer (1)
- Ice cream maker (1)
- Freezer-safe container – 1
Ingredients
- 1 ½ cups heavy cream
- 1 ½ cups whole milk
- ½ cup honey any variety
- ½ tsp salt reduce to ¼ tsp if desired
- 4 large egg yolks
- 1 ½ tsp vanilla extract
Instructions
- Prepare the Egg Yolks: In a small mixing bowl, add the four large egg yolks. Using a whisk, beat the yolks gently until they become smooth and slightly pale in color. This step ensures the eggs will blend evenly with the hot cream mixture later, preventing any lumps or curdling. Set the whisked egg yolks aside for now, as you’ll use them in the next stage.
- Heat the Dairy and Honey Mixture: In a medium saucepan, combine 1 ½ cups of heavy cream and 1 ½ cups of whole milk. Add ½ cup of honey and ½ teaspoon of salt (or ¼ teaspoon if you prefer a milder taste). Place the saucepan over medium to medium-high heat. Stir occasionally as the mixture warms, allowing the honey to dissolve completely and the cream to become fragrant. Heat the mixture until it just begins to simmer, creating small bubbles around the edges—do not let it reach a full boil.
- Temper the Egg Yolks: To prevent the eggs from scrambling, you’ll need to temper them. Slowly pour about ¼ cup of the hot cream mixture into the bowl of egg yolks while continuously whisking. This gradually raises the temperature of the eggs without cooking them. Once combined, pour the tempered egg mixture back into the saucepan with the remaining cream mixture, whisking constantly as you pour to ensure a smooth, uniform custard.
- Cook the Custard: Return the saucepan to the stove over medium or medium-low heat. Stir the mixture constantly with a whisk or wooden spoon, making sure to scrape the bottom and sides to avoid sticking. Continue cooking for approximately 10–12 minutes, or until the custard thickens slightly and coats the back of a spoon. Keep in mind that because honey is naturally thinner than sugar, this custard will be slightly more fluid than typical ice cream bases, but it will still set beautifully once churned.
- Strain the Custard: Remove the saucepan from heat. Place a fine mesh strainer over a clean container or bowl. Pour the custard through the strainer to catch any small bits of cooked egg or impurities, resulting in an ultra-smooth mixture. This step guarantees that your ice cream will have a perfectly creamy, silky texture.
- Add Vanilla and Chill: After straining, stir in 1 ½ teaspoons of pure vanilla extract to enhance the natural sweetness and aroma of the honey. Cover the container with a lid or plastic wrap and place it in the refrigerator. Chill for at least 6 hours or overnight, allowing the flavors to meld and the custard to cool completely. Cold custard churns into ice cream more efficiently and yields a smoother texture.
- Churn the Ice Cream: Once fully chilled, pour the custard into your ice cream maker according to the manufacturer’s instructions. Churn the mixture until it reaches a thick, creamy consistency. This process typically takes 20–30 minutes, depending on your machine. Churning incorporates air, making the ice cream light and fluffy while freezing it evenly.
- Freeze for Firmness: Transfer the churned ice cream into a freezer-safe container, smoothing the surface with a spatula. Cover the container tightly and place it in the freezer for several hours, ideally 2–4 hours, to allow the ice cream to firm up. This final freezing step ensures that every scoop holds its shape beautifully.
- Serve and Enjoy: Remove the honey ice cream from the freezer a few minutes before serving to soften slightly for easier scooping. Serve in bowls or cones, and enjoy the naturally sweet, creamy, and rich flavor of this homemade treat. For an added touch, drizzle extra honey on top or garnish with chopped nuts or fresh fruit.
Notes
- Use pure honey for the best flavor; the type of honey will slightly alter the sweetness and aroma.
- Do not boil the cream and milk mixture; gentle heat ensures a smooth custard.
- Tempering the egg yolks is essential to prevent scrambling and achieve a silky texture.
- Chill the custard thoroughly before churning to improve texture and creaminess.
- Ice cream is best enjoyed within a few days but can be frozen up to two weeks.
- Children under one year should not consume honey due to the risk of botulism.
- Adjust salt to taste; it enhances the flavor and balances the sweetness.
Chef’s Secrets For Perfect Ice Cream
The key to perfectly smooth honey ice cream lies in gentle cooking and careful attention to temperature.
Always heat the milk and cream mixture slowly to avoid curdling and allow the honey to dissolve fully.
When combining with egg yolks, temper gradually, whisking constantly, which creates a velvety custard.
Chilling the mixture overnight not only enhances the flavor but also ensures your ice cream churns evenly.
For extra richness, use high-quality cream, and if desired, infuse the milk with a touch of cinnamon or a vanilla bean for subtle depth.
Serving Suggestions To Impress Guests
Honey ice cream pairs beautifully with a variety of desserts.
Scoop it over warm apple or pear crisps for a cozy fall treat, or serve alongside fresh berries and a drizzle of extra honey for a light, elegant dessert.
For a more decadent option, pair with chocolate brownies, caramel sauce, or a sprinkle of toasted nuts.
This ice cream also works well in affogatos, where a scoop is topped with warm espresso, creating a perfect balance of sweetness and richness.
Storage Tips For Long-Lasting Quality
Store honey ice cream in an airtight, freezer-safe container to prevent ice crystals from forming.
Press a piece of plastic wrap or parchment directly on the surface before sealing the lid to maintain creaminess.
Keep it in the coldest part of the freezer rather than the door to avoid temperature fluctuations.
While best enjoyed within a few days, it can remain safe to eat for up to two weeks.
When ready to serve, let the ice cream sit at room temperature for a few minutes to soften slightly for easier scooping.
Frequently Asked Questions
1. Can I use alternative sweeteners instead of honey?
Yes, though honey provides a unique flavor and moisture. Maple syrup or agave can work, but they will slightly alter taste and texture. Adjust sweetness to your preference.
2. Can I make this recipe without an ice cream maker?
Absolutely! Pour the custard into a shallow freezer-safe container and stir every 30 minutes for the first 2–3 hours to break up ice crystals. This will create a creamy, scoopable texture.
3. Why is my ice cream too soft or runny?
If the custard isn’t chilled enough before churning, or if it was not cooked long enough to slightly thicken, the ice cream may be softer. Ensure proper chilling and slight custard thickening for best results.
4. Can I add mix-ins like nuts or chocolate?
Yes! Add them during the last few minutes of churning or fold them in after churning before the final freeze. This preserves texture and ensures even distribution.
5. Is this recipe safe for children?
This ice cream contains honey, which should not be given to children under one year. For older children and adults, it’s safe and nutritious, offering protein, healthy fats, and natural sweetness.
