All products are selected by our editorial team for quality. If you buy through our links, we may earn a small commission at no extra cost to you.
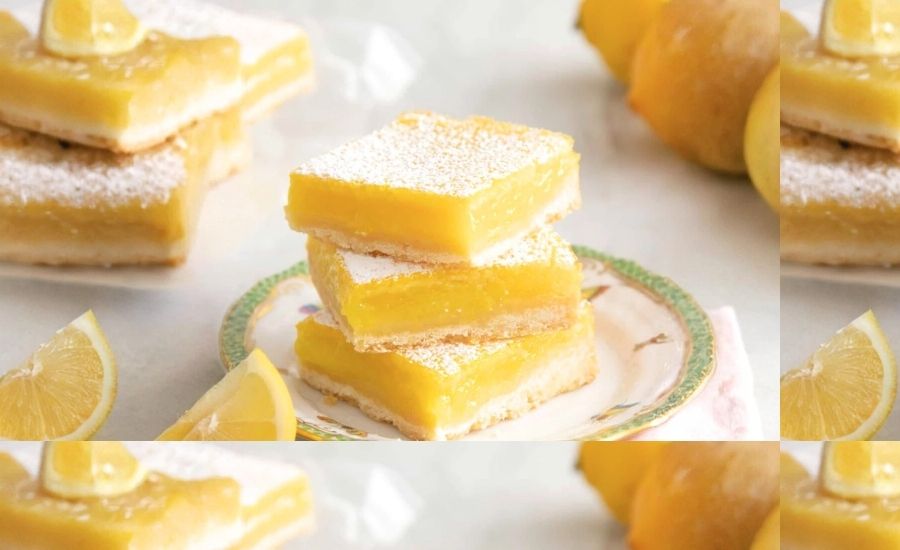
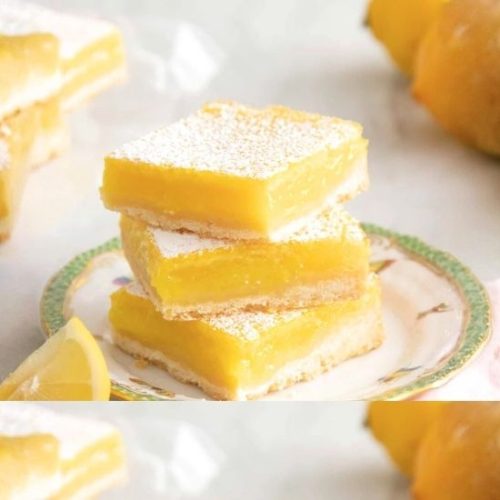
These lemon bars stand out for their perfect balance of bright, zesty lemon flavor paired with a buttery, tender shortbread crust.
Using fresh lemon juice and zest ensures a natural, vibrant citrus punch that truly shines.
Beyond their delicious taste, these bars offer a modest protein boost from eggs and contain some fiber from the flour, making them more satisfying than typical sugary desserts.
Though they’re a classic treat, the recipe remains approachable and flexible—ideal for everyday cooking or special occasions alike.
They’re relatively quick to prep, requiring just about 20 minutes before baking, and they chill well for make-ahead convenience.
Whether you want a refreshing dessert to brighten your afternoon or a crowd-pleaser to bring to gatherings, these lemon bars combine ease, flavor, and reliable results in one delightful package.
Must-Have Tools for Perfect Results
9×13 Baking Pan
The ideal size for creating uniform lemon bars with perfect thickness. Its sturdy construction ensures even heat distribution for a golden crust every time.
This pan is a versatile staple for casseroles, brownies, and sheet cakes in any home kitchen.
Food Processor
Essential for blending lemon zest into sugar effortlessly, creating that signature bright flavor.
It speeds up prep and produces a consistent texture.
Beyond lemon bars, it’s invaluable for chopping, mixing doughs, and pureeing ingredients.
Parchment Paper
Makes lining the baking pan simple, allowing for easy removal of the bars without sticking or crumbling.
It also aids in quick cleanup. Parchment is a must-have for baking cookies, roasting vegetables, and more.
Stand Mixer with Paddle Attachment (Optional)
Speeds up mixing the crust dough evenly and thoroughly without overworking.
Its hands-free design frees you up to prepare other ingredients.
This versatile tool handles everything from batters to doughs efficiently.
Sharp, Damp Knife
Using a sharp, slightly damp knife ensures clean, neat cuts without cracking the bars or leaving sticky edges.
This small trick elevates presentation and ease when serving desserts or cutting delicate pastries.
Lemon Bars
Equipment
- 1 — 9×13 inch baking pan
- 1 Food processor
- 1 — Mixing bowls (various sizes)
- 1 Whisk
- 1 — Stand mixer with paddle attachment (optional)
- Parchment paper (enough to line the pan)
- Sharp kitchen knife
Ingredients
- 3 cups all-purpose flour 360g, divided (2 1/2 cups for crust, 1/2 cup for filling)
- ⅔ cup powdered sugar 66g, plus extra for dusting
- ½ teaspoon salt
- 12 tablespoons unsalted butter 170g, melted
- Zest of 3 lemons about 3 tablespoons
- 3 cups granulated sugar 600g
- 8 large eggs at room temperature
- 1 cup fresh lemon juice about 240 mL
Instructions
- Prepare the Oven and Pan: Preheat your oven to 350°F (175°C). Line a 9×13-inch baking pan with parchment paper, allowing some overhang on the sides to make removing the bars easier later.
- Make the Shortbread Crust: In a medium bowl, combine 2 1/2 cups of the flour with the powdered sugar and salt. Pour in the melted butter and mix thoroughly until the mixture resembles a crumbly dough. You can also use a stand mixer fitted with a paddle attachment for this step to speed up mixing. Optionally, add a teaspoon of vanilla extract to the butter before mixing for subtle flavor enhancement.
- Bake the Crust: Press the dough evenly into the prepared baking pan, making sure it is compact and flat. Bake in the preheated oven for about 20 minutes or until the crust turns a light golden brown. Remove from the oven and set aside.
- Prepare the Lemon-Sugar Mixture: While the crust bakes, place the granulated sugar and lemon zest into a food processor. Pulse several times until the zest is finely incorporated and the sugar takes on a pale yellow hue. If you don’t have a food processor, finely grate the zest and mix thoroughly with the sugar using a bowl or a sealed plastic bag.
- Mix the Filling: In a large bowl, whisk together the lemon-sugar mixture, the remaining 1/2 cup flour, fresh lemon juice, and eggs. Stir vigorously until all ingredients are fully combined and smooth.
- Bake the Lemon Filling: Pour the lemon filling over the warm crust, spreading it out evenly. Return the pan to the oven and bake for 25 minutes, rotating the pan halfway through baking for even cooking. The filling should look set but slightly jiggly in the center.
- Cool and Chill: Remove the pan from the oven and let it cool at room temperature for about an hour. Then transfer to the refrigerator and chill for at least 2 hours to fully set the bars.
- Slice and Serve: Once chilled, dust the top with powdered sugar. Using a clean, sharp knife dipped in warm water and wiped dry, carefully cut the bars into 15 equal pieces. Wipe the knife between cuts for neat edges.
Notes
- Always opt for fresh lemon juice and zest — the natural brightness is essential for authentic lemon bar flavor. Bottled juice won’t provide the same fresh zing.
- Lining the pan with parchment paper is highly recommended for easy removal; foil can be a substitute in a pinch.
- Don’t be alarmed if the lemon filling seems slightly unset when first removed from the oven — it firms up as it cools and chills.
- These lemon bars freeze beautifully. For longer storage, freeze cut bars individually wrapped for up to three months. Thaw before serving and sprinkle with powdered sugar fresh.
- For an added twist, try folding in a teaspoon of vanilla extract into the crust butter for subtle richness.
Chef’s Secrets for Lemon Bars Success
Achieving the perfect lemon bar starts with using the freshest ingredients, especially the lemons.
Fresh lemon juice and zest deliver a vibrant, tangy flavor that bottled juice simply can’t match.
When making the crust, be sure to mix the butter thoroughly into the flour and sugar to create a tender but sturdy base.
Don’t skip chilling the bars after baking; this step allows the lemon filling to set properly, ensuring clean cuts and the ideal texture.
When slicing, use a sharp knife dipped in warm water and wiped clean between cuts—this trick helps prevent cracking and keeps the bars looking neat.
Finally, for a subtle flavor boost, consider adding a teaspoon of vanilla extract to the crust mixture.
These small touches make all the difference in creating lemon bars that are both visually appealing and delicious.
Serving Suggestions to Impress Everyone
Lemon bars are wonderfully versatile and pair beautifully with a variety of accompaniments.
Serve them chilled with a light dusting of powdered sugar to showcase their bright flavor and buttery crust.
For a refreshing twist, offer them alongside a dollop of whipped cream or a scoop of vanilla ice cream.
They also complement tea or coffee perfectly, making them ideal for afternoon snacks or dessert after a casual meal.
For a festive touch, garnish with fresh lemon slices or edible flowers.
If you’re planning a brunch or a party, lemon bars can be cut into smaller bites and arranged on a decorative platter for easy sharing.
Their balance of sweet and tart flavors makes them an all-time crowd-pleaser.
Storage Tips to Maintain Freshness
Proper storage is key to keeping your lemon bars fresh and flavorful.
Once cooled and cut, store the bars in an airtight container in the refrigerator.
They will keep well for up to five days without losing their texture or taste.
For longer storage, lemon bars freeze beautifully—wrap each bar individually in plastic wrap or parchment paper and place them in a freezer-safe container.
Frozen lemon bars can last up to three months.
To serve, thaw them in the refrigerator overnight and refresh the powdered sugar dusting just before presenting.
Avoid leaving lemon bars at room temperature for extended periods as the lemon filling can soften and lose firmness.
Frequently Asked Questions About Lemon Bars
1. Can I use bottled lemon juice instead of fresh?
While bottled lemon juice can be used in a pinch, fresh lemon juice is highly recommended for its bright, natural flavor and zest. It gives the bars a much fresher and more vibrant taste.
2. How do I know when the lemon bars are done baking?
The filling should look set around the edges and slightly jiggle in the center when you gently shake the pan. The bars will continue to firm up as they cool and chill in the refrigerator.
3. Why does the crust sometimes get soggy?
A soggy crust often results from insufficient baking time or excess moisture in the filling. Make sure the crust is fully baked before adding the filling, and avoid overpouring liquid ingredients.
4. Can I make these lemon bars gluten-free?
Yes! Substitute the all-purpose flour with a gluten-free flour blend designed for baking, and ensure all other ingredients are gluten-free certified. The texture may vary slightly but will still be delicious.
5. How can I cut lemon bars without them crumbling?
Use a sharp knife dipped in warm water and wiped clean after each cut. This prevents the filling from sticking to the knife and helps create clean, neat slices.
This recipe is inspired by preppykitchen and has been carefully refined to enhance clarity, streamline preparation steps, and ensure accurate results. We’ve also included health benefits, nutritional highlights, and Must-Have Tools to help you get the best results every time you cook.
