Loaded Potato Skins stand out as a crowd-pleasing appetizer or side dish that perfectly balances crispy textures with rich, savory flavors.
What makes this recipe truly special is its simplicity and versatility—perfectly baked potato skins serve as a crispy vessel for hearty fillings like cheddar cheese and bacon, topped with fresh chives and creamy sour cream.
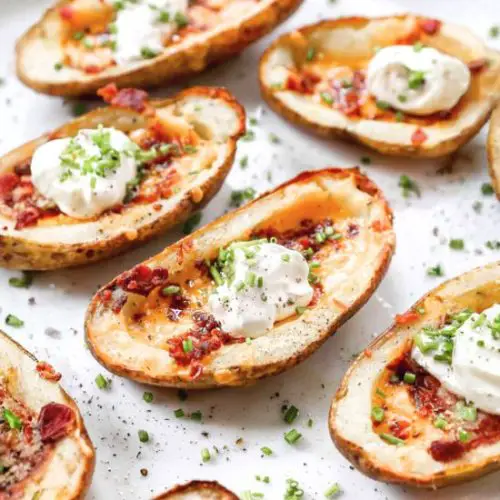
Easy Loaded Potato Skins
Equipment
- 1 Baking sheet
- 1 Fork
- 1 Small spoon
- 1 Pastry brush
- Oven with Broiler setting
Ingredients
- 6 small to medium Russet potatoes washed and dried
- 8 oz shredded sharp cheddar cheese
- 8 slices bacon cooked crisp and crumbled
- ¼ cup unsalted butter melted
- Sour cream for garnishing
- Fresh chives or green onions finely chopped, for garnish
- Salt to taste
- Freshly ground black pepper to taste
Instructions
- Prepare and Bake Potatoes: Preheat your oven to 400°F (200°C). Using a fork, gently prick each potato several times to allow steam to escape during cooking. Arrange the potatoes on a baking sheet and bake for about 60 minutes, or until the skins are crisp and a fork easily pierces the flesh. Remove from the oven and let them cool slightly for about 15 minutes until safe to handle.
- Slice and Hollow Out Potatoes: Once cooled, cut the larger potatoes lengthwise into thirds, creating three long strips each. For smaller potatoes, simply halve them. Carefully scoop out the center flesh with a small spoon, leaving a sturdy layer near the skin to hold fillings without breaking.
- Season and Broil Skins: Turn your oven to the broil setting on high. Using a pastry brush, coat the insides and outsides of each potato skin with melted butter. Place them back on the baking sheet and sprinkle with salt and pepper. Broil for 7-8 minutes, allowing the butter to crisp up the skins slightly.
- Add Cheese and Bacon Toppings: Remove the skins from the oven and fill each with a generous amount of shredded cheddar. Top with crumbled bacon pieces. Return the baking sheet to the broiler and cook for an additional 3-4 minutes, or until the cheese has melted and is bubbly.
- Final Garnish and Serve: Take the potato skins out of the oven and finish with a dollop of sour cream and a sprinkle of chopped chives or green onions. Serve warm and enjoy!
Notes
- Alternative Fillings: Customize your potato skins by using seasoned ground beef for a taco-style treat, shredded pulled pork with slaw for a Southern twist, or creamy homemade mac and cheese for indulgence.
- Storage Tips: Refrigerate any leftover skins and reheat in the oven or air fryer for best texture. Avoid microwaving to keep skins crispy.
- Freezing Instructions: To freeze, scoop out the potato flesh first and cool the skins completely. Store in an airtight container for up to 3 months. Thaw overnight in the fridge before filling and broiling as directed.
- Potato Selection: Russet potatoes are ideal for this recipe due to their thick skins and fluffy interiors, but Yukon Golds can work for a slightly creamier texture.
Nutritionally, this recipe offers a good source of protein from the cheese and bacon, while the potatoes provide fiber and potassium, supporting digestion and heart health.
With moderate fat content primarily from healthy unsalted butter and cheese, it remains satisfying without being overly heavy.
This recipe is an excellent choice for everyday cooking because it’s straightforward, uses common ingredients, and can easily be customized to fit different tastes and dietary preferences.
Plus, it’s meal-prep friendly: leftovers store well and reheat beautifully, making it a convenient option for busy households or entertaining guests.
Must-Have Tools for Perfect Results
Baking Sheet
Essential for evenly baking and broiling the potato skins. Its sturdy surface ensures crispy edges and consistent heat distribution, making it invaluable for roasting vegetables and baking other dishes in your kitchen.
Fork
Used to poke potatoes before baking, allowing steam to escape and ensuring fluffy insides. A simple yet crucial tool, forks are versatile for stirring, mixing, and serving a variety of meals.
Small Spoon
Perfect for scooping out potato flesh to create the hollow “boat” shape. Its precision makes it useful for garnishing, filling, and detailed food prep tasks.
Pastry Brush
Used to brush melted butter inside and outside the skins, adding flavor and aiding browning. This tool is great for applying oils, marinades, and glazes across countless recipes.
Oven or Broiler
While not a handheld tool, a reliable oven or broiler is critical for achieving the perfect crispy texture and melted cheese finish. Its versatility makes it a cornerstone of any home kitchen.
Chef’s Secrets for Crispy Perfection
Achieving the perfect loaded potato skins hinges on a few key techniques.
First, choosing Russet potatoes with thick skins is essential—they crisp up nicely while holding the filling well.
Be sure to prick the potatoes before baking to prevent bursting and ensure even cooking.
When hollowing out the potatoes, leave a sturdy layer of flesh near the skin to maintain structure but enough space for plenty of filling.
Brushing both the inside and outside with melted butter before broiling creates that coveted golden, crispy texture.
Broiling rather than baking at the end intensifies browning and melts the cheese quickly without drying out the skins.
For the best bacon flavor, cook it until crispy but not burnt, so it adds a smoky crunch without bitterness.
Finally, don’t skip the fresh chives or green onions; their mild onion flavor and vibrant color elevate the presentation and taste.
Serving Suggestions to Impress Guests
Loaded potato skins are a versatile appetizer that pairs well with a variety of dishes and occasions.
Serve them alongside a fresh garden salad or a tangy coleslaw for a balanced meal.
They also complement grilled meats or barbecue beautifully, making them a great party or game-day snack.
For a fun twist, offer a “topping bar” with options like diced tomatoes, jalapeños, guacamole, or salsa to let guests customize their skins.
Pair these with a crisp white wine or a light lager to balance the richness of the cheese and bacon.
For a casual family dinner, plate them with steamed vegetables or a hearty soup for a cozy, satisfying meal.
Storage Tips for Maintaining Freshness
To keep leftover loaded potato skins tasting fresh and crispy, store them in an airtight container in the refrigerator for up to three days.
When reheating, avoid microwaving, which can make the skins soggy.
Instead, reheat in a preheated oven at 350°F or use an air fryer for 5-7 minutes to revive their crispiness.
If you’ve prepared potato skins ahead of time, freeze the empty shells separately after baking and cooling.
When ready to serve, thaw them overnight in the fridge before filling and broiling to ensure the best texture and flavor.
Frequently Asked Questions Answered
Q1: Can I use sweet potatoes instead of Russets?
A: Yes, sweet potatoes can be a delicious alternative. They have a naturally sweeter flavor and softer texture, so baking times might vary slightly. Use the same process but keep an eye on the broiling to avoid burning.
Q2: How do I make this recipe vegetarian?
A: Skip the bacon and add extra cheese or substitute with sautéed mushrooms or seasoned black beans for a flavorful, meat-free version.
Q3: Can I prepare potato skins ahead of time?
A: Absolutely! Bake and hollow out the skins, then store them in the fridge or freezer. When ready, fill and broil just before serving for optimal freshness.
Q4: What if I don’t have a broiler?
A: You can bake the skins at 425°F for a few minutes to melt the cheese, though you may miss some of the crispy, browned finish the broiler provides.
Q5: How can I reduce the fat content?
A: Use reduced-fat cheese and turkey bacon or omit the bacon altogether. You can also brush the skins lightly with olive oil instead of butter for a healthier fat option.
