All products are selected by our editorial team for quality. If you buy through our links, we may earn a small commission at no extra cost to you.
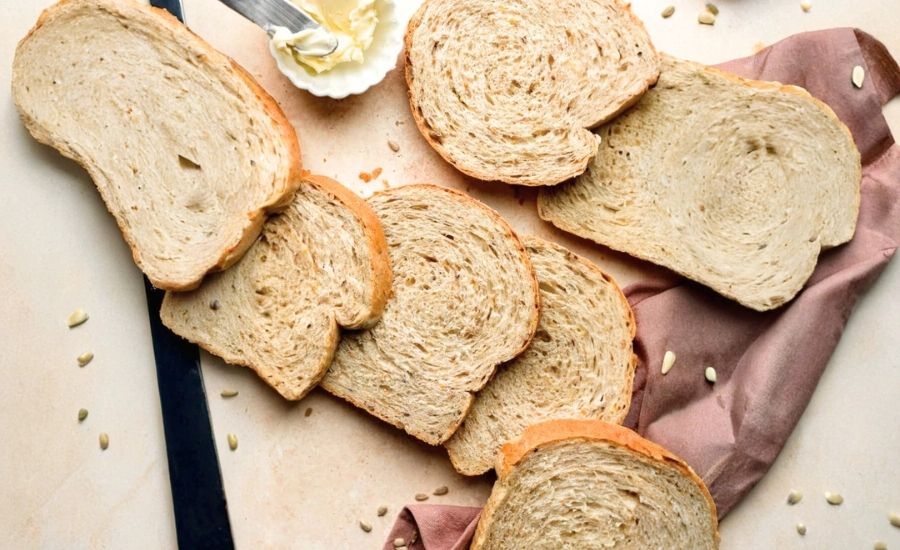
This Soft Multigrain Bread recipe stands out for its wholesome blend of grains, delivering a satisfyingly soft and fluffy texture with a complex, nutty flavor.
Incorporating multigrain cereal and optional seeds or dried fruit enhances its fiber content and provides a nutritious boost beyond typical white bread.
This bread is a great source of plant-based carbohydrates and fiber, helping with digestion and sustained energy release.
Using bread flour ensures a sturdy yet tender crumb, while moderate amounts of butter contribute good fats without excess saturated fat.
The recipe is approachable for bakers of all levels, featuring clear steps and flexibility for mix-ins, making it perfect for everyday baking.
Whether you’re looking for a nourishing sandwich base or a hearty breakfast toast, this bread balances nutrition with comfort.
Its long rise times yield great flavor and texture, while options like overnight refrigeration accommodate busy schedules.
Overall, it’s an excellent, versatile staple for home kitchens aiming for healthier bread without sacrificing softness or flavor.
Must-Have Tools for Perfect Results
Electric Stand Mixer
This powerhouse tool effortlessly kneads the dough to perfect consistency, saving time and arm fatigue compared to hand kneading.
Its dough hook attachment ensures even mixing and gluten development, delivering a tender, fluffy loaf every time.
A staple for serious bakers wanting consistency and ease.
9×5-Inch Loaf Pan
The ideal size for shaping and baking this bread, ensuring even heat distribution and a beautiful crust.
Its sturdy construction guarantees the loaf holds its shape and bakes uniformly. Essential for classic homemade bread presentations.
Digital Instant Read Thermometer
Precision is key when proofing dough and baking bread. This tool helps monitor the perfect water temperature for yeast activation and checks the loaf’s internal temperature for doneness, eliminating guesswork and ensuring consistent results.
Rolling Pin
Useful for shaping the dough into a uniform rectangle before rolling into the loaf shape. It helps create even layers and a professional look, especially for those new to bread shaping.
Silicone Spatula
Handy for scraping dough from bowl sides and folding in ingredients during mixing. Its flexibility and heat resistance make it versatile for baking and cooking tasks.
Multigrain Bread
Equipment
- 1 Electric Stand Mixer with dough hook attachment
- 1 9×5-Inch Loaf Pan
- 1 Digital Instant Read Thermometer
- 1 Rolling Pin
- 1 Silicone Spatula
Ingredients
- ½ cup 60g dry multigrain cereal blend or rolled whole oats
- 1¾ cups 410ml boiling water
- 2¼ teaspoons 7g active dry or instant yeast (one standard packet)
- 3 tablespoons 37g packed brown sugar (light or dark)
- 3 tablespoons 43g unsalted butter, softened to room temperature
- 1½ teaspoons salt
- 3⅓ cups 433g bread flour, plus extra for dusting and adjustments
- Optional add-ins: ½ cup 60g sunflower seeds, chopped nuts, pepitas, raisins, or dried cranberries
Instructions
- Soak the Grains: Place your multigrain cereal or oats in a large heatproof mixing bowl. Pour the boiling water over the grains and stir gently. Let the mixture cool until it reaches about 110°F (43°C) — warm enough to activate yeast but not so hot that it kills it. This usually takes around 20 minutes.
- Activate Yeast Mixture: Add the yeast and brown sugar into the warm grain mixture. Using a stand mixer fitted with a dough hook or paddle attachment (or a large spoon if mixing by hand), stir gently to combine. Cover the bowl and let it rest for 5 to 10 minutes until the surface bubbles and becomes foamy, indicating the yeast is active.
- Incorporate Butter, Salt, and Flour: Add the softened butter, salt, and 1 cup (about 130g) of bread flour to the yeast mixture. Mix on low speed for about 30 seconds. Stop to scrape down the sides of the bowl, then add another cup of flour and continue mixing on medium until combined, though small lumps of butter may remain.
- Add Remaining Flour and Optional Ingredients: Add the remaining flour all at once, along with your choice of seeds or dried fruit if using. Mix on medium speed for about 2 minutes, or until the dough pulls away from the sides of the bowl and forms a cohesive ball. If the dough feels too sticky, add flour one tablespoon at a time until it firms up slightly but remains soft and tacky.
- Knead the Dough: Continue kneading the dough in the stand mixer for 3 to 5 more minutes, or alternatively, transfer it to a lightly floured surface and knead by hand for the same amount of time. The dough should be soft, elastic, and slightly tacky without sticking excessively. Perform a “windowpane test” by stretching a small piece of dough thinly—if light passes through without tearing, it’s ready.
- First Rise: Lightly oil a large clean bowl with olive oil or nonstick spray. Place the dough in the bowl and turn it to coat all sides in oil. Cover the bowl with plastic wrap, a towel, or foil and let it rise in a warm, draft-free spot for 1 to 2 hours, or until the dough has roughly doubled in size.
- Prepare Loaf Pan and Shape Dough: Grease a 9×5-inch loaf pan. Punch down the risen dough to release trapped air. On a lightly floured surface, roll the dough out into an approximately 8×15-inch rectangle. Don’t worry about perfect edges—rustic shapes are fine. Roll the dough tightly into an 8-inch log and place it seam side down into the prepared pan.
- Second Rise: Cover the loaf pan loosely with foil, plastic wrap, or a clean kitchen towel. Let the dough rise again until it’s about 1 to 2 inches above the pan’s rim, typically around 1 hour.
- Bake the Bread: Position your oven rack on a lower level and preheat the oven to 350°F (177°C). Bake the bread for 35 to 40 minutes. If the crust begins to brown too quickly, tent the loaf loosely with foil to prevent burning. The bread is done when it sounds hollow when tapped or an instant-read thermometer inserted in the center reads between 195°F and 200°F (90°C–93°C).
- Cool and Store: Remove the loaf from the oven and allow it to cool in the pan for several minutes. Transfer it to a cooling rack and let it cool completely before slicing for best texture. Store leftover bread tightly wrapped at room temperature for 2 to 3 days, or refrigerate up to 10 days.
Notes
- Grain Options: Any plain multigrain hot cereal mix works well, including 5-, 7-, or 10-grain blends. Avoid flavored or sweetened cereals to keep the bread balanced. Rolled oats are a great substitute if multigrain blends aren’t available.
- Yeast Choice: Both active dry and instant yeast can be used interchangeably; just ensure water temperature is correct to activate the yeast properly.
- Flour Substitutions: Bread flour is preferred for a sturdy, elastic crumb, but all-purpose flour can be substituted with slightly softer texture. Up to 1 cup whole wheat flour can be added for nuttiness, but expect a denser loaf.
- Add-ins: Seeds and dried fruits add flavor and texture. For smaller seeds like chia or flax, reduce the quantity to 2–3 tablespoons, or mix with larger seeds/nuts for best results.
- Freezing: Dough doesn’t freeze well after rising but the baked loaf freezes beautifully for up to 3 months. Thaw fully before slicing or reheating.
- Overnight Rise: For convenience, you can refrigerate the shaped loaf overnight and bake the next day after allowing it to come to room temperature and complete its final rise.
Chef’s Secrets for Soft Multigrain Bread
Creating perfectly soft multigrain bread starts with respecting the delicate balance between moisture and flour.
Using boiling water to soak the multigrain cereal blend not only softens the grains but also activates their natural flavors, enriching the dough.
Temperature control is crucial—ensuring the water cools to about 110°F before adding yeast protects the yeast’s activity for a robust rise.
Don’t rush the kneading process; well-developed gluten is key to a tender yet elastic crumb.
The “windowpane test” is a great visual cue for this. Incorporating softened butter rather than melted butter keeps the dough tender without making it greasy.
For extra flavor and texture, mixing in seeds or dried fruit offers delightful surprises in every bite.
Lastly, the two-rise method—first in a bowl, then shaped in the pan—ensures a light, airy loaf with a beautifully uniform crumb.
Covering the dough properly during rises prevents drying out and encourages steady yeast growth, producing that classic homemade bread aroma we all love.
Serving Suggestions to Elevate Your Bread
This multigrain loaf is wonderfully versatile and pairs beautifully with a wide range of dishes.
Serve it sliced thick for hearty sandwiches filled with fresh vegetables, lean meats, or creamy cheeses.
Toasted slices make an excellent base for smashed avocado, topped with a sprinkle of chili flakes and a squeeze of lemon for a nutritious breakfast or snack.
Its slightly nutty flavor complements savory spreads like hummus or tapenade, as well as sweet toppings such as honey or fruit preserves.
For a cozy meal, serve alongside soups or stews to soak up warm broths.
For entertaining, slice the bread into small cubes and use it for homemade croutons or bread bowls.
This loaf’s satisfying texture makes it a reliable choice for meal prepping, as it holds up well in sandwiches and toasts even after a few days.
Storage Tips to Keep Bread Fresh
To maintain the bread’s freshness, store it tightly wrapped at room temperature for up to 2-3 days, ideally in a bread box or an airtight container that allows slight air circulation to avoid sogginess.
For longer storage, refrigerate the bread for up to 10 days, but be aware refrigeration can slightly dry out the crumb.
To extend shelf life even further, freeze the fully baked and cooled loaf wrapped securely in plastic wrap and then foil.
When ready to eat, thaw it at room temperature or gently warm it in the oven to restore softness.
Avoid freezing the dough itself, as it often inhibits proper rising after thawing.
If the crust softens during storage, a quick toast or oven crisping can revive its delightful texture.
Frequently Asked Questions About Bread
1. Can I substitute all-purpose flour for bread flour?
Yes, all-purpose flour can be used, but bread flour is preferred for its higher protein content, which strengthens gluten development and gives the bread a chewier texture and better rise.
2. What if I don’t have a stand mixer?
You can absolutely make this bread by hand using a wooden spoon or spatula for mixing and kneading on a floured surface. It requires more effort but yields the same delicious results.
3. Can I use instant yeast instead of active dry yeast?
Yes, both types of yeast work interchangeably in this recipe. The process and measurements remain the same, though instant yeast may activate slightly faster.
4. How do I know when the bread is fully baked?
The loaf is done when it sounds hollow when tapped on the bottom or when an instant-read thermometer inserted in the center reads between 195°F and 200°F (90°C–93°C).
5. Can I add other seeds or nuts?
Absolutely! Feel free to customize with pumpkin seeds, walnuts, flaxseeds, or chia seeds. Just adjust quantities so you don’t overload the dough, aiming for a total of about ½ cup mixed in.
This recipe is inspired by sallysbakingaddiction and has been carefully refined to enhance clarity, streamline preparation steps, and ensure accurate results. We’ve also included health benefits, nutritional highlights, and Must-Have Tools to help you get the best results every time you cook.
