This no-churn chocolate caramel ice cream is the ultimate summer treat that combines rich chocolate flavor with ribbons of gooey caramel.
Made without an ice cream maker, it’s quick, fuss-free, and indulgent.
With protein from dairy, a touch of fiber from chocolate, and less sugar than store-bought ice cream, it’s a lighter way to enjoy dessert.
Perfect for everyday cooking, it’s creamy, satisfying, and freezer-friendly.
No Churn Chocolate Ice Cream
Equipment
- 1 large mixing bowl
- 1 hand mixer or stand mixer
- 1 Measuring Cup Set
- 1 Measuring Spoon Set
- 1 Spatula
- 1 loaf pan or freezer-safe container (9×5-inch works well)
Ingredients
- 1 ¾ cups 414 ml heavy whipping cream
- ½ cup 118 ml chocolate coffee creamer or chocolate milk
- 2 oz 57 g semi-sweet baking chocolate, melted and cooled
- 1 can 14 oz / 396 g sweetened condensed milk
- Chocolate fudge sauce to taste
- Caramel sauce to taste
Instructions
- Prepare Your Ingredients: Before you start, gather all your ingredients and equipment. Measure out heavy whipping cream, chocolate coffee creamer, semi-sweet chocolate, and sweetened condensed milk. Make sure your chocolate is melted and slightly cooled—this prevents it from curdling when mixed with the cream. Also, have your chocolate fudge and caramel sauces ready for swirling later. A little prep ensures the process is smooth and stress-free.
- Chill Your Equipment: For extra creamy results, place your mixing bowl and beaters in the refrigerator for 10–15 minutes. Cold equipment helps the cream whip faster and hold its texture, which is essential for a smooth ice cream base.
- Whip the Cream: Pour the heavy whipping cream and chocolate coffee creamer into your chilled mixing bowl. Using a hand mixer or stand mixer, start beating on medium speed. Whip the mixture until soft peaks form—this means when you lift the beaters, the cream holds its shape but still has a slight fold. This step is crucial because the whipped cream is what gives your ice cream its airy, smooth texture.
- Incorporate Melted Chocolate: Slowly add the melted semi-sweet chocolate to the whipped cream. Fold gently with a spatula to combine, being careful not to deflate the whipped cream. Folding instead of mixing aggressively ensures the ice cream remains light and fluffy while the chocolate is evenly distributed throughout the base.
- Add Sweetened Condensed Milk: Pour in the sweetened condensed milk gradually. Use your spatula to fold it into the whipped cream and chocolate mixture. At this stage, the mixture will start to thicken and resemble a creamy, luscious mousse. Take your time folding—it should be smooth, uniform, and fully incorporated, but still soft enough to swirl in your toppings later.
- Swirl in Chocolate Fudge and Caramel: Now comes the fun part: flavor swirls!Drizzle some chocolate fudge sauce and caramel sauce over the ice cream base.Using your spatula, gently fold the sauces into the mixture, creating beautiful streaks. Do not overmix—the goal is a marbled effect with pockets of rich chocolate and gooey caramel in every bite.
- Transfer to Freezer-Safe Container: Carefully pour or spoon the ice cream mixture into a loaf pan or sealable container. Spread it evenly with the spatula, but leave a slightly textured surface—this makes it easier to scoop later.
- Add Extra Toppings: For an even more indulgent treat, drizzle additional chocolate fudge and caramel sauces over the top. This creates a decorative, delicious top layer that also intensifies the flavor. You can even swirl lightly with a skewer or spoon to enhance the marbled look.
- Freeze Until Firm: Cover the container tightly with a lid or plastic wrap. Place it in the freezer for at least 4 hours, or until the ice cream is fully set. For best results, avoid opening the freezer frequently during this time, as temperature changes can affect the creamy texture.
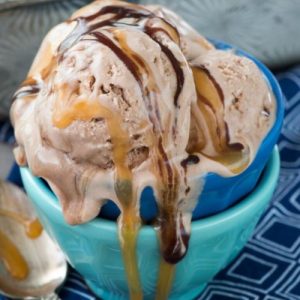
- Serve and Enjoy: Once the ice cream is firm, scoop generous portions into bowls or cones. The chocolate and caramel swirls should be visible in each scoop, making it as visually appealing as it is delicious. Enjoy immediately, or cover and store in the freezer for up to 2 weeks. This no-churn ice cream is perfect for hot summer days, special occasions, or anytime you crave a homemade, creamy treat.
Notes
- You can substitute chocolate milk for chocolate coffee creamer if desired, for a milder chocolate flavor.
- Adjust the amount of fudge and caramel sauces based on personal sweetness preference.
- For a richer chocolate taste, use dark or semi-sweet chocolate rather than milk chocolate.
- Optional mix-ins like chopped cookies, nuts, or candy pieces can be added when folding the ice cream base.
- If you want a plain chocolate version, skip the caramel and fudge entirely.
- Make sure the melted chocolate is slightly cooled before folding to prevent curdling.
- Whipped cream should reach soft peaks for the perfect light and airy texture.
Chef’s Secrets For Perfect Ice Cream
The key to creamy, smooth, no-churn ice cream lies in properly whipping the cream to soft peaks before combining with condensed milk and chocolate.
Folding gently is essential—vigorous mixing will deflate the air, making the texture dense instead of fluffy.
Use chilled equipment, such as a bowl and beaters, to help the cream whip faster and stay stable.
For a more pronounced chocolate flavor, melt the chocolate over a double boiler instead of the microwave to prevent burning or seizing.
Finally, lightly swirl the fudge and caramel for a marbled effect—overmixing can blend all flavors into a single layer, reducing visual appeal and texture contrast.
Serving Suggestions For Ice Cream
This chocolate caramel ice cream is incredibly versatile.
Serve it in waffle cones or dessert bowls, topped with extra chocolate or caramel sauce for a decadent treat.
For a refreshing twist, pair it with fresh berries or sliced bananas—the fruit balances the sweetness beautifully.
You can also layer it in a parfait with granola or cookie crumbles for a visually stunning presentation.
For adults, a splash of espresso or coffee liqueur creates a rich mocha flavor.
Whether for casual snacking, summer parties, or special occasions, the creamy texture and gooey swirls make every serving feel indulgent.
Storage Tips For Best Results
Store your ice cream in an airtight, freezer-safe container to prevent ice crystals from forming and to maintain a creamy texture.
Press a layer of plastic wrap directly on the surface before sealing the lid—this extra step minimizes freezer burn.
Keep the ice cream in the coldest part of the freezer, not the door, to maintain consistent temperature.
It’s best enjoyed within 2 weeks, though it can last up to a month.
If the ice cream hardens too much, let it sit at room temperature for 5–10 minutes before scooping for easier serving.
Frequently Asked Questions
1. Can I make this recipe dairy-free?
Yes! Use coconut cream or plant-based heavy cream and a dairy-free sweetened condensed milk alternative. For chocolate, choose vegan chocolate or dark chocolate without milk solids. The texture may be slightly different but will remain creamy and delicious.
2. Do I need an ice cream maker?
No. This is a true no-churn recipe—whipping the cream and folding it with condensed milk creates the necessary airiness. An ice cream maker is optional only if you want an even smoother, softer texture.
3. Can I prepare this ice cream in advance?
Absolutely! This ice cream is perfect for meal prep or parties. Make it a day or two in advance and store in the freezer. Just remember to cover tightly to avoid freezer burn.
4. How can I adjust sweetness?
If you prefer a less sweet dessert, reduce the caramel and fudge sauce, or choose a lower-sugar chocolate creamer. Sweetened condensed milk contributes sweetness, so reduce toppings slightly if needed.
5. Can I add mix-ins like cookies or nuts?
Yes! Fold in your favorite chopped cookies, chocolate chips, or nuts just before transferring to the freezer. This adds texture and makes the ice cream more indulgent without affecting the creamy consistency.
