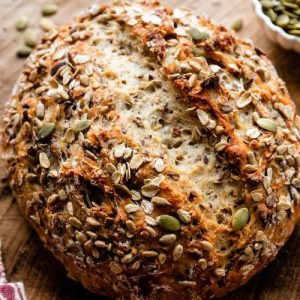
This no-knead seeded oat bread is the perfect balance of hearty flavor and wholesome nutrition.
Packed with fiber-rich oats, protein-loaded seeds, and healthy fats, it delivers long-lasting energy without excess carbs or saturated fat.
The no-knead method makes it incredibly simple—just mix, rest, and bake.
Ideal for everyday cooking, it’s a versatile loaf that’s equally satisfying for breakfast, lunch prep, or healthy snacking.
No Knead Seeded Oat Bread
Equipment
- 1 large mixing bowl
- 1 Silicone spatula or wooden spoon
- Plastic wrap or foil (for covering)
- 1 Nonstick baking sheet (or parchment-lined sheet)
- 1 sharp knife or bread lame for scoring
- 1 Instant-read thermometer (optional, for accuracy)
Ingredients
Bread Dough:
- 3 cups 390 g bread flour (plus extra for dusting)
- 2 tsp 6 g instant yeast
- 1 cup 85 g rolled oats
- ¼ cup 30 g pumpkin seeds (pepitas), unsalted preferred
- ¼ cup 30 g sunflower seeds
- 2 tbsp 18 g flax seeds or sesame seeds
- 2 tsp coarse salt
- 2 tbsp 43 g honey
- 1 ½ cups 360 ml warm water (about 95°F / 35°C)
- Optional: cornmeal for dusting
Topping:
- 1 tbsp 5 g rolled oats
- 1 tbsp 8 g pumpkin seeds
- 1 tbsp 8 g sunflower seeds
- 1 tsp flax seeds or sesame seeds
Instructions
- Prepare Ingredients: Gather all ingredients and measure them accurately. Use a kitchen scale for flour, seeds, and oats to ensure consistent results. Warm the water to about 95°F (35°C) to activate the yeast properly without killing it. Pre-measure seeds, honey, and salt so that you can add them seamlessly during mixing, which helps maintain an even texture throughout the dough.
- Mix Dry Ingredients: In a large, ungreased mixing bowl, whisk together 3 cups (390 g) bread flour and 2 teaspoons (6 g) instant yeast. Then, add 1 cup (85 g) rolled oats, ¼ cup (30 g) pumpkin seeds, ¼ cup (30 g) sunflower seeds, 2 tablespoons (18 g) flax or sesame seeds, and 2 teaspoons coarse salt. Whisk everything lightly until the dry ingredients are well combined and evenly distributed, creating a base that will absorb the wet ingredients uniformly.
- Combine Wet Ingredients: In a separate small bowl or measuring cup, mix 2 tablespoons (43 g) honey with 1 ½ cups (360 ml) warm water. Stir until the honey is completely dissolved. This mixture provides sweetness to enhance flavor and acts as food for the yeast, supporting proper fermentation and rise.
- Form the Dough: Pour the honey-water mixture over the dry ingredients. Using a silicone spatula or wooden spoon, gently fold the ingredients together. Initially, the mixture will appear dry and shaggy. Keep folding until all flour is moistened. If needed, use your hands to lightly press and combine the dough. Shape it loosely into a ball in the bowl—the dough will be sticky, which is normal for no-knead bread.
- First Rise: Cover the bowl tightly with plastic wrap or aluminum foil and leave at room temperature for approximately 3 hours. During this rise, the dough should almost double in size and develop bubbles throughout, creating an airy texture. For deeper flavor, the dough can also rest in the refrigerator for 12–72 hours. A longer rest allows natural fermentation to enhance both taste and texture.
- Prepare the Baking Surface: Lightly dust a nonstick baking sheet with flour or cornmeal to prevent sticking. Alternatively, line the sheet with parchment paper for easy cleanup. Ensure your hands and work surface are well-floured, as the dough will be sticky during shaping. This step sets the stage for a loaf that will release easily after baking.
- Shape the Dough: Using floured hands, lift the dough gently and form it into a loose ball. Avoid pressing too hard to preserve air bubbles, which create a soft interior. If preferred, shape the dough directly in the bowl to minimize deflation. Transfer the shaped dough to the prepared baking sheet.
- Add Topping: In a small bowl, combine 1 tablespoon oats, 1 tablespoon pumpkin seeds, 1 tablespoon sunflower seeds, and 1 teaspoon flax or sesame seeds. Sprinkle evenly over the top of the dough and press lightly so the seeds adhere. This adds texture, flavor, and visual appeal, while providing additional plant-based protein and healthy fats.
- Second Rise: Loosely cover the dough with plastic wrap or a clean kitchen towel and let it rest at room temperature for 45 minutes. This brief second rise allows the dough to relax and puff up slightly, ensuring an even crumb and a tender interior during baking. Meanwhile, preheat the oven to 425°F (218°C).
- Score the Dough: Using a sharp knife or bread lame, make a shallow ½-inch slash or an X across the top of the dough. Scoring allows steam to escape and guides the bread’s expansion. If the dough has flattened during resting, gently reshape it with floured hands before scoring.
- Optional Steam for Crust: For a crispier, golden crust, place a shallow metal or cast iron pan on the bottom oven rack while preheating. When ready to bake, carefully pour 3–4 cups boiling water into the pan and quickly close the oven. The resulting steam helps develop a professional-looking, crunchy crust. Use extreme caution to avoid burns.
- Bake the Bread: Place the scored dough on the center oven rack and bake for 40 minutes. Watch the bread’s color; if the crust darkens too quickly, tent it loosely with aluminum foil. To check doneness, tap the bottom of the loaf—it should sound hollow. For precise results, the internal temperature should reach 195°F (90°C).
- Cool Before Slicing: Remove the bread from the oven and transfer it to a wire rack. Allow it to cool for 10–20 minutes before slicing. Cooling lets the interior finish setting and prevents the crumb from being gummy, while maintaining a soft, tender texture inside with a crunchy crust outside.
- Storage Tips: Store leftover bread loosely covered at room temperature for up to 3 days or refrigerate for up to 10 days. For long-term storage, freeze baked loaves for up to 3 months. If freezing the dough, wrap tightly in plastic, freeze, and thaw in the fridge overnight before baking. The loaf retains most of its flavor and texture after freezing.
Notes
- You can refrigerate the dough for up to 3 days for deeper flavor; just allow it to come to room temperature before shaping.
- Use bread flour for optimal texture; all-purpose flour works in a pinch but may yield a slightly softer loaf.
- Seed variations are encouraged: swap flax with chia, or add poppy seeds for extra crunch.
- For a crispier crust, introduce steam during baking with a pan of boiling water or a Dutch oven.
- Honey can be replaced with maple syrup or agave for a vegan-friendly option.
- If the dough is too sticky, dust hands and work surface generously with flour during shaping.
- Check doneness by tapping the bottom of the loaf (hollow sound) or using an instant-read thermometer (195°F / 90°C).
Chef’s Secrets For Perfect Bread
Achieving a perfect loaf requires patience and attention to detail.
First, resist the urge to over-handle the dough—no-knead breads rely on gentle folding and resting to develop gluten naturally.
Longer, slower rises, especially in the refrigerator, enhance flavor and texture, creating a slightly nutty, more complex taste.
Always preheat the oven fully and, if using steam, add it carefully to create a golden, crisp crust.
For best results, score the loaf just before baking to guide expansion and maintain its shape.
Serving Suggestions For Every Meal
This seeded oat bread pairs beautifully with both sweet and savory toppings.
Spread with almond butter or cream cheese for breakfast, or use for hearty sandwiches filled with roasted vegetables, avocado, or lean meats at lunch.
Its nutty flavor also complements soups, stews, and fresh salads.
Toasting a slice enhances the crunch and brings out the aroma of the seeds.
Leftover bread can be used for croutons or breadcrumbs, making it versatile for meal prep and zero-waste cooking.
Storage Tips To Keep Fresh
To maintain freshness, store the bread loosely wrapped at room temperature for up to three days.
Avoid airtight containers for short-term storage, as they can soften the crust.
For longer storage, refrigeration extends shelf life up to ten days, though it may slightly dry the crumb.
For best results, freeze either the fully baked loaf or pre-shaped dough for up to three months.
Thaw frozen bread at room temperature or gently reheat slices in the oven or toaster to restore crispness and flavor.
Frequently Asked Questions
1. Can I use whole wheat flour instead?
Yes! You can substitute up to 1 cup (130 g) of bread flour with whole wheat flour. The bread will be slightly denser and have a nuttier flavor, but the oats and seeds help maintain moisture and texture.
2. What if I don’t have instant yeast?
You can use active dry yeast as a substitute, but you will need to extend the first rise time by about 30–60 minutes. Dissolve it in warm water before adding to the dry ingredients for best results.
3. How do I prevent sticking while shaping?
Generously flour your hands and work surface, and handle the dough gently. If necessary, shape the dough directly in the mixing bowl to reduce deflating air pockets. Cornmeal or parchment on the baking sheet also helps prevent sticking.
4. Can I make this bread vegan?
Yes! Simply replace honey with maple syrup, agave, or another liquid sweetener. The yeast will still ferment properly, and the loaf will retain its flavor, texture, and nutritional benefits.
5. How do I achieve a crunchier crust?
Introduce steam during the first 10–15 minutes of baking using a shallow pan of boiling water in the oven or by using a Dutch oven with the lid on. High oven temperature (425°F / 218°C) and proper preheating also contribute to a golden, crispy crust.
