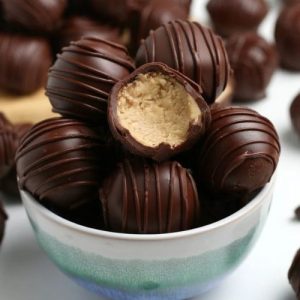
These Chocolate Peanut Butter Balls are a quick, no-bake treat that’s both indulgent and satisfying.
Packed with protein from peanut butter and a touch of good fats, they offer a healthier alternative to traditional candy.
With just a few simple ingredients, they’re fiber-rich, low in saturated fat, and perfect for everyday snacking, holiday treats, or easy meal prep.
Peanut Butter Balls
Equipment
- 1 Mixing Bowl
- 1 spatula or spoon
- 1 Baking Sheet
- Wax paper
- Microwave-safe bowl or double boiler
Ingredients
- ½ cup creamy peanut butter
- 3 Tbsp salted butter softened
- 1 cup powdered sugar
- 1 cup semi-sweet chocolate chips
- 1 Tbsp vegetable shortening or coconut oil optional, for smoother chocolate
Instructions
- Prepare Your Workspace: Before you start, gather all your ingredients and equipment. Line a baking sheet with wax paper or parchment paper to prevent the peanut butter balls from sticking later. Make sure your mixing bowl, spatula, and microwave-safe bowl (or double boiler) are ready. This simple preparation will make the process smooth and stress-free.
- Mix the Peanut Butter and Butter: In a medium-sized mixing bowl, combine ½ cup of creamy peanut butter with 3 tablespoons of softened salted butter. Use a spatula or spoon to blend them together thoroughly. The goal is to create a smooth, uniform mixture where the butter and peanut butter are fully incorporated, forming a creamy base that will hold the peanut butter balls together.
- Incorporate the Powdered Sugar: Gradually add 1 cup of powdered sugar to the peanut butter-butter mixture. Stir slowly to avoid a powdery cloud in the air. Mix until fully combined. The texture should become slightly thick and pliable, almost dough-like. This sugar not only sweetens the mixture but also helps the peanut butter balls hold their shape during chilling.
- Chill the Dough: Cover the bowl with plastic wrap or a lid and place it in the refrigerator for at least 15 minutes. Chilling firms up the mixture, making it much easier to shape the peanut butter balls without them sticking to your hands. While waiting, you can prepare your chocolate for dipping in the next step.
- Shape the Balls: Once chilled, remove the mixture from the fridge. Using your hands, take small portions and roll them into 1-inch balls. Try to make them as uniform as possible for even chocolate coating. Place each ball on the prepared baking sheet lined with wax paper. Once all balls are shaped, cover them loosely with plastic wrap and refrigerate for an additional 20 minutes. This step ensures that the balls hold their shape when dipped in chocolate.
- Melt the Chocolate: In a microwave-safe bowl, combine 1 cup of semi-sweet chocolate chips with 1 tablespoon of vegetable shortening or coconut oil (optional). Microwave in 20-30 second intervals, stirring in between, until fully melted and smooth.If you prefer, you can melt the chocolate using a double boiler over gently simmering water. The shortening or coconut oil helps make the chocolate slightly thinner, making it easier to coat the peanut butter balls.
- Dip the Peanut Butter Balls: Using a fork, gently pick up one peanut butter ball at a time and dip it into the melted chocolate. Make sure the ball is fully coated. Allow any excess chocolate to drip back into the bowl. Carefully place the coated ball back onto the wax paper-lined baking sheet. Repeat this process for all the remaining balls, ensuring each is evenly covered in chocolate.
- Chill to Set: Once all balls are dipped in chocolate, place the baking sheet in the refrigerator for at least 20-30 minutes to allow the chocolate to fully harden. This step ensures a firm outer shell while keeping the peanut butter center soft and creamy.
- Serve and Enjoy: After chilling, your Chocolate Peanut Butter Balls are ready to enjoy. Serve them as a snack, dessert, or holiday treat. They can be stored in an airtight container in the fridge for up to a week, making them perfect for meal prep, gifting, or indulging whenever you want a quick, satisfying treat.
Notes
- Use creamy peanut butter for smooth texture; chunky peanut butter can make rolling balls more difficult.
- If the mixture is too sticky, chill for a few extra minutes before shaping.
- For an even chocolate coating, add 1 tablespoon of coconut oil or vegetable shortening to the chocolate.
- Store peanut butter balls in an airtight container in the fridge for up to one week or freeze for up to three months.
- Adjust sweetness by slightly reducing or increasing powdered sugar to suit your taste.
- Optional: sprinkle a pinch of sea salt on top after dipping to enhance flavor.
- Make uniform-sized balls for even chocolate coverage and presentation.
Chef’s Secrets For Perfect Balls
Creating the perfect Chocolate Peanut Butter Balls is all about balance and technique.
First, chilling the peanut butter mixture before shaping ensures the balls hold their form without sticking to your hands.
When melting chocolate, avoid overheating it—use short microwave bursts or a gentle double boiler to keep it smooth and glossy.
Adding a small amount of coconut oil or vegetable shortening improves the coating’s consistency, giving a professional finish.
For an extra touch, you can lightly toast the peanut butter in the pan beforehand for a richer, nutty flavor.
Consistency, temperature control, and careful handling are the keys to achieving a flawless, melt-in-your-mouth treat every time.
Serving Suggestions To Impress Guests
Chocolate Peanut Butter Balls are versatile and can be served in multiple creative ways.
Present them on a decorative plate for holiday parties or stack them in a glass jar for gifting.
Pair them with a cup of hot cocoa, coffee, or a cold glass of milk for a balanced flavor experience.
They also make a delightful addition to dessert boards alongside fresh fruits, nuts, or dried berries.
For an elevated touch, drizzle white chocolate over the top or lightly dust with cocoa powder or crushed nuts before serving.
These little bites are equally perfect as an everyday snack or a show-stopping dessert.
Storage Tips To Keep Fresh
Proper storage ensures your peanut butter balls remain fresh and flavorful.
Store them in an airtight container in the refrigerator, where they will stay firm and delicious for up to one week.
For longer-term storage, freeze them in a single layer on a baking sheet, then transfer to a freezer-safe container for up to three months.
Thaw in the fridge before serving to maintain their shape. Avoid storing at room temperature for extended periods, as the chocolate coating can soften and the peanut butter center may become too sticky.
Properly stored, they retain their texture, taste, and chocolate shine.
Frequently Asked Questions
1. Can I use natural peanut butter?
Yes! Natural peanut butter works, but it may be slightly softer and oilier than creamy processed peanut butter. Chill the mixture longer if it feels too sticky, and ensure thorough mixing to maintain smooth texture.
2. Can I make these balls ahead of time?
Absolutely. You can prepare the peanut butter balls, dip them in chocolate, and store them in the fridge for up to a week. For longer storage, freeze them for up to three months and thaw before serving.
3. Can I use other types of chocolate?
Yes, feel free to use milk chocolate, dark chocolate, or even flavored chocolate chips. Adjust the optional oil or shortening as needed to achieve a smooth coating.
4. How do I prevent chocolate from cracking?
Avoid sudden temperature changes. Let the chocolate set at room temperature first, then refrigerate. Ensure peanut butter balls are firm before dipping. Adding a small amount of coconut oil also helps create a flexible, glossy coating.
5. Can I add extra flavors or toppings?
Definitely! You can add a pinch of sea salt, sprinkle crushed nuts, or drizzle white chocolate on top. For a twist, mix in a few chocolate chips or tiny caramel bits into the peanut butter mixture before rolling
