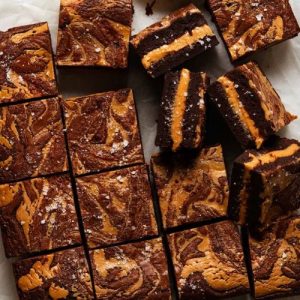
Indulge in these decadent peanut butter stuffed brownies that balance rich chocolate and creamy peanut butter in every bite.
Packed with plant-based protein and fiber from wholesome ingredients, they deliver a satisfying treat without excessive saturated fat.
Easy to prepare and perfect for everyday baking, these brownies are ideal for meal prep, sharing with friends, or a guilt-free dessert fix.
Peanut Butter Stuffed Brownies
Equipment
- 20 cm / 8" square baking pan
- Baking paper/parchment
- heatproof mixing bowl
- Microwave or double boiler for melting chocolate
- Spatula and spoon
- Butter knife or teaspoon for swirling
Ingredients
Peanut Butter Layer:
- 1 cup 250 g smooth peanut butter (sandwich spread type, e.g., Skippy’s)
- 1 tsp sea salt flakes divided
Brownie Batter:
- 200 g 14 tbsp unsalted butter
- 1 ¼ cups 200 g / 7 oz dark chocolate chips
- 1 cup loosely packed brown sugar
- 3 large eggs lightly beaten
- 1 tsp vanilla extract
- ½ cup 60 g plain flour
- ¼ cup 25 g unsweetened cocoa powder
- ⅛ tsp kosher salt / cooking salt
Instructions
- Prepare the Baking Pan: Start by greasing an 8-inch (20 cm) square baking pan thoroughly with a little butter or non-stick spray. Then, line the pan with baking parchment, ensuring there’s a slight overhang on the edges. This overhang will make it much easier to lift the brownies out of the pan later for cutting and serving. Set aside while you prepare the peanut butter layer.
- Create the Peanut Butter Slab: Reserve 2 tablespoons of peanut butter for swirling later in the recipe. Warm the remaining peanut butter slightly in the microwave for 20–30 seconds, just until it’s soft enough to pour but not hot. Spread the softened peanut butter evenly into the prepared pan, smoothing it with a spatula to create a flat slab. Sprinkle half of the sea salt flakes evenly over the surface. Freeze the peanut butter slab for 2–3 hours, or until it is firm and can be lifted easily.Once frozen, you can lift it out using the parchment paper and leave it on the paper in the freezer while preparing the brownie batter.
- Line the Pan Again for the Brownie Batter: After freezing the peanut butter, re-line the pan with fresh parchment paper if necessary, again leaving an overhang on the sides. This ensures a clean release of the brownies and makes cutting easier once they’ve set.
- Preheat Your Oven: Preheat the oven to 180°C (350°F), or 160°C (320°F) if using a fan-forced oven. Proper preheating ensures the brownies bake evenly and develop that rich, fudgy texture.
- Melt Butter and Chocolate: Place the unsalted butter and dark chocolate chips in a heatproof bowl. Melt together using either a microwave or a double boiler. If using a microwave, heat in 30-second bursts, stirring well between each session until completely smooth and glossy. This forms the base of the rich brownie batter.
- Mix in the Sugar: Add the brown sugar to the melted chocolate and butter mixture. Stir thoroughly to combine. The mixture should become slightly glossy and smooth, and the sugar should start to dissolve, creating a rich, fudgy foundation for the brownies.
- Incorporate Eggs and Vanilla: Lightly beat the eggs in a separate bowl, then add them to the chocolate mixture gradually, stirring continuously. Follow with the vanilla extract. Mix thoroughly until the batter becomes uniform, thick, and velvety. This step ensures a smooth, fudgy texture in the final brownies.
- Fold in Dry Ingredients: Sift together the plain flour, unsweetened cocoa powder, and salt. Gradually fold this mixture into the wet chocolate batter using a spatula.Be gentle but thorough, making sure there are no streaks of flour left. The resulting batter should be thick, rich, and glossy, ready to encase the peanut butter slab.
- Assemble the Brownie Layers: Pour half of the prepared brownie batter into the lined pan, spreading it evenly to cover the base. Carefully place the frozen peanut butter slab on top of this first layer, ensuring it is centered. Gently cover the peanut butter slab with the remaining brownie batter, spreading it carefully to seal the peanut butter inside.
- Swirl the Reserved Peanut Butter: Dollop the 2 tablespoons of reserved peanut butter over the top of the brownie batter. Using a butter knife or teaspoon, create random swirls across the surface. Don’t worry about precision—messy swirls bake beautifully, creating pockets of peanut butter throughout each brownie.
- Bake the Brownies: Place the pan in the preheated oven and bake for 32 minutes.The edges should look set and slightly firm, while the center may still jiggle slightly when you gently shake the pan. This is normal; the brownies will continue to set as they cool.
- Cool on Countertop: Once baked, remove the brownies from the oven and allow them to cool in the pan on the counter for at least 1 hour. This step allows the brownies to firm up slightly and prevents the peanut butter from oozing out during cutting.
- Refrigerate to Set: After cooling on the countertop, transfer the pan to the refrigerator for at least 3 hours. This final chilling step is essential to set the peanut butter inside the brownies completely, ensuring clean slices and a neat peanut butter layer.
- Slice and Serve: Using the parchment overhang, carefully lift the brownies out of the pan. Place them on a cutting board and slice into 16 even squares using a sharp knife. Allow the brownies to come to room temperature for 15 minutes before serving to maximize fudginess and peanut butter creaminess. Store any leftovers in an airtight container in a cool, dry place or refrigerate if needed.
- Enjoy: Indulge in these rich, fudgy brownies with a creamy peanut butter center.Each bite delivers the perfect combination of chocolate and nutty flavor, making them a standout treat for dessert, snacks, or even a special occasion.
Notes
- Peanut Butter Choice: Use smooth commercial sandwich-style peanut butter (like Skippy or Bega) rather than natural varieties. Natural peanut butter is runnier and may seep out during baking.
- Chocolate Selection: Stick with standard dark chocolate or semi-sweet baking chips (up to 45% cocoa). Milk chocolate or high-cocoa chocolate may alter the fudgy texture.
- Swirling Technique: Don’t overthink the swirls—messy, random patterns bake beautifully and create visible pockets of peanut butter in each slice.
- Baking Pan Size: A 20 cm / 8-inch square pan works perfectly. Using a larger pan will make the brownies thinner and may affect texture.
- Cooling and Setting: Chill the brownies for at least 3 hours after baking. This step ensures a clean peanut butter layer and prevents oozing when cutting.
- Serving Temperature: Always enjoy at room temperature to maximize fudginess and creaminess. Refrigeration can make the chocolate firm and reduce the melty texture.
- Optional Salt Finish: Sprinkle a few sea salt flakes on top just before baking to enhance the chocolate and peanut butter flavors.
Chef’s Secrets For Perfect Results
The key to these brownies is layering and temperature control.
Freezing the peanut butter slab before baking is crucial—it prevents the peanut butter from mixing with the batter and ensures clean layers.
When melting the chocolate and butter, take your time; low, steady heat prevents scorching and keeps the batter silky.
Gently folding in dry ingredients rather than vigorous stirring preserves the fudgy texture.
For extra flavor depth, lightly toast the peanut butter before freezing—it adds a subtle nutty aroma.
Finally, resist cutting the brownies straight from the fridge; letting them reach room temperature ensures each bite is soft, luscious, and indulgent.
Serving Suggestions To Impress Guests
These brownies are versatile and pair beautifully with a variety of accompaniments.
Serve warm with a scoop of vanilla or chocolate ice cream for a classic dessert treat.
For a lighter snack, pair a brownie square with fresh berries or a dollop of Greek yogurt.
They’re also excellent for brunch or afternoon tea, alongside a hot latte, cappuccino, or chilled almond milk.
For a more indulgent presentation, drizzle melted chocolate or caramel over the top and sprinkle with crushed peanuts for texture and visual appeal.
Storage Tips To Keep Fresh
Store brownies in an airtight container to maintain freshness and texture.
At room temperature, they will stay soft and fudgy for up to four days.
If your environment is warm, refrigeration is recommended, but allow brownies to return to room temperature before serving to restore the creamy peanut butter layer.
For longer-term storage, wrap individual squares in plastic wrap or parchment and freeze for up to three months.
When ready to enjoy, thaw overnight in the refrigerator, then bring to room temperature for the best flavor and texture.
Frequently Asked Questions
1. Can I use natural peanut butter?
Yes, but natural peanut butter is thinner and less sweet, which may cause it to ooze during baking.
If you prefer natural peanut butter, use half the amount for the slab, and swirl the rest into the batter for better control. Adding a pinch of sugar can help balance flavor and texture.
2. Can I make this gluten-free?
Absolutely! Substitute the plain flour with a gluten-free all-purpose flour blend. Ensure it’s one that measures cup-for-cup like regular flour.
Baking time may remain the same, but check the center carefully—it should jiggle slightly when done, setting as it cools.
3. How can I make the brownies more fudgy?
For extra fudginess, slightly underbake the brownies by 2–3 minutes, especially in the center.
Avoid overmixing the batter when adding flour, as this can create a denser, cake-like texture rather than soft, rich brownies.
4. Can I add mix-ins like nuts or chocolate chunks?
Yes! Chopped roasted peanuts, walnuts, or chocolate chunks can be folded into the brownie batter.
Spread evenly over the base layer before adding the peanut butter slab to maintain even distribution and prevent the slab from breaking apart.
5. Can I prepare these ahead of time?
Definitely. You can assemble the brownies up to a day in advance and refrigerate before baking, or bake fully and store chilled.
They are also freezer-friendly for up to three months. Thaw completely and bring to room temperature before slicing for the best texture.
