These Pumpkin Granola Bars are a wholesome, chewy snack packed with plant-based protein, fiber, and healthy fats.
Naturally sweetened and infused with warm pumpkin spice, they make a perfect everyday treat that’s both satisfying and nutrient-dense.
Quick to prepare and ideal for meal prep, they’re a delicious way to fuel your day while keeping sugar and saturated fat in check.
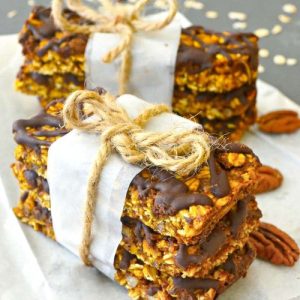
Pumpkin Granola Bars
Equipment
- 1 × 8 x 8 inch (20 x 20 cm) baking pan
- Parchment paper
- 1 × Large mixing bowl
- 1 × small saucepan
- Wooden spoon or spatula
- Large sharp knife or pizza cutter
- Small bowl for chocolate drizzle
Ingredients
Dry Ingredients:
- 2 cups 200 g rolled oats or old-fashioned oats
- 3 tbsp ground flax seeds
- 1 tsp pumpkin spice
- ⅓ cup 40 g chopped pecans
- ½ tsp fine sea salt
Wet Ingredients:
- ½ cup 112 g pumpkin puree
- 4 tbsp nut or seed butter any variety
- 4 tbsp brown rice syrup
- 1 tbsp molasses or extra 1 tbsp brown rice syrup
Optional Chocolate Drizzle:
- ½ cup 90 g dairy-free chocolate chips
- 2 tbsp plant-based milk
Instructions
- Preheat Your Oven and Prepare the Pan: Start by preheating your oven to 350°F (175°C). This ensures your bars cook evenly and develop a light golden color. Line an 8 x 8-inch (20 x 20 cm) baking pan with parchment paper, allowing extra paper to hang over the edges. This will make it easy to lift the bars out of the pan later without them breaking apart. Set aside while you prepare the ingredients.
- Combine the Dry Ingredients: In a large mixing bowl, add 2 cups (200 g) of rolled oats, 3 tablespoons of ground flax seeds, 1 teaspoon of pumpkin spice, ⅓ cup (40 g) of chopped pecans, and ½ teaspoon of fine sea salt. Stir everything together with a wooden spoon or spatula until fully blended. Take a moment to notice the lovely aroma from the pumpkin spice—it will infuse the bars with a warm, comforting flavor.
- Warm the Wet Ingredients: In a small saucepan over low heat, combine ½ cup (112 g) pumpkin puree, 4 tablespoons of your chosen nut or seed butter, 4 tablespoons of brown rice syrup, and 1 tablespoon of molasses. Gently warm the mixture for about 5 minutes, stirring occasionally, until the ingredients are smooth and fully incorporated. The mixture should be pourable but still thick enough to hold the oats together.
- Mix Wet and Dry Ingredients: Pour the warm pumpkin mixture into the bowl of dry ingredients. Using a sturdy wooden spoon or spatula, stir thoroughly. Make sure every oat is coated with the wet mixture, and there are no dry patches left. This step is crucial for ensuring your bars are soft and chewy rather than crumbly. Take your time to mix evenly, scraping the sides of the bowl as needed.
- Press the Mixture into the Pan: Transfer the combined mixture into your prepared baking pan. Using the back of your spatula or your clean hands, press the mixture evenly across the pan. Apply gentle but firm pressure so that the bars hold together when baked. Smooth the top as much as possible to ensure even baking and a uniform texture.
- Bake the Bars: Place the pan in the preheated oven and bake for 20 minutes. The bars should rise slightly and develop a light golden hue around the edges. Avoid overbaking, as this can make them dry and less chewy. While baking, enjoy the inviting aroma of pumpkin and spice filling your kitchen.
- Cool Before Cutting: Once baked, remove the pan from the oven and allow it to cool in the pan for about 20 minutes. Cooling slightly is essential because the bars are still soft and need time to firm up. Afterward, lift the bars out of the pan using the parchment paper as handles and place them on a cutting board. Using a large sharp knife or a pizza cutter, cut the baked slab into 10 evenly sized bars.
- Prepare the Chocolate Drizzle: In a small bowl, combine ½ cup (90 g) dairy-free chocolate chips with 2 tablespoons of plant-based milk. Melt gently over a double boiler or in short bursts in the microwave, stirring frequently to prevent burning. The chocolate should be smooth, glossy, and pourable for drizzling.
- Drizzle Chocolate Over the Bars: Place the cut granola bars back onto the parchment paper to catch any spills. Using a spoon, drizzle the melted chocolate over each bar in a zigzag or artistic pattern. The chocolate adds a rich, indulgent touch while keeping the bars wholesome and satisfying.
- Let the Chocolate Set: Allow the chocolate to set at room temperature for a few minutes or speed up the process by placing the bars in the fridge. Once the chocolate is firm, your Pumpkin Granola Bars are ready to enjoy. Store any extras in an airtight container in the fridge for up to 4 weeks or freeze for up to 2 months for long-term snack prep.
Notes
- For best results, use old-fashioned or rolled oats; quick oats can make the bars mushy.
- Ground flax seeds act as a natural binder, but chia seeds can be used as an alternative.
- Nut or seed butter can be swapped depending on your preference—almond, peanut, or sunflower work well.
- Brown rice syrup provides natural sweetness without refined sugar, but maple syrup or agave can be substituted.
- Cut bars after cooling slightly, but before completely chilled, to prevent cracking.
- Chocolate drizzle is optional but adds a rich flavor contrast and visual appeal.
- Bars can be stored in the fridge for up to 4 weeks or frozen for 2 months.
Chef’s Secrets To Perfect Bars
The key to perfectly chewy granola bars lies in balancing wet and dry ingredients.
Make sure your pumpkin mixture is warm but not hot when combining with oats, as this helps evenly coat the dry ingredients.
Press the mixture firmly into the pan—this ensures bars hold together after baking.
Using parchment paper with overhanging edges makes removing bars effortless.
Finally, resist cutting them while completely hot; slight cooling prevents crumbling and gives the bars a firm, yet chewy texture.
Serving Suggestions For Snack Times
Pumpkin Granola Bars are incredibly versatile.
Enjoy them as a quick breakfast with a drizzle of nut butter and a glass of almond milk.
They also make a perfect on-the-go snack for work, school, or travel.
For an indulgent treat, warm a bar slightly and add a dollop of yogurt or dairy-free ice cream.
Pairing them with fresh fruit like apple slices or berries enhances the natural sweetness and provides an extra boost of vitamins and fiber
Storage Tips For Freshness
To maintain the bars’ chewy texture, store them in an airtight container.
Keep them in the fridge for up to 4 weeks, which also helps preserve the optional chocolate drizzle.
For longer storage, freeze the bars in single layers or individually wrapped in parchment paper for up to 2 months.
When ready to eat, thaw at room temperature or warm gently in the microwave.
Avoid leaving them at room temperature for extended periods, as they can dry out or lose their shape.
Frequently Asked Questions
1. Can I make these bars gluten-free?
Absolutely! Ensure you use certified gluten-free oats and check that your nut butter and syrup don’t contain gluten. This will give you chewy, safe bars without compromising flavor or texture.
2. Can I replace pumpkin puree with something else?
Yes! Sweet potato puree or mashed banana can work as a substitute. Keep in mind that sweetness and moisture levels may vary, so adjust the syrup slightly if needed.
3. How can I make these bars less sweet?
Reduce the brown rice syrup by 1–2 tablespoons or skip the chocolate drizzle. You can also add unsweetened coconut flakes or extra nuts to balance flavors naturally.
4. Can I use regular butter instead of nut butter?
Yes, softened unsalted butter can replace nut or seed butter, but it will slightly alter the nutritional profile. Using nut butter keeps the bars high in healthy fats and plant-based protein.
5. How do I prevent the bars from sticking together?
Line your pan with parchment paper and allow the bars to cool slightly before cutting. Store them in a single layer or separate with parchment sheets to avoid sticking.
