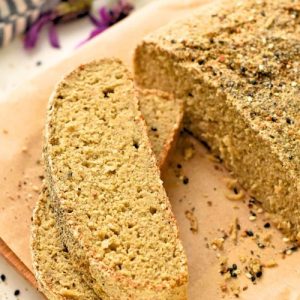
This protein-packed quinoa bread is a wholesome, gluten-free alternative to traditional sandwich loaves.
Rich in plant-based protein, fiber, and heart-healthy nutrients, it’s naturally yeast-free and low in saturated fat.
Easy to prepare and perfect for meal prep, it offers a satisfying, hearty texture that makes it ideal for sandwiches, toasts, or snacking.
A simple, nourishing option for everyday cooking.
Soft Gluten-Free Quinoa Bread
Equipment
- 1 bowl
- 1 bowl
- High-Speed Blender
- Rubber Spatula
- Baking sheet
- Parchment paper
- Cooling Rack
Ingredients
- 1 cup dry quinoa soaked, rinsed, drained
- 1 ½ cups oat flour homemade or store-bought
- 3 tbsp psyllium husk powder
- 1 tsp baking soda
- 1 ½ cups lukewarm water
- 2 tbsp apple cider vinegar or lime/lemon juice
- 1 tsp salt
- Optional: bagel seasoning for topping
Instructions
- Prepare and Soak the Quinoa: Start by measuring 1 cup of dry quinoa and placing it into a medium-sized bowl. Cover the quinoa completely with cold tap water and let it soak. Ideally, soak for at least 3 hours, or for best results, leave it overnight. zSoaking softens the quinoa, making it easier to blend into a smooth, creamy texture later, and helps remove any natural bitterness.
- Drain and Rinse the Quinoa: After soaking, place a fine-mesh sieve over the sink and carefully drain the quinoa. Rinse it thoroughly under cold running water to remove any residual starch or bitterness. Once drained, transfer the quinoa to a high-speed blender.
- Blend the Quinoa into a Smooth Paste: Add 1 ½ cups of lukewarm water to the blender with the drained quinoa. Lukewarm water should feel like a gentle bath temperature (around 98 °F / 37 °C). Blend the mixture on medium-high speed for 20–30 seconds until no visible grains remain and the mixture has a smooth, slightly creamy consistency. Stop blending, scrape down the sides if necessary, and set aside the quinoa paste.
- Combine Dry Ingredients: In a large mixing bowl, combine 1 ½ cups of oat flour, 3 tablespoons of psyllium husk powder, 1 teaspoon of baking soda, and 1 teaspoon of salt. Use a whisk to mix them thoroughly. This ensures the leavening agent and fiber are evenly distributed throughout the flour, which helps the bread hold together properly.
- Add Wet Ingredients to Dry Mixture: Pour the blended quinoa mixture into the bowl with the dry ingredients. Add 2 tablespoons of apple cider vinegar (or lime/lemon juice as a substitute) directly into the bowl. The vinegar interacts with the baking soda to help slightly aerate the bread, giving it a light texture despite being gluten-free and yeast-free.
- Mix into a Dough: Using a rubber spatula, fold and stir the ingredients together. The mixture will gradually thicken as the psyllium husk absorbs the liquid. Continue stirring for about 1 minute until a dense, sticky, greyish dough forms. The dough should hold together but remain moist. This step is essential for achieving a chewy, satisfying texture.
- Rest the Dough: Cover the bowl lightly and let the dough rest for 10 minutes. This allows the oat flour and psyllium husk to fully hydrate, improving the bread’s texture and making it easier to shape.
- Preheat the Oven and Prepare Baking Sheet: While the dough is resting, preheat your oven to 350 °F (180 °C). Line a baking sheet with parchment paper and lightly oil the paper to prevent sticking. Proper preheating ensures even baking and a golden-brown crust.
- Shape the Bread: Lightly oil your hands to prevent sticking. Transfer the dough onto the prepared baking sheet. Shape it into an oval loaf, keeping the height no more than 2 inches (5 cm). Because this bread contains no gluten, it will not rise, so the shape you give it now is the shape it will have after baking.Make sure the dough is evenly thick to allow consistent baking.
- Optional Topping: If desired, sprinkle your favorite toppings, such as bagel seasoning, seeds, or herbs, on top of the dough. This adds extra flavor and a crunchy exterior. Gently press toppings into the dough so they adhere during baking.
- Bake the Bread: Place the baking sheet on the center rack of the preheated oven. Bake at 350 °F (180 °C) for 1 hour. The bread is done when the exterior is firm and crusty, and a toothpick or skewer inserted into the center comes out with just a few moist crumbs—not wet batter. If it’s still too sticky, continue baking in 5–10 minute intervals.
- Cool the Bread: Carefully transfer the bread from the baking sheet to a cooling rack.Let it cool completely for at least 3 hours, or preferably overnight. Cooling allows the bread to set fully, making it easier to slice without crumbling.
- Slice and Store: Once cooled, slice the bread into even pieces, approximately 1-inch thick. Store the bread wrapped in a clean kitchen towel at room temperature for up to 3 days. For longer storage, freeze slices in an airtight container for up to 1 month. Toast before serving if desired.
Notes
- Quinoa Variety: You can use red, white, or tricolor quinoa. Make sure it is raw and drained; cooked quinoa will not work in this recipe.
- Flour Options: For best results, use finely ground oat flour. You can also use gluten-free flour, all-purpose flour, or a mix with millet or teff flour.
- Psyllium Husk: Essential for binding and texture. Do not skip or substitute with other fiber types. Flake husk can be used at 20% more than the powder called for.
- Water Temperature: Lukewarm water (around 98 °F / 37 °C) helps activate the binding properties of the husk.
- Acid Substitute: Apple cider vinegar can be swapped with lemon or lime juice to activate the baking soda.
- Baking Tip: Keep the loaf under 2 inches thick to ensure even baking. Thicker dough may remain moist in the center.
- Optional Toppings: Seeds, herbs, or bagel seasoning enhance flavor and texture but are not necessary.
Chef’s Secrets For Perfect Bread
To achieve the ideal texture, timing and technique are key.
Soaking the quinoa overnight softens the grains and removes any bitterness, creating a smooth base for the dough.
When blending, use a high-speed blender to ensure a uniform paste—no graininess is crucial for the final bread texture.
Always shape the dough gently with oiled hands to prevent tearing, as this bread will not rise during baking.
Patience while cooling is another secret: allowing it to rest for at least 3 hours ensures a firmer, sliceable loaf without crumbling.
Serving Suggestions For Every Meal
Quinoa bread is versatile and works with a variety of meals.
For breakfast, toast a slice and top it with avocado, a poached egg, or nut butter for a nutrient-rich start.
It’s perfect for sandwiches with grilled vegetables, lean meats, or plant-based fillings.
Pair it with soups, stews, or salads for a fiber-rich accompaniment. Even plain, it makes a satisfying snack with a drizzle of olive oil or a sprinkle of seeds.
Its neutral flavor allows for endless creative toppings.
Storage Tips Keep Bread Fresh
This bread keeps well at room temperature when wrapped in a clean kitchen towel for up to three days.
To extend its shelf life, slice and freeze in an airtight container for up to one month.
When freezing, separate slices with parchment paper to prevent sticking.
Thaw at room temperature or lightly toast straight from the freezer.
Avoid storing in plastic wrap alone, as it can trap moisture and make the crust soggy.
Proper storage preserves both texture and flavor.
Frequently Asked Questions
1. Can I use cooked quinoa?
No, cooked quinoa will not work because it introduces excess moisture and prevents the dough from binding correctly. Always use soaked, drained, and raw quinoa.
2. Is psyllium husk mandatory?
Yes. Psyllium husk provides structure, moisture retention, and chewiness. Without it, the bread will crumble and lack the proper texture.
3. Can I substitute oat flour?
You can use other gluten-free flours, all-purpose flour, or a blend like millet or teff flour. Ensure the flour is finely ground for the best texture.
4. Why is the bread dense?
This bread is naturally dense because it contains no gluten or yeast. Its texture is moist and chewy, which is normal for gluten-free, protein-rich breads.
5. How do I prevent a sticky center?
Ensure the dough is no thicker than 2 inches and bake fully at 350 °F. Using the correct amount of psyllium husk and allowing it to cool completely will help set the bread.
